
AI Product Builders course · lesson 12 of 25
- 1The AI Product-Building Loop: From Idea to Improvement
- 2Define the Problem Before You Choose a Solution
- 3Check the Idea Before You Build
- 4App Anatomy for Non-Engineers: What Happens Behind a Screen
- 5Scope the First Version: Choose What to Build Now
- 6Choose a Tech Stack That Fits Your Constraints
- 7Choose a Prototype Tool for Your Product and Team
- 8Build a Clickable Prototype in One Focused Flow
- 9Test a Prototype with Real People
- 10Decide Whether to Keep, Change, or Stop
- 11Move from a Prototype to Real Code
- 12Work with an AI Coding Tool on One Clear Task
- 13Learn the Web Basics Behind Your App
- 14Connect a Database Without Losing Control of Your Data
- 15Tell a Small Fix from a Structural Change
- 16Run a Refinement Loop That Keeps the Product Useful
- 17Make an AI-Built Product Easier to Use
- 18Review and Check Changes Before They Reach the Team
- 19Test an AI-Built Product in Layers
- 20Work with a Team and Stakeholders
- 21Choose Where to Deploy Your Product
- 22Go Live: A Launch Checklist for Your Product
- 23Measure and Improve Your Product After Launch
- 24Add an AI Feature to Your Product Carefully
- 25Capstone: Take a Product Idea to Launch
After this lesson, you will be able to choose an AI coding workflow for your project, give it a task that can be reviewed, and follow the work from the first inspection through a human check. You will also know what project context to provide and when a session has become too tangled to continue productively.
We will keep using ToolShelf, the fictional neighbourhood tool-sharing idea. It has no real users or production code in this course. The examples below show how a team might work after making a decision to move a prototype toward code; they are not reports of a real ToolShelf build.
Start with the product decision, not the tool
An AI coding tool is software that uses a model to understand project files and help make or review code changes. Depending on the tool and setup, it may also run commands, inspect errors, create a branch, or open a pull request. A coding assistant can make a suggestion inside an editor; a more agent-like workflow can carry out several steps and return a set of changes. The distinction is about how much work the tool can attempt, not whether you should review its output.
Before opening a session, take the next task from your handoff note, product scope, or decision record. Give the tool one result you can check. “Build ToolShelf” is not a useful first task. It leaves the tool to invent user accounts, borrowing rules, screens, data, notifications, and a large amount of behavior that the product team has not decided.
A more manageable task could be: “On the sample request form, show a clear validation message if the end date is earlier than the start date. Keep the data fictional, do not connect a database, and do not change the rest of the flow.” That task describes one visible behavior and keeps the prototype boundary in place. The acceptance check is concrete: reverse the two dates and confirm the message appears without creating a request.
If the product decision is unresolved, do not ask the coding tool to decide it by generating a feature. A question like “Should ToolShelf verify a neighbour’s home address?” involves privacy, trust, safety, and operations. Write down the open product question and gather the right evidence or advice first. A model can help compare implementation approaches after the team has set the requirements; it cannot make the product choice on your behalf.
Choose a workflow that fits the project
The tools named in the roadmap have overlapping features, and the line between a coding assistant, an editor agent, and a hosted task agent continues to move. Think about where your code lives, how much autonomy the task needs, and where you want to inspect changes. Then check current official docs for access, data handling, permissions, models, and cost before you use a tool with a real project.
| Workflow shape | When it may fit | What to check |
|---|---|---|
| Assistant in an editor | You are working in a file and want a suggestion, explanation, or focused edit nearby | Which files it can see, how suggestions are applied, and whether it can run commands |
| Agent in an editor or terminal | You want it to inspect a repository, make changes across files, and help run checks while you steer | Tool permissions, terminal access, diff review, repository instructions, and session controls |
| Hosted task or pull request agent | A task is written as an issue or bounded request and the work can return in a separate branch for review | Which repository and environment it accesses, what actions it can take, and how review and merge work |
As checked on 4 November 2026, Claude Code’s official overview describes terminal, IDE, desktop, and browser surfaces for reading a codebase, editing files, and running commands. Codex’s current product documentation lists multiple ways to work, including its app, CLI, and code editor integrations. Cursor’s documentation describes an editor-centered coding agent for understanding a repository, planning and building features, fixing bugs, and reviewing changes. GitHub documents both Copilot agent work in IDEs and cloud tasks started from issues or prompts. These are starting points for comparison, not a ranking.
Google’s Gemini CLI repository describes a terminal coding agent, but its supported audience changed in June 2026: the repository now points individual free and Google AI plan users to Antigravity CLI, while Gemini CLI remains for specified enterprise Code Assist and legacy paid API or Vertex workflows. Check Google’s current guidance before choosing a CLI based on an older tutorial. Availability and account requirements can change after this lesson was drafted.
Do not choose by a feature list alone. Compare the workflow with the way you want to work:
- Does the tool work with the repository or files your team actually uses?
- Can you see and review the changed files before they become the shared version?
- Can you stop it, redirect it, or ask it to explain a decision?
- Does it run commands locally, in a hosted environment, or both?
- What project data leaves your environment, and what account or policy controls that?
- Does your team already have a supported account, and how are use and cost measured?
- Can the people who maintain the code use the same workflow and access the history?
The best choice for a one-line copy change may differ from the best choice for a repository-wide migration. Start with one small task and learn how the tool behaves in your actual environment.
Prepare a clean starting point
A coding tool needs an accurate starting point. Before asking for a change, make sure you have the correct project open and know what version you are working from. If several people or tools can edit the project, agree who is working on the same files. Save a checkpoint or use the team’s branch workflow so you can identify what changed during this task.
Record the current state in plain language:
- What behavior exists now?
- What should be different after this task?
- Which product decision or scope item supports the change?
- What should remain unchanged?
- What is the simplest check that shows the change worked?
If you are unfamiliar with the project, begin with a read-only request: ask the tool to summarize the relevant flow and point to the files it used. Check the file references yourself. This helps you notice when the agent has misunderstood the framework, missed an existing component, or inferred behavior from a similarly named file.
Do not start by asking for a full project summary if you only need a small label change. More context is not always better. Give the tool the current scope and the files or behavior relevant to the task, then invite it to find additional dependencies if needed.
Give the agent a bounded task
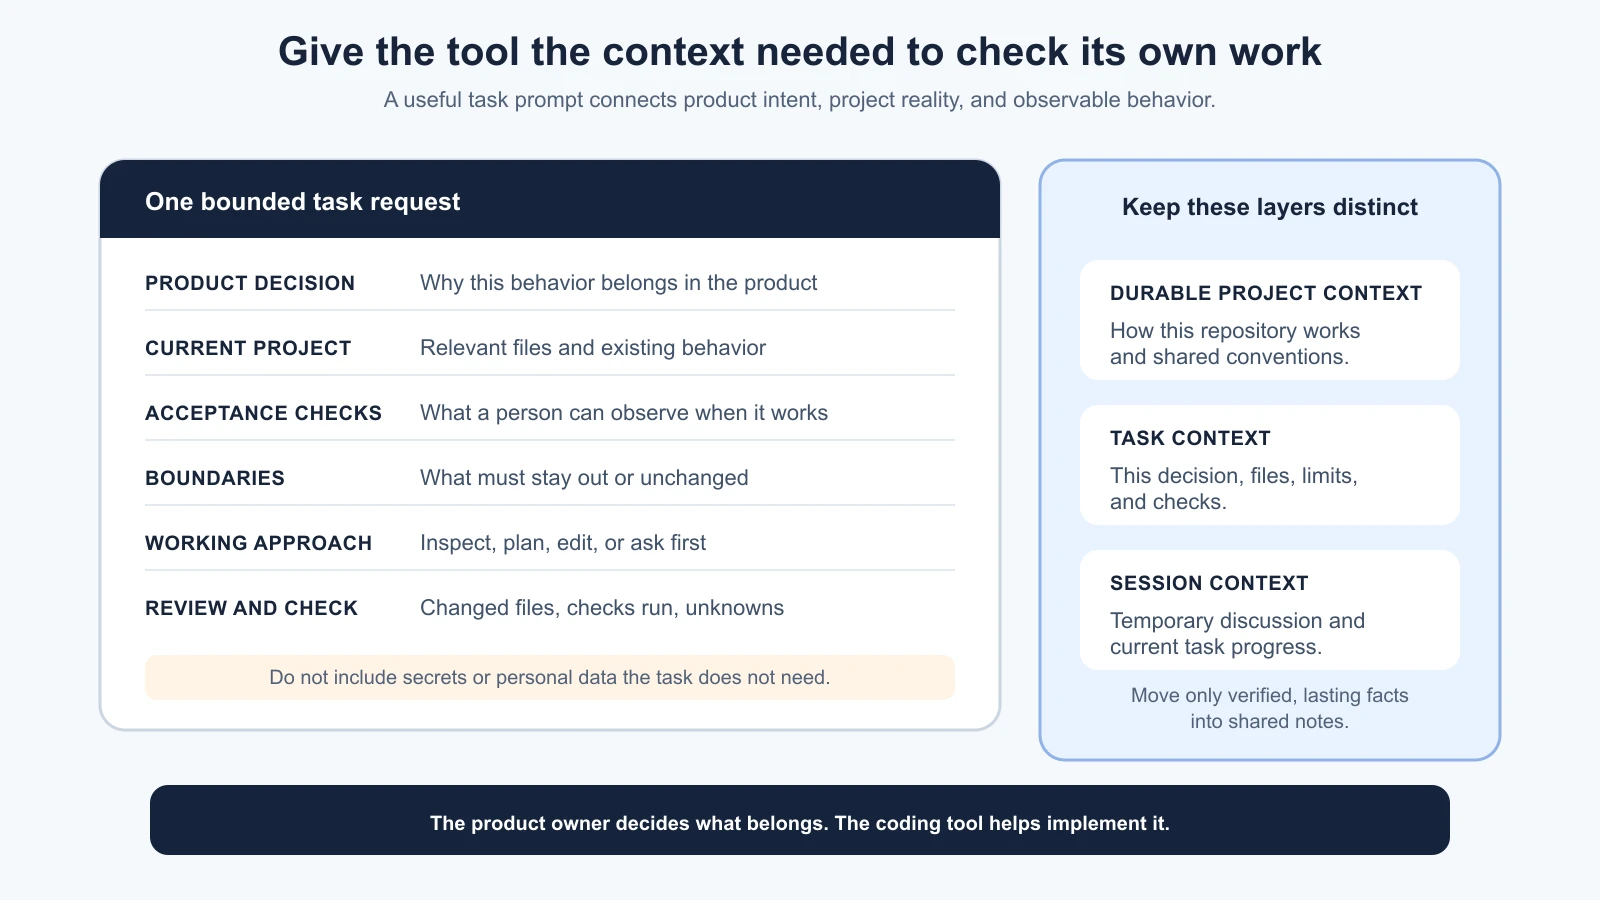
A useful coding request names the change, the reason, the context, the boundaries, and the check. This does not need to be a long prompt. It needs enough detail that you can tell whether the result matches the product decision.
1Goal:
2[One behavior or result to add or change.]
3
4Product context:
5[Link or point to the scope, decision note, and relevant files.]
6
7Acceptance checks:
8- [Observable behavior that should happen.]
9- [Important invalid or empty case.]
10
11Boundaries:
12- Keep [existing flow, stack, or visual behavior] unchanged.
13- Do not add [out-of-scope service, package, or feature].
14- Use fictional data. Do not connect real accounts or external services.
15
16Approach:
17Inspect the relevant files first. Summarize your plan and any assumptions.
18Stop before editing if the request conflicts with the product scope.
19After implementation, list changed files and checks performed.
For the ToolShelf date example, acceptance checks might say: valid dates continue to the same demonstration screen; an end date before the start date shows a plain-language message; no request is saved or sent. Those conditions translate the product boundary into behavior the team can inspect.
You can ask for a short plan before code changes when a task crosses multiple files or has uncertainty. For a small, clear edit, a plan may add needless overhead. In either case, be explicit about whether the tool should only inspect, propose, or edit now. A request to “take a look” should not silently become permission to change the project.
The Vibe Coding guide to prompts that build things goes deeper into writing implementation prompts. This lesson uses the minimum structure needed to connect a product decision to a code change.
Work in a short task cycle
A coding session can be thought of as a loop with a human review gate. The tool can do useful work inside the loop, but you decide whether the product requirement was met and whether the changes should continue.
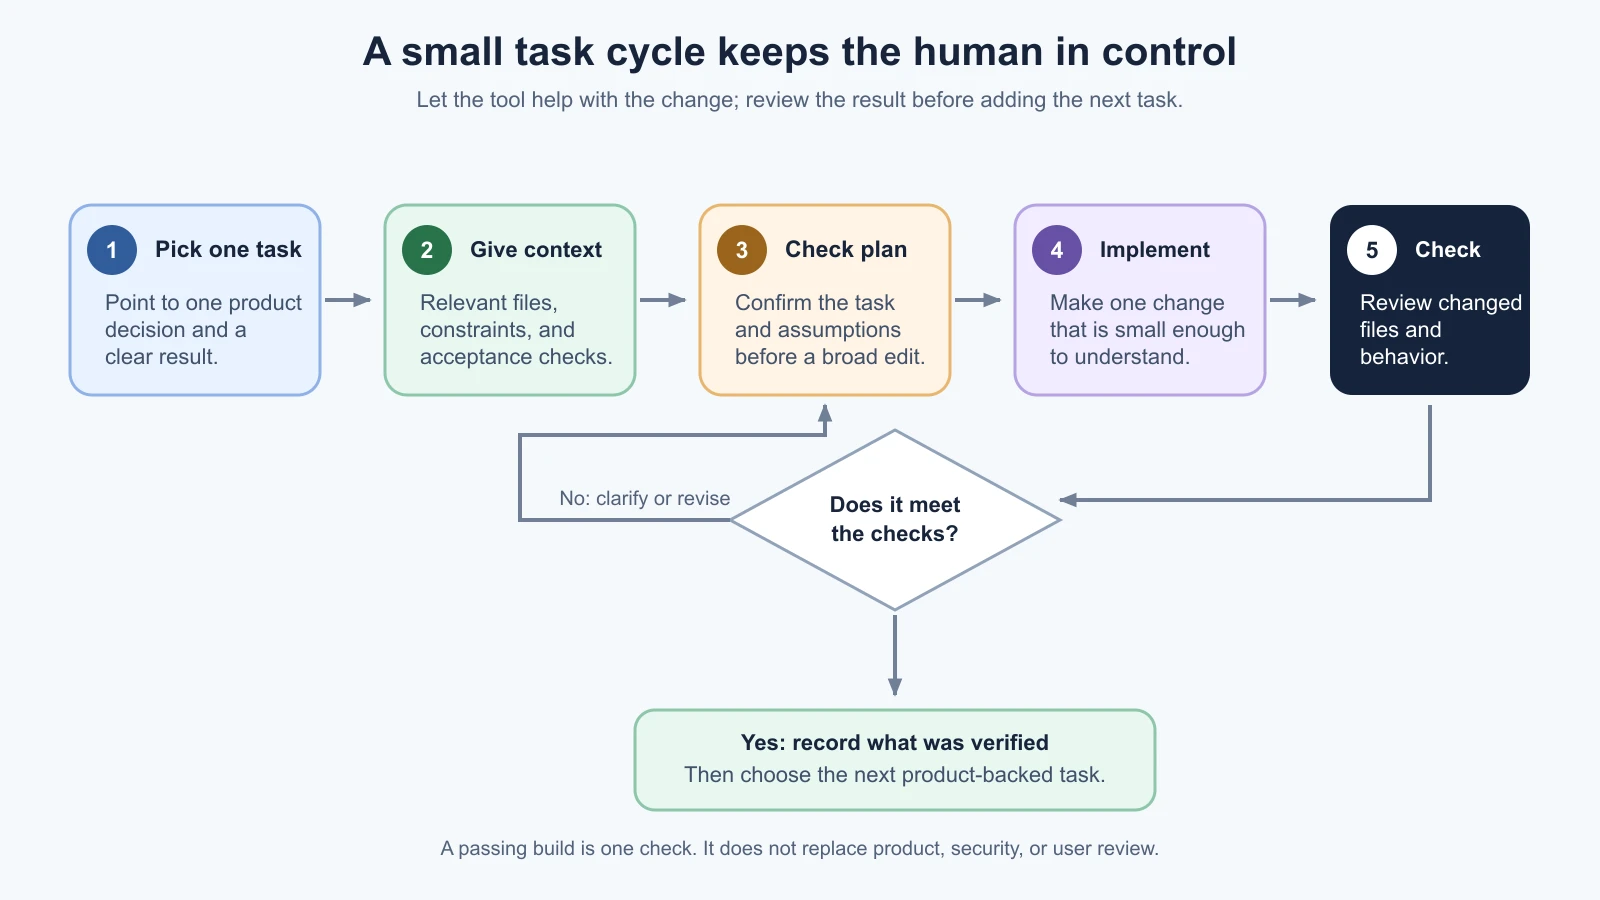
A practical sequence looks like this:
- State the task and the source of truth. Point to the scope or decision note that authorizes the behavior.
- Ask it to inspect. Have the tool identify relevant files, current behavior, and assumptions before a broad change.
- Review the plan. Check that it has understood the task and has not added hidden product decisions.
- Make one coherent change. Keep the task small enough to understand as a single unit.
- Inspect the diff. A diff is a view of what was added, removed, or changed. Look for unrelated files, surprising dependencies, generated data, and edits outside the stated boundary.
- Check the result. Run or perform checks that fit the project and task. Compare the behavior with each acceptance check, including a relevant failure case.
- Decide whether to accept it. If something is unclear, ask for an explanation or correction before building more on top of it.
- Save the outcome. Record the verified behavior, remaining issue, and next product task in the project’s normal history or notes.
The review gate should be real. Do not let one change merge into another while you still do not know whether the first one worked. If the agent reports that a command passed, look at which command ran and whether it checked the behavior you care about. A successful build does not prove a form handles invalid data correctly.
Review changes like a teammate’s contribution
A fluent explanation is not proof that the code is correct. Review the changed files and compare them with the requested behavior. You do not need to understand every line immediately, but you should know what files changed and why each one was involved.
Ask the tool to summarize its work in terms of evidence:
- Which files changed, and what role does each file play?
- Which acceptance checks did it run, and what were the results?
- Which checks could not be run?
- What assumptions did it make?
- Are there new packages, external services, data fields, permissions, or account requirements?
- What should a person test manually in the interface?
Then verify those claims. Open the changed screen, try valid and invalid input, inspect a relevant diff, or have a teammate review a higher-risk change. If you do not understand a new dependency or data flow, ask before you accept it. For project-specific review and safety practices, use the Vibe Coding lessons on context documents and your first AI coding workflow as practical companions.
A tool may be able to make commits, create pull requests, or use external systems. Those capabilities depend on its configuration and your organization’s policy. Give only the access needed for the task. A prototype task should not require deployment credentials, production customer data, or permission to change billing settings.
Give context that lasts, and context that expires
Project context is information the coding tool can use to understand how the team works. Some context stays true across tasks; other details are specific to one change or one session.
Durable context belongs in a project-owned place the team maintains: how to run the app, what framework it uses, code conventions, key architecture choices, and boundaries that should apply to all tasks. Depending on the tool, this may be a recognized instruction file or another project document. Check the product’s current docs to learn which files it reads and when. Do not assume one instruction filename works in every tool.
Task context belongs with the specific request: the relevant scope item, design, error report, data shape, acceptance checks, and files that should be inspected. It should not become a permanent rule unless it truly applies to future work.
Session context includes what the tool learned or changed during the current conversation. It can be useful while working on one task, but it may become stale when the code changes, the product decision changes, or the conversation gets long. Summarize durable findings into project documents and keep short-lived details in the issue or task record.
The Vibe Coding lesson on context documents explains how to write and update shared project context. Avoid placing passwords, API keys, real participant notes, or confidential data into an instruction file simply because the agent reads it automatically. Shared context is still data that may be exposed to the tool and its users.
Know when to start a fresh session
Continue the same session while the goal and changed files remain easy to track. Start a fresh one when the task has changed, the tool is repeatedly relying on a mistaken assumption, the conversation contains conflicting instructions, or a large amount of old context is distracting from the current decision.
Before you close a useful session, ask for a handoff summary:
1Summarize this task for the project record:
2- The product goal and acceptance checks
3- Files changed and why
4- Checks actually run and their outcomes
5- Assumptions, unresolved questions, and known risks
6- The next small task, if any
7Do not claim a check passed unless it ran and show which one.
Save details that will matter later in the issue, decision note, or context document. Start the next session by naming the current task and pointing to those sources. Do not assume the tool will remember a previous conversation or know that a product decision has changed.
For Claude Code specifically, its current session and context documentation covers its supported surfaces and links to guidance on managing sessions. The broader habit applies across tools: carry forward verified project facts, not every turn of an old conversation.
Keep the person responsible for the product
AI coding tools can help translate requirements into code, explore a repository, and handle repetitive changes. The product owner and team remain responsible for choosing the user problem, setting boundaries, reviewing tradeoffs, and deciding whether the result is ready to share. A tool that can make a change does not know whether that change belongs in the product.
The task workflow is repeatable: choose one product-backed task, provide relevant context and observable checks, let the tool inspect and make a bounded change, then review the diff and verify the behavior. Keep the project’s decisions findable, and close or restart sessions when their context stops matching the work.
Further reading
- Claude Code overview and manage sessions, for current Claude Code surfaces and session controls.
- Codex, for current OpenAI Codex product and workflow documentation.
- Cursor documentation, for its coding agent, planning, diffs, and project customization.
- GitHub Copilot in IDEs and start a Copilot cloud task, for interactive and delegated workflows.
- Gemini CLI, including its current status and supported account paths.
- Prompts That Build Things, for a deeper guide to implementation prompts.
- Context Documents, for durable project instructions and shared context.
- Your First Vibe-Coded App, for practicing a small edit, browser check, and checkpoint.
- Claude Code: your first session, for the interface and workflow of one coding agent.
- Claude Code: manage context and sessions, for tool-specific session controls.
- Claude Code: prompting patterns for code, for further prompt examples.
Mistakes beginners make
- Prompting for the whole product. Choose one behavior that follows from an existing product decision.
- Starting before checking the project. Confirm the repository, version, and task source first.
- Giving context without boundaries. Name what must stay unchanged and what is outside the work.
- Confusing a plan with a verified result. Check the diff and the behavior yourself.
- Trusting a summary without evidence. Ask which files and commands support each claim.
- Keeping stale session details as permanent instructions. Move only durable, checked facts into shared context.
- Giving more access than the task needs. Keep production data, deployment, and billing outside a routine coding task.
- Continuing a tangled conversation. Save a factual summary and start fresh when the task or assumptions have changed.
Recap and try it yourself
Choose an AI coding workflow that fits your project and the way you want to review changes. Take one task from a scope or decision note, give the tool only the relevant context, and state boundaries plus acceptance checks. Ask it to inspect first, then review its plan and diff. Verify the behavior before accepting the result. Save durable project facts in shared context and start a fresh session when the task changes or old assumptions are getting in the way.
Try it: choose one small behavior in your own project. Write a task prompt with the goal, source document, two acceptance checks, and one boundary. Ask a coding tool to inspect the project and identify the files it would change. Review the plan before asking it to edit. After implementation, check the diff and try the behavior yourself. Record what you verified, what remains uncertain, and what the next task should be.