
AI Product Builders course · lesson 22 of 25
- 1The AI Product-Building Loop: From Idea to Improvement
- 2Define the Problem Before You Choose a Solution
- 3Check the Idea Before You Build
- 4App Anatomy for Non-Engineers: What Happens Behind a Screen
- 5Scope the First Version: Choose What to Build Now
- 6Choose a Tech Stack That Fits Your Constraints
- 7Choose a Prototype Tool for Your Product and Team
- 8Build a Clickable Prototype in One Focused Flow
- 9Test a Prototype with Real People
- 10Decide Whether to Keep, Change, or Stop
- 11Move from a Prototype to Real Code
- 12Work with an AI Coding Tool on One Clear Task
- 13Learn the Web Basics Behind Your App
- 14Connect a Database Without Losing Control of Your Data
- 15Tell a Small Fix from a Structural Change
- 16Run a Refinement Loop That Keeps the Product Useful
- 17Make an AI-Built Product Easier to Use
- 18Review and Check Changes Before They Reach the Team
- 19Test an AI-Built Product in Layers
- 20Work with a Team and Stakeholders
- 21Choose Where to Deploy Your Product
- 22Go Live: A Launch Checklist for Your Product
- 23Measure and Improve Your Product After Launch
- 24Add an AI Feature to Your Product Carefully
- 25Capstone: Take a Product Idea to Launch
After this lesson, you will be able to prepare the public address, production settings, data recovery, privacy information, support path, and release plan before inviting people to use your product. You will also have a launch checklist you can adapt to your own app.
We will keep using ToolShelf, the fictional neighbourhood tool-sharing product. It has no real domain, user accounts, production database, or launch. Its examples show a responsible planning format, not completed checks. In Choose Where to Deploy, we compared hosting options. Here we will prepare one choice to serve real users. For the technical deployment walkthrough, see Deploy Your App, and for secret and access-control habits, see Security for Vibe Coders.
Treat launch as a set of checks and owners
Going live is more than making a deployment public. People may create records, send messages, rely on dates, share information, or expect help when something goes wrong. A launch is ready when the app's important paths work in the production environment and the team knows how to respond to problems.
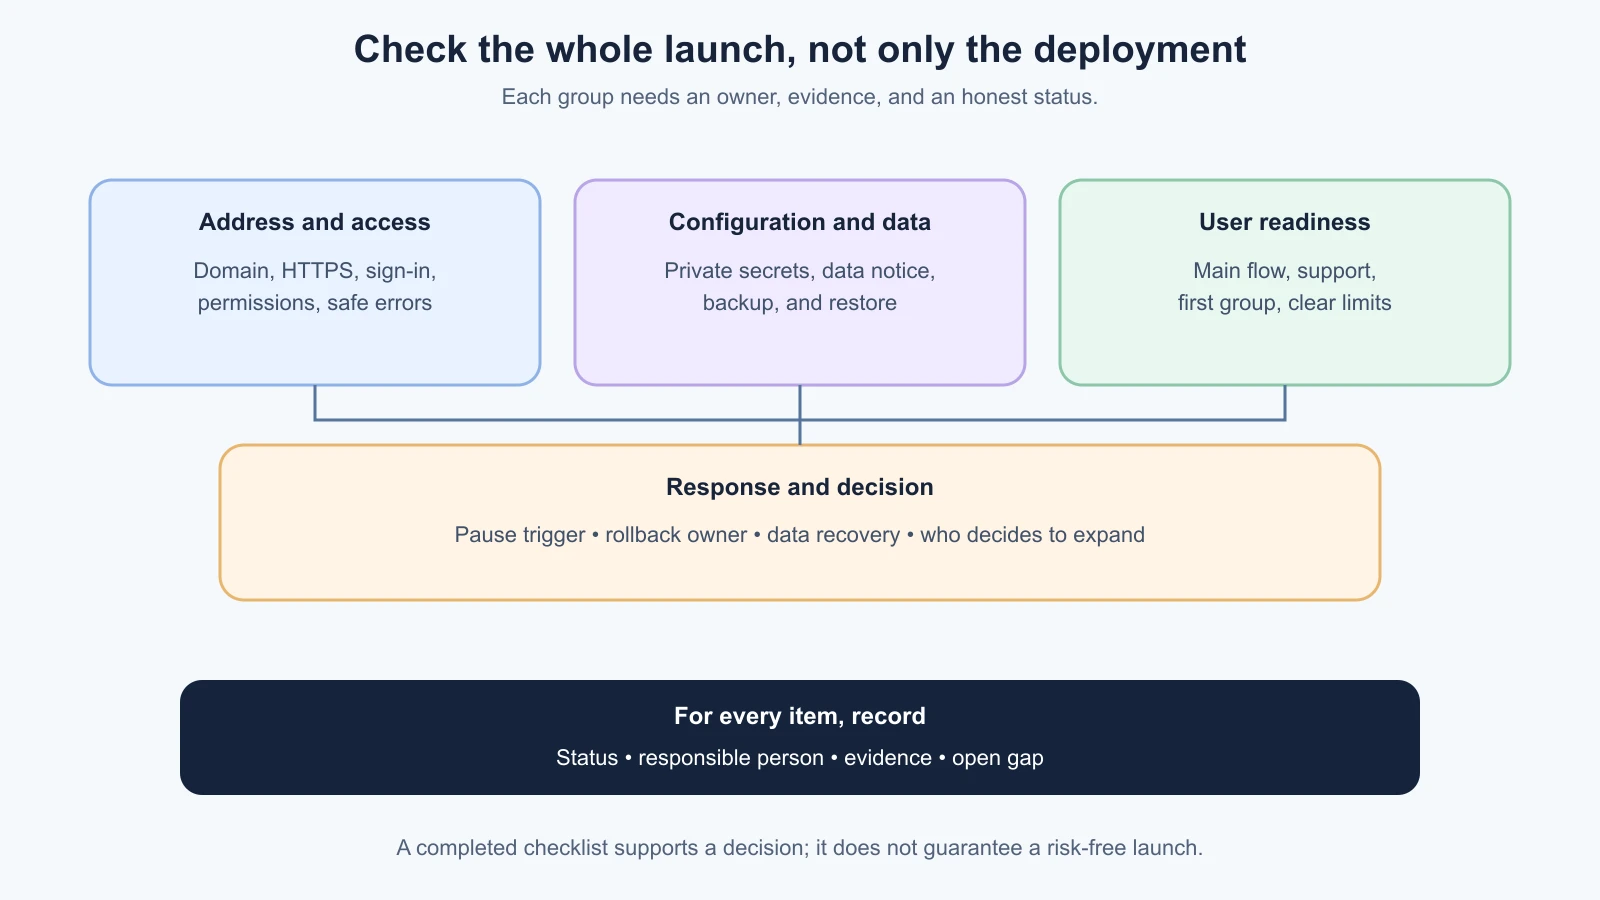
Use this lesson as a planning tool, not as a guarantee that an app is safe or compliant. The checks depend on the product, its data, its users, and the hosting setup. A product with payments, health information, children's data, or other sensitive records needs qualified review beyond a general checklist. Choose a person responsible for each check, record any gap, and make a clear decision about whether that gap is acceptable before inviting users.
Connect the domain and check HTTPS
A domain is the human-readable address people use to reach the app, such as toolshelf.example. You register or manage it through a domain registrar, then point its DNS records to the host following that provider's instructions. DNS is the system that helps browsers find the destination for a domain. The host may ask you to add a particular record or prove that you control the domain. Copy the current values exactly and confirm the host reports the domain as configured.
HTTPS is HTTP protected by Transport Layer Security, or TLS. In a browser, the address should use https://, and the certificate should be valid for the domain. Many hosts can provision and renew certificates automatically, but check the provider's setup and renewal behavior for your chosen service. Open the actual address in a private browser window or another device and verify that the certificate warning is absent, the app loads, and any sign-in or email links use the intended production domain.
The site should not expose authentication tokens or private information in a URL. Redirect old or alternate hostnames to the intended address if your setup supports that. Make sure the authentication provider, email service, and other integrations recognize the production domain where needed. A preview URL that worked during testing may not be permitted for production callbacks.
Do not treat a lock icon as proof that the entire app is secure. HTTPS protects communication between the browser and the site while it is in transit. It does not make weak access rules, leaked credentials, unsafe data handling, or a misleading product flow safe. See the Let's Encrypt getting started guide for certificate basics, and follow your host's current domain instructions.
Put production secrets in the right place
A secret is a credential that grants access, such as a database password, signing key, or private API token. The app may need secrets to connect to a database or send email. Put them in the host's protected configuration or a secrets manager, following the chosen platform's guidance. Do not commit them to Git, paste them in an AI prompt, put them in a screenshot, or include them in a public issue.
Keep separate values for local development, preview, and production. A preview should use test accounts and a test database or a restricted credential. Production should use only the values required for its live services. Give each service the minimum permissions it needs. If a secret appears in code, logs, a prompt, or an exposed build, assume it may be compromised: revoke or rotate it with the service that issued it, replace the configured value, and investigate where it was copied.
Check framework behavior too. In Next.js, for example, variables prefixed with NEXT_PUBLIC_ can be made available to browser code, so that prefix is only for values intended to be public. Other frameworks and hosting services have their own build and runtime rules. Confirm that production variables are set for the right environment and that a redeploy or restart is required when they change. Never paste the actual secret into a checklist; record its name and where it is configured.
For a ToolShelf launch, the production database credential would be configured only in the server-side production environment. The preview environment would use fictional data and a separate database. This is an example configuration, not a claim that either environment exists. OWASP's Secrets Management Cheat Sheet covers access, auditing, rotation, and backup considerations for secrets.
Know what data you collect and why
Before people use the app, list the data it collects or creates. Include details that may be easy to overlook: names, email addresses, location, uploaded files, support messages, analytics events, application logs, and records sent to an external service. For each, ask why the product needs it, who can see it, how long it should remain, and how a user can ask a question or request help.
Publish an accurate privacy notice that reflects what the live product actually does. If the product uses cookies, analytics, email, or third-party services, check whether people need a notice or a choice before those features run. Consent and privacy requirements depend on the people, locations, data, and services involved. Do not copy a generic policy and assume it answers the legal question. Ask qualified privacy or legal counsel to review requirements that apply to the product. This lesson provides general awareness, not legal advice.
Keep the notice consistent with the app. If the product says it collects a phone number only to coordinate a handoff, do not quietly reuse it for marketing. If the product does not yet need precise location, do not collect it just because a map service makes it possible. Use the minimum data needed for the agreed user task and avoid including real personal data in test records, screenshots, AI prompts, or public demos.
For ToolShelf, the team might list account email, tool listing details, request dates, owner approval state, and support messages. It should decide which fields are visible to a borrower, an owner, and an administrator, and whether a location should be approximate rather than a home address. These are questions for a product team to resolve with users and qualified advisers, not established ToolShelf requirements.
Make a recovery plan for the data
A backup is a copy that can help restore data after deletion, corruption, a failed migration, or a service problem. Find out what is backed up, how often copies are created, how long they are kept, where they are stored, who can access them, and how a restore is requested. Include uploaded files and other persistent data, not only the primary database. A backup that has never been restored is an assumption, not a proven recovery path.
Practice restoring a copy in a safe test environment. Check that the restored database can connect to the app, the expected records are present, and related files still work. Do not practice by overwriting production. If the app uses migrations, understand which schema version the backup matches and whether the current application can read it. Write down who can initiate recovery and where they can find the provider's process.
Choose a recovery point based on how much recent data the product could afford to lose, and a recovery time based on how long users could reasonably wait. A tiny internal prototype may accept a simpler recovery plan than a public service that coordinates time-sensitive reservations. These are product and operations decisions, not numbers to guess from a template. NIST's contingency planning overview describes recovery planning as coordinated procedures and technical measures; its examples are written for information systems generally, not specifically for a small consumer app.
A code rollback and a data restore solve different problems. Returning to an earlier app version does not necessarily undo a database migration, delete a bad record, restore a file, or reverse an email that was sent. The previous deployment lesson explains why the application and its data need separate recovery thinking. If a change could alter stored information, have an experienced engineer review the migration and restore plan before applying it to live data.
Give users a safe failure and a way to get help
Apps fail. A database can be unavailable, a request can time out, an email can be delayed, or a user can enter invalid information. A launch-ready product explains what the person can do next without exposing internal details. For example, “We couldn't send your request. Try again in a moment, or contact support if it continues” is more useful than a blank page. Do not show stack traces, secret values, database queries, or private information in an error message.
Check expected errors such as missing fields, unavailable records, and denied access. Check what an unexpected failure looks like too. A missing-page response should not look like a successful empty page. A successful form submission should give a clear confirmation, and the wording should match what the system actually did. For ToolShelf, “Request sent, awaiting owner approval” is accurate only if the request was actually stored with pending status. If saving failed, do not display a success message.
Decide how users can contact the team. Put a support address or help link somewhere people can find it, make sure it reaches someone, and state when the team expects to respond if a response window is promised. Have a person responsible for reading errors and support requests during the initial release. Do not collect extra sensitive details in an error form just because a field is available.
The application logs can help the team understand failures, but avoid recording passwords, tokens, full payment details, or unnecessary personal data. Use enough context to connect an error to a request or time without exposing secrets. The Next.js production checklist and error handling guide describe production error behavior for Next.js apps. Other frameworks have their own guidance.
Decide how to pause or roll back
Before inviting users, agree how to respond if the main path fails. Who can pause new sign-ups or disable a risky feature? Who can restore a prior app deployment? Who checks whether data or messages were affected? How will the team tell users what happened? These are not all solved by a dashboard rollback button.
Write a simple response sequence for the first release:
- Notice the issue through a user report, alert, log, or a launch check.
- Decide whether to stop new activity, hide the affected action, or keep the app available with a clear message.
- Name the incident owner and preserve the information needed to investigate without sharing secrets.
- Roll back the application if that is safe; handle data and external side effects separately.
- Check the key user flow after recovery and tell affected users what they need to know.
- Record what happened and what should change before the next release.
Agree on a trigger in plain language, such as “pause new tool requests if the app cannot reliably store or display their status.” A trigger should identify a product consequence, not only a technical symptom. If the team has no one available to respond, a limited invitation window may be safer than opening the product widely and assuming someone will notice.
Release in stages
A staged release lets the team invite a limited group first, observe the important flows, address problems, and then decide whether to expand access. A “small group” is a way to limit exposure, not proof that the product works for everyone. Pick participants who can exercise the real task, explain what the product is ready for, and avoid promising that the preview is complete.
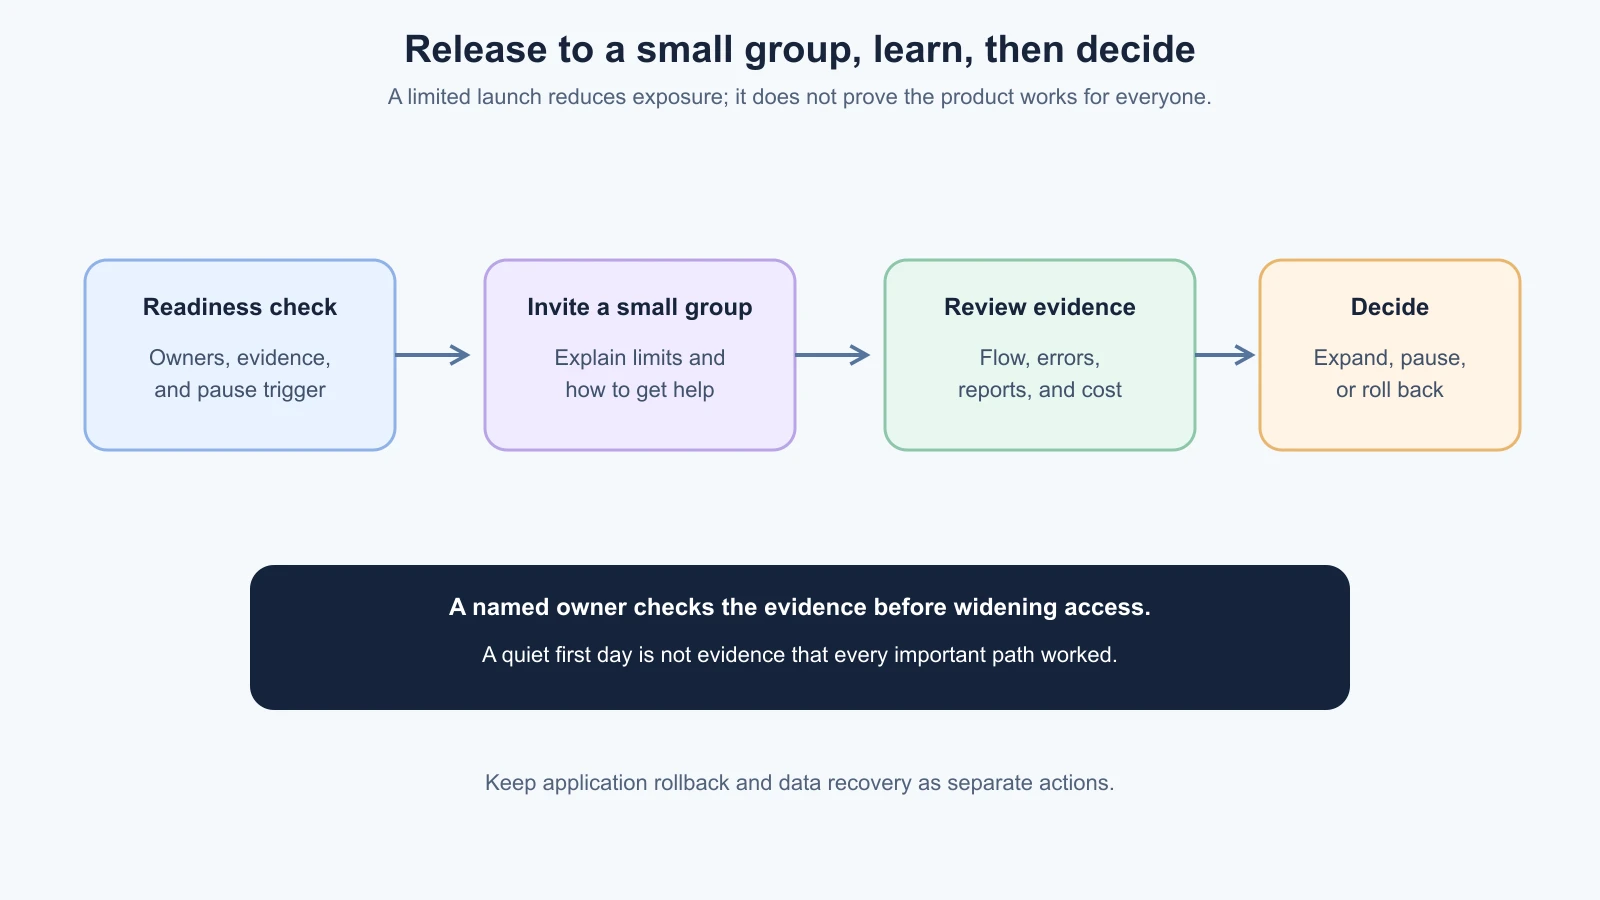
Before ToolShelf invites its first neighbours, the team could make one test listing with fictional information and verify request submission, owner approval, rejection, and the visible status for each role. It could then invite a small set of people who understand that this is an early release and provide a support contact. The team would watch for incorrect status, failed requests, access mistakes, confusing steps, or unexpected costs. Only after reviewing actual evidence would the team decide whether to invite more people. This is a proposed process; no participant results or release outcomes are claimed.
For a staged launch, write down:
- Who is included and how they will be invited.
- What the product is ready to do and what is not available yet.
- Which user journey and failure signals the team will watch.
- Who checks reports and logs, and when.
- What would cause the team to pause, roll back, or contact participants.
- Who decides whether to widen access and what evidence they need.
Do not assume that a quiet first day means the app is healthy. Confirm that the group was able to use the product and that the system recorded the action as expected. Ask a clear question when you request feedback. If the app changes during the pilot, tell participants when the change affects what they can do or what data the product collects.
Use a launch checklist with honest statuses
The checklist below is a template. Mark each item Ready, Not ready, Not applicable, or Needs review, and include the person who checked it and a link to evidence. Do not mark a box ready because the AI said it was covered or because a deployment finished without an error.
1# Launch checklist
2Product and release date:
3Decision owner:
4Support owner:
5
6## Address and access
7- [ ] Production domain points to the intended host
8- [ ] HTTPS and certificate are valid for the production address
9- [ ] Sign-in, callbacks, and access rules use production settings
10- [ ] Public errors do not reveal internal details or secrets
11
12## Configuration and data
13- [ ] Production secrets are private, scoped, and documented by name only
14- [ ] Preview and production use the intended separate data and credentials
15- [ ] Privacy notice and any required user choices match actual behavior
16- [ ] Backup coverage, retention, access, and restore steps are known
17- [ ] Data migration and recovery owner are identified
18
19## User readiness
20- [ ] Main journey and key failure states checked in production configuration
21- [ ] Support contact works and someone is assigned to review requests
22- [ ] Limits, unavailable features, and early-access terms are clear
23- [ ] First group and invitation plan are defined
24
25## Response and decision
26- [ ] Pause or rollback trigger is written in plain language
27- [ ] Application rollback and data recovery are understood separately
28- [ ] Team knows who checks errors and who can make the expand decision
29- [ ] Open gaps are listed with an owner and explicit decision
30
31## Evidence
32Check, status, date, owner, evidence link, and follow-up:
For every item that is not ready, state the user consequence and decide whether the release should wait, be limited, or proceed with an approved mitigation. “Not applicable” should have a reason. For example, if the app stores no persistent user data, a database backup item might not apply, but the team should still confirm that it has no uploaded files or external records to recover.
Further reading
- Choose Where to Deploy, for hosting responsibilities, regions, and cost checks.
- Vibe Coding's Deploy Your App and Security for Vibe Coders, for deployment setup and application security habits.
- Let's Encrypt: Getting Started introduces TLS certificates and enabling HTTPS.
- OWASP Secrets Management Cheat Sheet covers protection, access, rotation, and recovery of secrets.
- NIST contingency planning provides general recovery-planning context; its guidance may be more formal than a small product needs.
- Next.js production checklist and error handling, for framework-specific production and error behavior. Check docs for your framework and version.
Mistakes beginners make
- Treating “deployed” as “ready for users.” Check the real production address, configuration, data connection, and main journey.
- Putting production secrets into preview or prompts. Keep credentials private and separate; rotate a credential if it was exposed.
- Assuming HTTPS proves the app is secure. It protects transport, not access rules, data collection, or application logic.
- Collecting data without deciding why. List the data, purpose, access, retention, and external sharing before launch.
- Assuming automatic backups can be restored. Practice a restore in a safe environment and record who owns it.
- Using the same rollback plan for app code and data. They may need separate recovery steps.
- Showing technical details in an error page. Give users a safe next step and keep diagnostic information in controlled logs.
- Inviting everyone before learning from a small release. Stage access, assign someone to review evidence, and agree what pauses expansion.
- Calling an incomplete checklist ready because an AI summarized it. Verify each item and link to actual evidence.
- Treating a generic privacy policy as legal approval. Get qualified advice for the requirements that apply to your users and data.
Recap and try it yourself
Before going live, verify the production domain and HTTPS, configure secrets privately, understand what data the app collects, confirm backups and recovery, prepare safe errors and support, and agree how to pause or roll back. Start with a limited group, observe the real product behavior, and expand only after someone reviews the evidence. Legal and security requirements depend on the product and its context, so get qualified help where needed.
Try it: choose a practice app and fill out the launch checklist. For each item, write a status, a responsible person, and the evidence you would inspect. Mark anything you cannot verify as “Needs review.” Then describe who would pause the release if a core user action failed and how you would recover app code and user data separately.