
AI Product Builders course · lesson 8 of 25
- 1The AI Product-Building Loop: From Idea to Improvement
- 2Define the Problem Before You Choose a Solution
- 3Check the Idea Before You Build
- 4App Anatomy for Non-Engineers: What Happens Behind a Screen
- 5Scope the First Version: Choose What to Build Now
- 6Choose a Tech Stack That Fits Your Constraints
- 7Choose a Prototype Tool for Your Product and Team
- 8Build a Clickable Prototype in One Focused Flow
- 9Test a Prototype with Real People
- 10Decide Whether to Keep, Change, or Stop
- 11Move from a Prototype to Real Code
- 12Work with an AI Coding Tool on One Clear Task
- 13Learn the Web Basics Behind Your App
- 14Connect a Database Without Losing Control of Your Data
- 15Tell a Small Fix from a Structural Change
- 16Run a Refinement Loop That Keeps the Product Useful
- 17Make an AI-Built Product Easier to Use
- 18Review and Check Changes Before They Reach the Team
- 19Test an AI-Built Product in Layers
- 20Work with a Team and Stakeholders
- 21Choose Where to Deploy Your Product
- 22Go Live: A Launch Checklist for Your Product
- 23Measure and Improve Your Product After Launch
- 24Add an AI Feature to Your Product Carefully
- 25Capstone: Take a Product Idea to Launch
After this lesson, you will be able to turn a product scope into one small clickable flow, tell a tool what to build without quietly expanding the product, and decide when the prototype is ready to test. You will use sample data where real information is not needed and keep a record of what you asked the tool to do.
We will continue with ToolShelf, the fictional neighbourhood tool-sharing idea. Its first-version job is to help a neighbour find a listing, ask its owner to borrow the item, and see the owner’s response. There are no real listings, participants, or ToolShelf results behind this example.
A prototype helps you learn about an experience
A prototype is a model of how a product might work. It can be a drawing, a sequence of linked screens, or a working app that responds to clicks. Its purpose is to help you examine a design or learn from a task. A prototype is not automatically a finished or reliable product, even if it looks convincing or has a shareable web address.
That distinction helps you keep the work small. You are not trying to build ToolShelf’s whole lending service in this lesson. You are making a version that can help you explore one question: “Can a neighbour find a drill and understand what information to enter to request it?” The upcoming lesson on testing prototypes will show how to observe someone using the result. This lesson prepares the object for that test; it does not prove the idea works.
Before opening a builder, return to your scope and prototype brief. The scope for ToolShelf’s first version says what job the product supports and what is outside its boundary. The prototype tool decision guide helps you decide whether a design tool, app builder, or coding agent fits your learning question.
Write one sentence for what the prototype should help someone do. Then write one sentence for what you need to learn from watching them try it. If you cannot say what the person will do, your scope may be too broad or your test question may be unclear. Revise those sentences before you ask an AI tool to generate screens.
Keep one path to three screens
A first prototype is easier to understand when it contains one main path rather than a menu of unrelated features. For ToolShelf, a simple flow can use three screens:
- Find a tool: show a short list of clearly fictional items and a simple way to select one.
- Review and ask: show the chosen item, its made-up description, and a form for proposed borrowing dates.
- See what happened: show a confirmation that is clearly marked as a prototype result. It can say that the sample request is “pending” without actually sending anything to an owner.
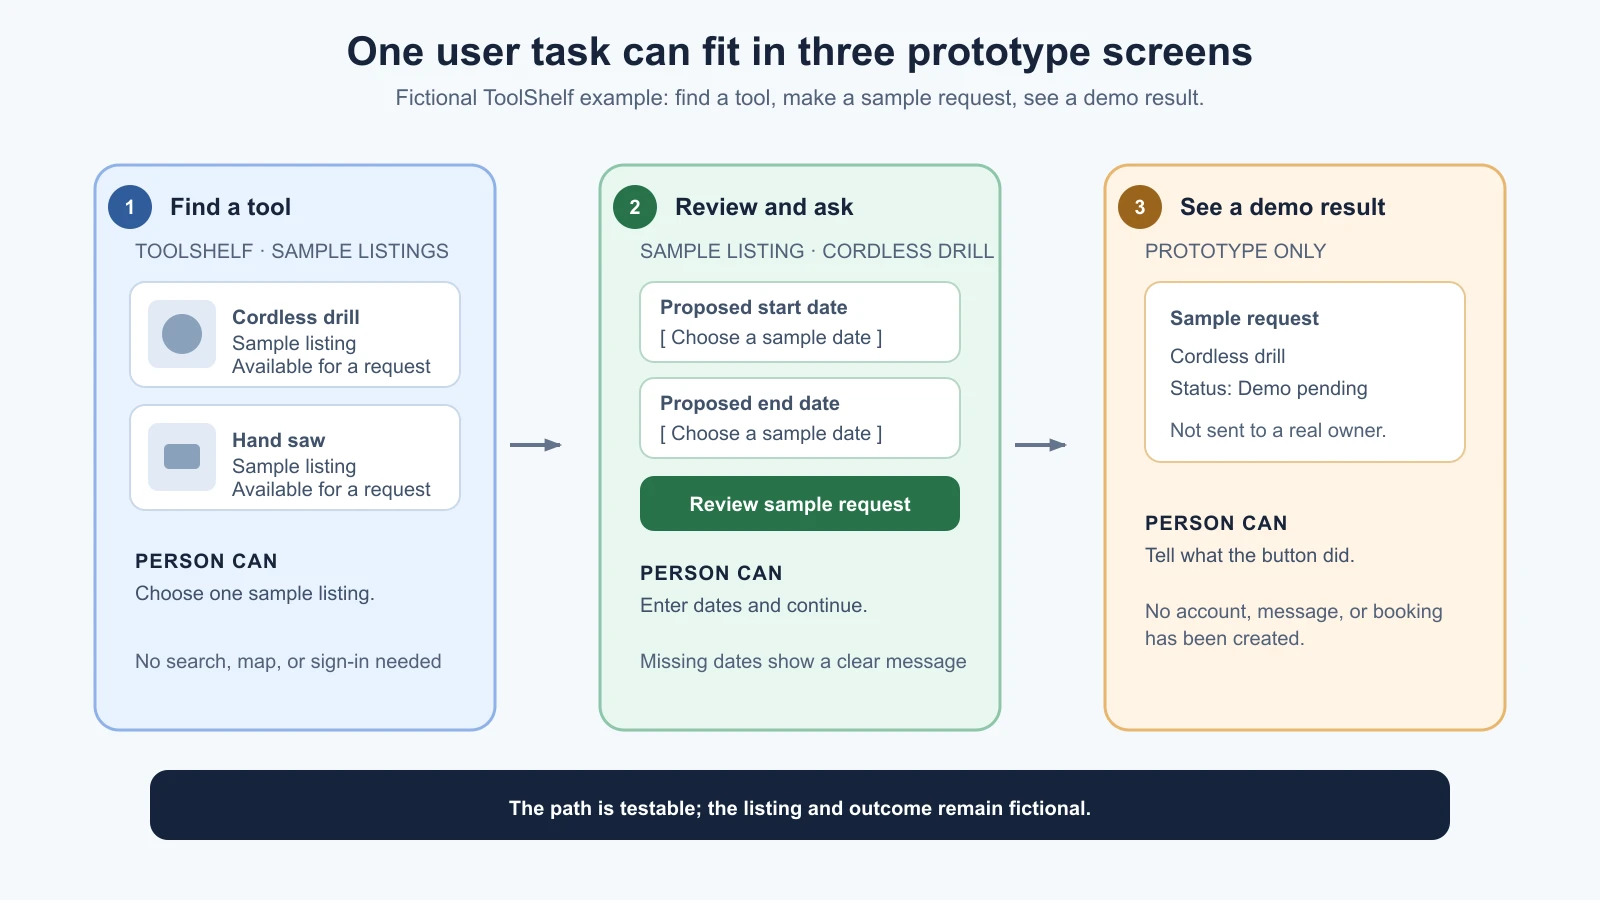
The three screens give the person a starting point, an action, and a visible outcome. If your own job needs more steps, use the smallest number that still allows someone to reach the outcome. “Three” is a useful constraint for this lesson, not a rule that every prototype must have exactly three screens.
For each screen, list what must be visible and what action can be taken. Do not begin with decoration. A rough structure and labels can reveal missing decisions sooner than a polished interface. If a person needs to know whether an item is available before requesting it, the prototype must show some availability information. If the owner’s response is outside the test question, do not invent a full owner dashboard just to make the flow look complete.
Think about the awkward states as well as the happy path. What happens if the person leaves the dates blank? What should the button say while the request is being prepared? What does the prototype show after the person clicks it? For a static prototype, you may only need to represent one error state. For a working prototype, keep the behavior simple and make sure that it does not imply that real data was sent or saved.
Decide what can stay fake
Sample data is invented information used to make a screen or interaction understandable. A prototype can use sample listings, names, dates, and statuses. Keep the data obviously fictional and do not copy private details from a real person or service account just to make the display look authentic.
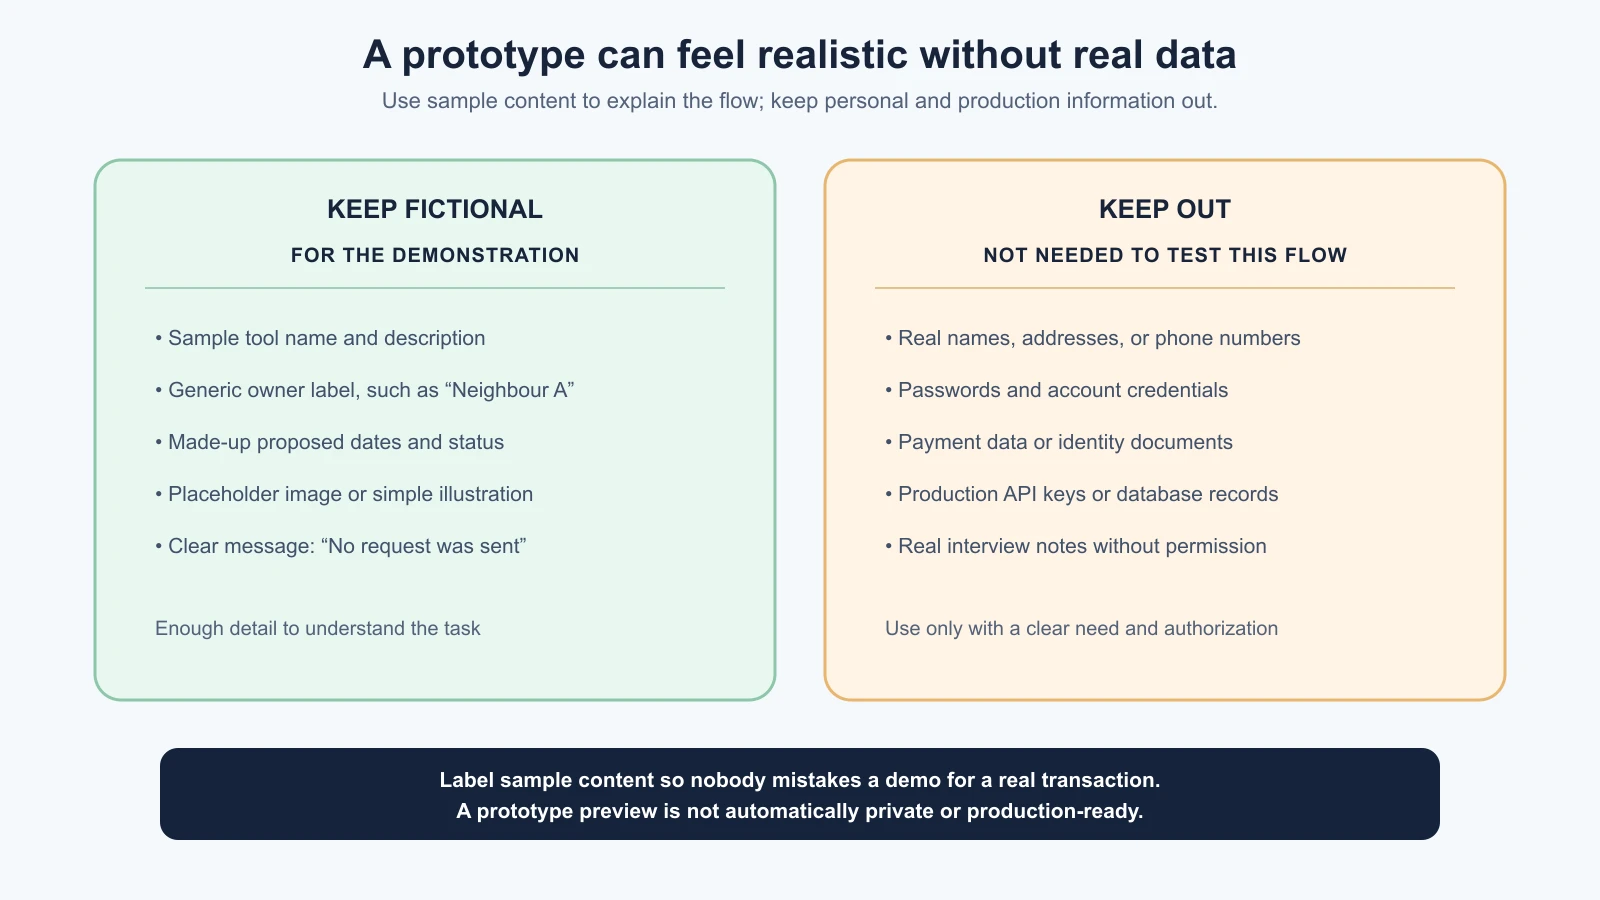
For ToolShelf, a safe sample might be “Cordless drill, sample listing, available this weekend” with a fictional owner name. A test could ask someone to choose it, select two proposed dates, and see the demonstration confirmation. A caption can remind the reader, “Example data only. No request was sent.” The point of the sample is to support the task, not to suggest that a real neighbour has offered a drill.
Some information should stay out of this prototype:
- Real names, addresses, phone numbers, or account credentials.
- Actual requests between neighbours or real availability schedules.
- Payment details, deposits, or real identity documents.
- API keys, production database credentials, or access tokens.
- Personal data copied from an interview or another product without permission.
If an app builder creates a database automatically, that does not mean you must put real information in it. Use clearly fictional data, inspect what the prototype stores, and understand who can open a shared preview. Avoid copying sensitive information into prompts or a tool’s project context. Your tool choice checks include data location and sharing; revisit them if the build setup changes.
Fictional data can still contain accidental real information if you make it from memory or copy a realistic address. Keep examples generic: “Neighbour A,” “Oak Street Tool Library” only if it is clearly a made-up label, and dates chosen for the demonstration. Do not claim that an owner accepted a request or that anyone completed the borrowing process. A visible demonstration state is more honest than a fake success presented as a real event.
Turn the scope into a build prompt
Give the tool enough context to build the flow, but make the boundary explicit. A useful prompt tells it what the prototype is for, what screens to include, what should happen when someone acts, what can stay fictional, and what not to build.
Here is a copy-ready pattern:
1Create a clickable prototype from this brief.
2
3Learning question:
4[What do I want to learn by watching someone use it?]
5
6Intended person and task:
7[Who will try the prototype, and what will they do?]
8
9Main path:
10[Describe the start, action, and visible result.]
11
12Screens:
131. [First screen and the action available]
142. [Next screen and the action available]
153. [Final screen and what it communicates]
16
17Use clearly fictional sample data. Label the result as a prototype.
18Do not use real names, contact details, credentials, payment data,
19or production services. Do not add features outside this flow.
20
21Before building, summarize the screens, actions, sample data, and
22anything you cannot implement as described. Do not change the scope.
For ToolShelf, the learning question could be whether a person understands what to enter to ask for a drill. The three screens are a sample list, a drill detail with proposed dates, and a demonstration result. Sample data might include three generic tool names and fictional descriptions. A boundary could say: “Do not add sign-up, chat, maps, payment, ratings, real email, or a live database.”
The instruction to summarize first gives you a chance to catch a misunderstanding before the tool makes several screens from it. Review the plan for any extra features or assumptions, then ask for a correction before it builds. If you are working with a coding agent or a project with existing files, use the review and repository habits in your first Vibe Coded app. If you need to attach a visual reference, the guide to using mockups and examples as input explains how to tell the tool what the reference does and does not specify.
Add a simple visual reference if it clarifies the flow
A rough sketch can be quicker than explaining the whole layout in a paragraph. Draw three boxes, label the key elements, and connect the screens with arrows. The sketch might show “Tool list,” “Drill details and dates,” and “Prototype confirmation.” It does not need polished colors or exact spacing.
If you attach a mockup, say which decisions it communicates. For example, “Use the drawing to understand the order of the content and the three main buttons. The sample owner and listing are fictional. The drawing does not specify a real booking system or account flow.” The written scope still controls behavior. A picture can suggest a location for a button, but it does not explain what happens after the click unless you add that instruction.
Avoid attaching several unrelated inspiration images and asking the model to combine them without guidance. They may show different navigation, typography, or feature assumptions. Pick one reference per question, label the important areas, and identify anything that is only decorative or out of scope.
Keep a record of prompts and results
An iteration is one round of asking for a change, looking at the result, and deciding what to do next. Record enough to remember why the prototype changed. A short log also helps you distinguish what you originally asked for from what the tool added on its own.
1# Prototype iteration log
2
3Project and version:
4Tool and date:
5Learning question:
6
7## Iteration 1
8Prompt or request:
9What the tool changed:
10What I checked in the preview:
11What worked:
12What is confusing or missing:
13Next decision:
14
15## Iteration 2
16Prompt or request:
17What the tool changed:
18What I checked in the preview:
19What worked:
20What is confusing or missing:
21Next decision:
You can keep this log in a note, project file, or document the team already uses. If the prototype tool provides version history, save meaningful versions and note which prompt led to each one. A screenshot of the three screens can help you compare the first draft with the last draft. Do not paste secrets or private interview notes into a log that other people can access.
After each change, ask the tool what it modified, then look at the changed screen yourself. You do not have to inspect every line of code to notice that a fourth feature appeared or a key label changed. If you are using a code project, review the diff and run the app, following the habits in the Vibe Coding lesson. If you are using an app builder, review the generated behavior, preview visibility, data settings, and any new integrations.
Make focused changes, then stop polishing
When a screen is confusing, describe what you observed instead of saying “make it better.” For example: “On the request screen, the date fields do not explain which date comes first. Add the labels ‘Start date’ and ‘End date.’ Keep the other layout and sample data unchanged.” That gives the tool one clear adjustment and helps you check the result.
Change one thing at a time when you can. If you change the wording, layout, number of screens, sample data, and navigation all at once, you may not know what made the flow clearer or more confusing. Keep the learning question fixed while you refine the prototype. If the question itself changes, write that down as a new decision rather than pretending the same test is still underway.
Set a stopping point before you begin. The prototype is ready for the next lesson when:
- The main task can be completed from its starting screen to a visible result.
- The labels and sample data make sense without you narrating every click.
- The most relevant missing-input or error state is represented.
- The result is clearly a prototype, and it does not imply that a real request or transaction happened.
- You know how to share the preview with the intended tester and remove access afterward.
- You have recorded one unresolved issue rather than hiding it behind more decoration.
You do not need a logo, animations, every product setting, a complete admin area, or a polished mobile and desktop design system to test one flow. Fix a visual issue if it blocks the task. Keep a list for details that can wait. A prototype is ready when it can help answer the learning question, not when there is nothing left you could improve.
The next lesson covers how to put this prototype in front of real people and observe what they do. At the end of this lesson, you have a testable artifact and a record of its limits, not evidence that people will use the product.
Further reading
- Scope the first version and choose a prototype tool, earlier lessons in this course.
- Your First Vibe-Coded App, for making a small app, running it, checking it, and asking for one focused change.
- Mockups and Examples as Input, for labeling visual references and keeping a mockup aligned with the written scope.
Mistakes beginners make
- Trying to prototype the whole product. Keep one task and one main path in view.
- Writing a feature list instead of describing a task. Say what the person does and what result they should see.
- Treating sample data as real evidence. Label it as fictional and never report it as user activity.
- Using real personal information for realism. Generic sample data can show the flow without exposing someone’s identity or contact details.
- Letting a mockup silently add behavior. Keep the written scope in charge of what happens when a person clicks.
- Sending repeated broad prompts. Describe one observed issue and one change at a time.
- Polishing after the learning question is answerable. Save optional improvements for later and prepare the prototype for a test.
- Calling the prototype validated. It is ready to test; results come only after people try it.
Recap and try it yourself
Start with one learning question, connect the smallest number of screens needed to complete the task, and use visibly fictional data. Give the tool a bounded prompt that names the screen flow, interactions, out-of-scope features, and safety limits. Record each iteration, check the result, and stop when the prototype is clear enough for a person to try. A working preview is an artifact for learning, not proof of demand or a production-ready service.
Try it: take one job from your scope document and sketch three screens for it. Mark what is real in the future product and what is sample-only in the prototype. Write a prompt that requests the flow and excludes at least three features. Ask the tool to summarize its plan before building. After the first preview, record one thing that works, one thing that is confusing, and one focused change. Save a version that is ready for someone to try. Next, you will test the prototype with real people.