
Vibe Coding course · lesson 8 of 26
- 1What Is Vibe Coding? A Beginner's Guide
- 2The Vibe Coder Mindset: Build Small, Check Often
- 3Choosing Your Vibe Coding Tool: A Beginner's Guide
- 4Set Up Your Workspace for Vibe Coding
- 5Your First Vibe-Coded App in 30 Minutes
- 6From Idea to MVP: Plan a Small First Version
- 7Spec-Driven Development: Give AI a Clear Plan to Build From
- 8Mockups and Examples as Input: Show AI What You Mean
- 9Choose a Tech Stack: Pick Tools You Can Keep Using
- 10Prompts That Build Things: Give AI a Clear Task
- 11Context Documents: Give AI Lasting Project Instructions
- 12Managing Context and Sessions: Keep AI on the Right Task
- 13Set Standards Early and Review AI Output
- 14Build the Skeleton: Start the BookmarkBox App
- 15Add Data and a Database: Save Real Bookmarks
- 16Add Accounts Safely: Sign In and Protect Each User's Data
- 17Design and Polish: Improve the App One Pass at a Time
- 18Version Control with AI: Keep a Safe History of Your Work
- 19Debugging with AI: Find the Cause Before You Fix It
- 20Test by Default: Make Sure Each Feature Keeps Working
- 21Refactor and Keep Your Code Healthy
- 22Security for Vibe Coders: Protect Your App and Its Users
- 23Deploy Your App: Put BookmarkBox Online
- 24Monitor and Maintain Your App After Launch
- 25Where Vibe Coding Stops: Know When to Change Your Approach
- 26Capstone: Ship a Project from Idea to Production
After this lesson, you will be able to prepare a useful visual reference for an AI coding tool, explain what it should learn from that reference, and keep it aligned with your written spec. A picture can make layout and style easier to discuss, but it cannot answer every question about how a feature should work.
In Spec-driven development, you wrote a small spec for adding a bookmark. Now we will give that feature a clearer visual shape without changing its behavior.
What counts as a visual reference?
A mockup is a picture of a proposed screen. It can be a polished design, a rough sketch on paper, a slide, or a screenshot with notes. A wireframe is a simpler mockup that focuses on the placement of elements rather than color and detail.
Other useful references include a screenshot of your current app, a page you want to use as inspiration, a sample of the data the screen will show, and existing files from your project. You can also write down design tokens: named, reusable choices such as the main color, body text size, corner style and spacing scale. Tokens help keep several screens consistent.
You do not need a design application. A quick sketch photographed in good light can answer questions like “Is the form above or beside the list?” and “What should the empty page look like?” Add short labels if the drawing alone could be misunderstood.
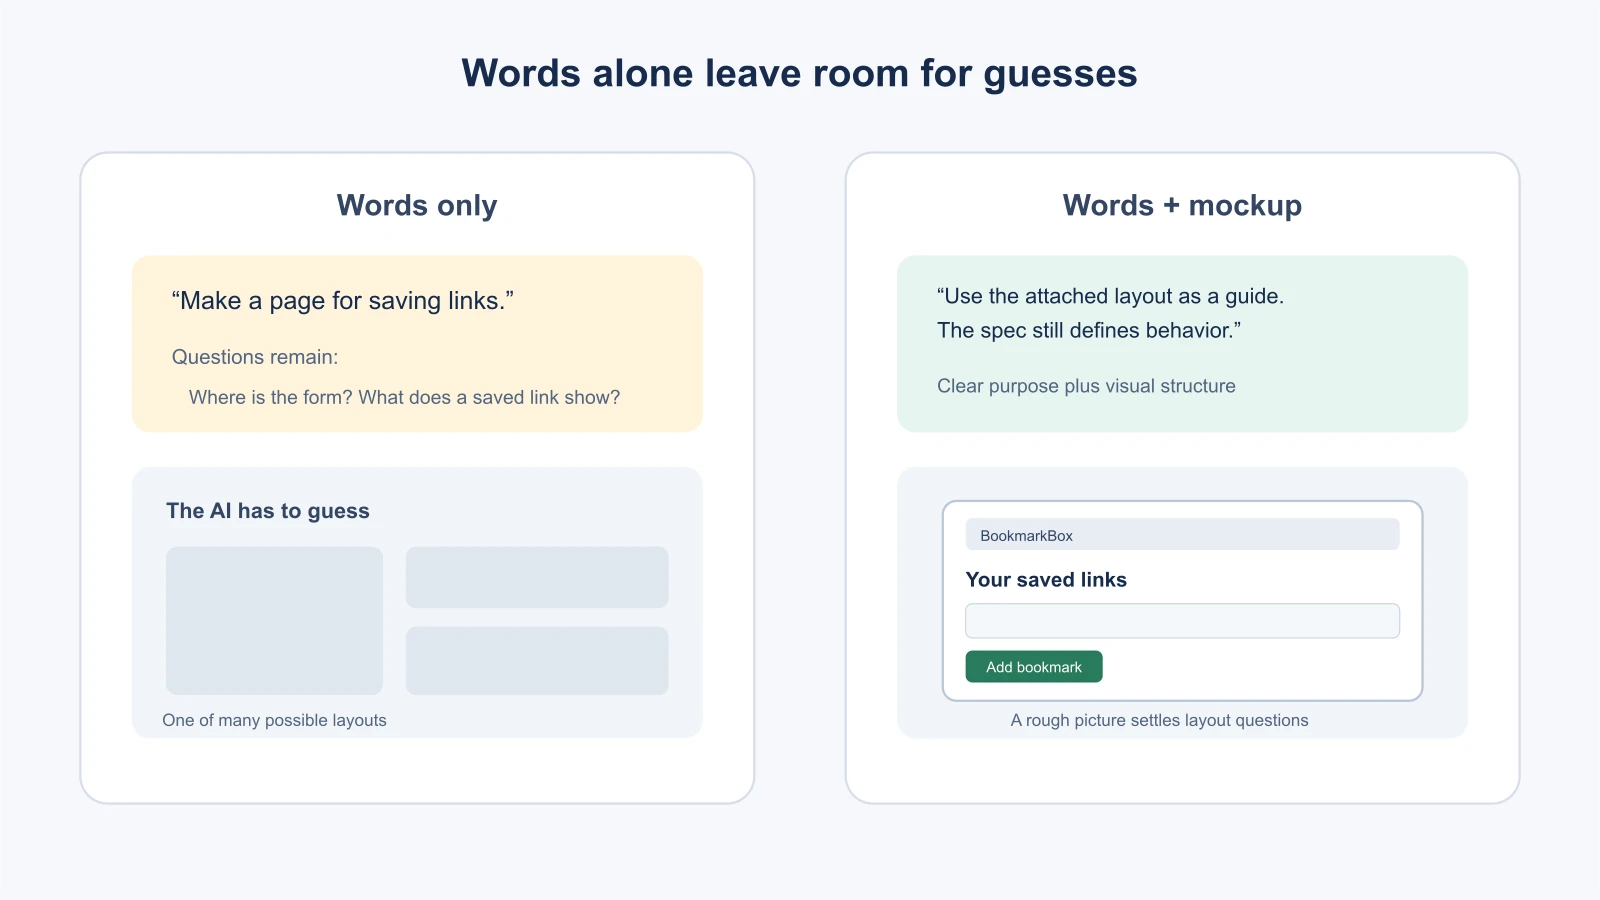
Words and pictures answer different questions
Your BookmarkBox spec says that a person can enter a page title and web address, save the bookmark, and see it in a list. That describes behavior. It does not decide whether the form spans the page, sits in a card, or appears beside the list.
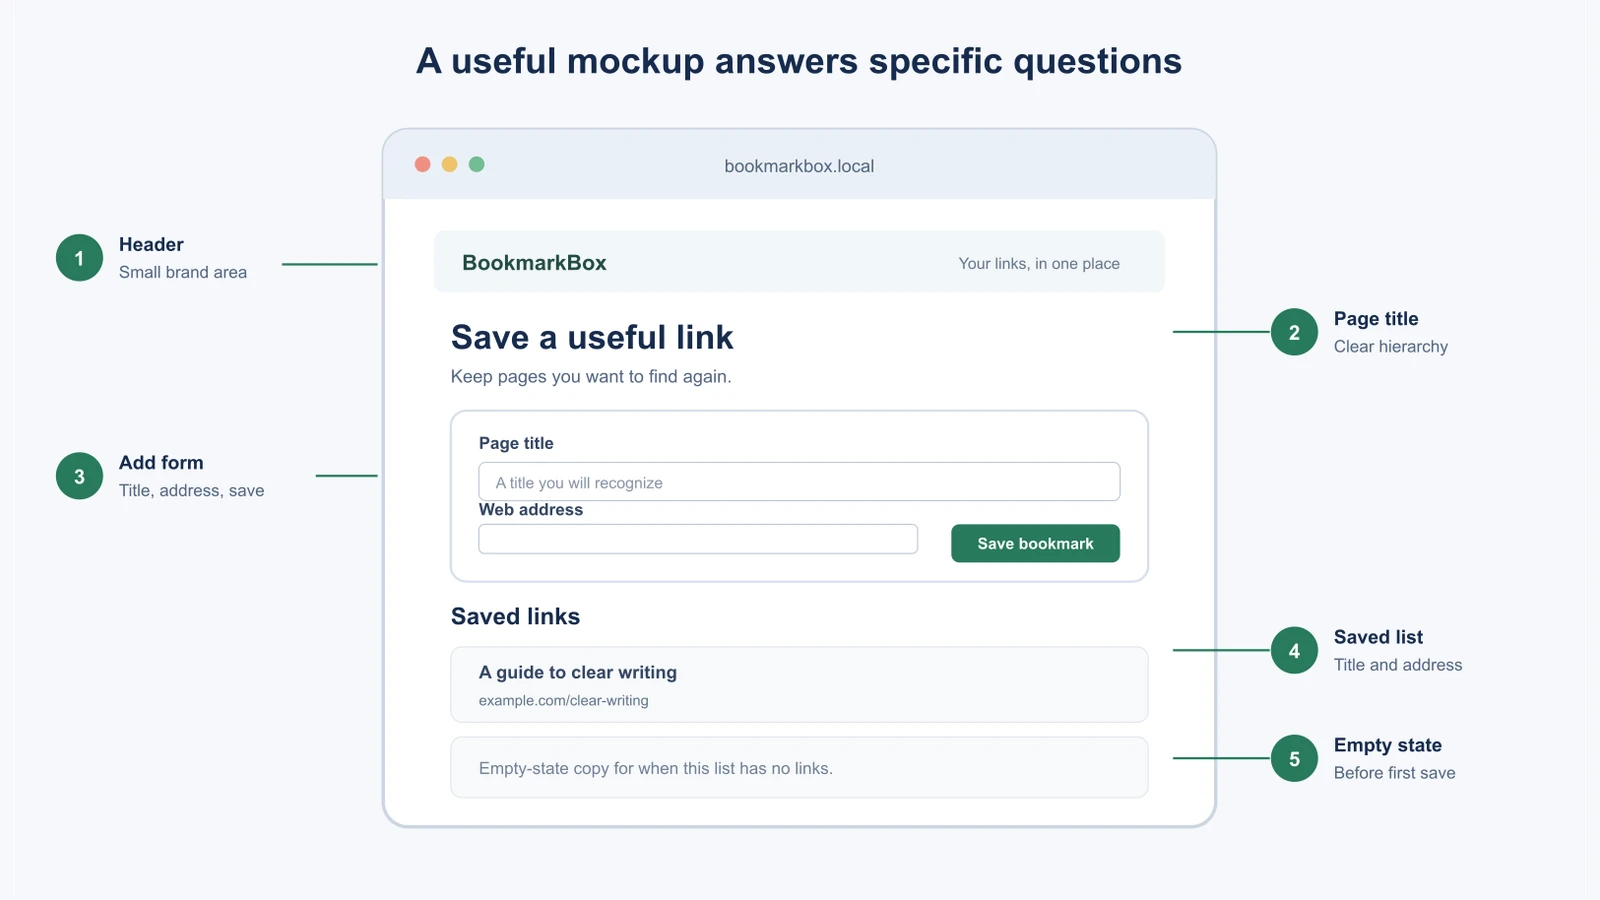
A mockup can show those choices. For example, it might put the BookmarkBox name in a small header, the page title below it, an “Add a bookmark” form in a card, and saved links in a list underneath. It might also show what the page looks like before the first bookmark is saved.
The picture should not silently add behavior. If it shows a search box but search is out of scope, either remove it or mark it “later, not in this feature.” If a label or button conflicts with the spec, decide which one should change before asking the AI to build it.
Make the reference easy to interpret
Before attaching a file or sharing its path, tell the tool what it is and what to pay attention to. For an annotated mockup, number the callouts and explain them in the prompt. Say which parts are fixed, which are examples, and what should happen on a narrow screen.
Here is a prompt for the first BookmarkBox slice:
1Read the current BookmarkBox spec before editing. The feature is “Add and list a bookmark.”
2
3Use the attached mockup as a guide to the page layout and visual hierarchy. The numbered notes identify the header, page title, add form, saved-links list and empty state. The mockup is a visual guide, not a request to add features that are absent from the spec.
4
5Build only the behavior in the spec: accept a title and web address, save a valid bookmark, show it in the list, and explain missing information clearly. Do not add sign-in, tags, search or a browser extension.
6
7First, inspect the existing files and tell me what you plan to change. Keep the layout usable on a phone as well as a wide screen. If the mockup and spec disagree, stop and point out the conflict before coding.
Attach the image if your tool supports image input, or give it a path it can read. Image support depends on the product and the place you use it. For example, Cursor documents adding images to a prompt for UI implementation and debugging, and v0 documents using screenshots or mockups as input. Check the current instructions for your own tool and workspace before relying on that workflow. (Cursor prompting guide, v0 FAQ).
Add examples that settle details
An example can be as useful as a picture. If saved bookmarks should show a title, address and date, give the AI two or three made-up examples in the order you expect. Sample data helps it build realistic content and reveals missing decisions, such as what to show when a title is long. Do not use private information from a real account when made-up examples will do.
Existing project files also provide context. Point to the relevant spec, design tokens or existing page, and say which one is authoritative. For instance: “Use the colors in styles/tokens.css; do not copy the temporary colors in the screenshot.” If the AI has not seen the project yet, ask it to inspect the files first rather than guessing paths or replacing existing conventions.
Keep your references small and focused. One screenshot with clear labels is often easier to follow than a folder of near-duplicates. When a reference site inspires you, describe the particular quality you mean, such as “use a compact header and generous space between sections.” A site name alone leaves too many choices open.
Check the result against both references
After the AI makes a first pass, run the app and compare it with the mockup and spec. Ask yourself:
- Does the page have the elements and visual order the mockup shows?
- Does each interaction still match the written spec?
- Are the empty and narrow-screen layouts accounted for?
- Did the AI add controls or behavior that neither reference requested?
Treat a mismatch as a decision to make, not just a prompt to repeat. If you want to change the feature, update the spec and mockup so they agree. If the spec is still right, explain the specific visual adjustment and ask for that focused change.
Make a quick mockup in ten minutes
A mockup does not need to be pretty. Here is a simple way to make one for a screen you want built:
- List what must appear. For BookmarkBox's first screen: the app name, a title, a form with two fields and a button, and the list of saved links.
- Draw boxes. Use paper, a whiteboard or any drawing tool. A rectangle for each area is enough. Put the most important thing first.
- Label each box with what it is, not how it looks: “Add form,” “Saved links,” “Empty message.”
- Add one real-looking example inside the list, such as a title and address.
- Capture it. Take a photo or a screenshot, and check that you can still read your own labels.
- Write a three-line caption that says what the picture is, what it should be used for, and what it does not decide.
If you can, draw the narrow, phone-sized version first. A small screen forces you to decide what matters most, and a layout that works there usually stretches to a wide screen more easily than the reverse.
When your tool cannot read images
Some tools or modes cannot take an image. You can still give the same information in words. A structured description is often clearer than a long paragraph. For example:
1Layout on a phone (narrow screen), top to bottom:
21. Header: the name "BookmarkBox" on the left.
32. Page title: "Save a useful link", with one line of explanation under it.
43. Add form in a card: a "Page title" field, a "Web address" field and a "Save bookmark" button.
54. "Saved links" heading, then one card per bookmark with the title in bold and the address in smaller text.
65. Empty state: when there are no bookmarks, one sentence under "Saved links" explaining how to add the first one.
7
8On a wide screen, keep the same order and limit the content to a comfortable reading width.
Written this way, the description can sit in your spec next to the behavior, which keeps the two easier to update together.
Annotate what the picture cannot say
A picture shows layout. It does not show everything a builder needs to know. When you annotate a mockup or write a caption, consider adding:
- Names for each area, so you and the AI use the same words.
- States that are not drawn, such as empty, loading and error.
- What is fixed and what is an example. The sample bookmark titles are made up; the position of the form is a requirement.
- What happens next. An arrow from the Save button to the list can say “the new bookmark appears at the top.”
- What is out of scope. If the mockup includes a search box that you do not want yet, mark it clearly.
When the result differs from the mockup
AI tools will sometimes build something close to the mockup but not the same. Before you ask for a fix, ask the tool to compare, so you can see the difference in words:
1Compare the page you built with the attached mockup and the spec. List the differences in layout, wording and behavior. For each difference, say whether the mockup, the spec or your implementation should win, and why. Do not change any files yet.Then decide. Some differences are improvements you are happy to keep. Others are mistakes. A short written list of differences makes it easier to give one clear correction instead of a series of vague ones.
Mistakes beginners make
- Attaching an image without explaining it. Say what the image represents and which details matter.
- Expecting a mockup to specify behavior. Keep validation, saving and error behavior in the written spec.
- Mixing references that disagree. Choose the current source for each decision and make conflicts explicit.
- Leaving accidental features in the picture. Remove them or label them as out of scope.
- Using vague inspiration. Describe the layout or style you want the AI to take from a reference.
- Reviewing only on a large screen. Check the page at a narrow width too.
Recap and try it yourself
A mockup clarifies appearance; a spec explains behavior. A short annotation, sample data and named design tokens can fill in details, provided you tell the AI how each reference should be used. When references conflict, pause and bring them back into agreement before continuing.
Try it: sketch a screen for one feature in your own app. Label three important areas, write two sample records, and add one sentence about what should happen on a phone. Ask an AI to summarize what it understood before it edits anything. In Choose a tech stack, you will decide which technologies BookmarkBox will use.