
Vibe Coding course · lesson 18 of 26
- 1What Is Vibe Coding? A Beginner's Guide
- 2The Vibe Coder Mindset: Build Small, Check Often
- 3Choosing Your Vibe Coding Tool: A Beginner's Guide
- 4Set Up Your Workspace for Vibe Coding
- 5Your First Vibe-Coded App in 30 Minutes
- 6From Idea to MVP: Plan a Small First Version
- 7Spec-Driven Development: Give AI a Clear Plan to Build From
- 8Mockups and Examples as Input: Show AI What You Mean
- 9Choose a Tech Stack: Pick Tools You Can Keep Using
- 10Prompts That Build Things: Give AI a Clear Task
- 11Context Documents: Give AI Lasting Project Instructions
- 12Managing Context and Sessions: Keep AI on the Right Task
- 13Set Standards Early and Review AI Output
- 14Build the Skeleton: Start the BookmarkBox App
- 15Add Data and a Database: Save Real Bookmarks
- 16Add Accounts Safely: Sign In and Protect Each User's Data
- 17Design and Polish: Improve the App One Pass at a Time
- 18Version Control with AI: Keep a Safe History of Your Work
- 19Debugging with AI: Find the Cause Before You Fix It
- 20Test by Default: Make Sure Each Feature Keeps Working
- 21Refactor and Keep Your Code Healthy
- 22Security for Vibe Coders: Protect Your App and Its Users
- 23Deploy Your App: Put BookmarkBox Online
- 24Monitor and Maintain Your App After Launch
- 25Where Vibe Coding Stops: Know When to Change Your Approach
- 26Capstone: Ship a Project from Idea to Production
After this lesson, you will be able to make a clean Git checkpoint before a feature, review the AI's changes, commit a working result and recover from a mistake. Git gives you a history of your project; it is separate from an AI tool's chat history or undo button.
In Design and polish, you made focused UI changes. Now we will use Git to keep those changes organized as BookmarkBox grows.
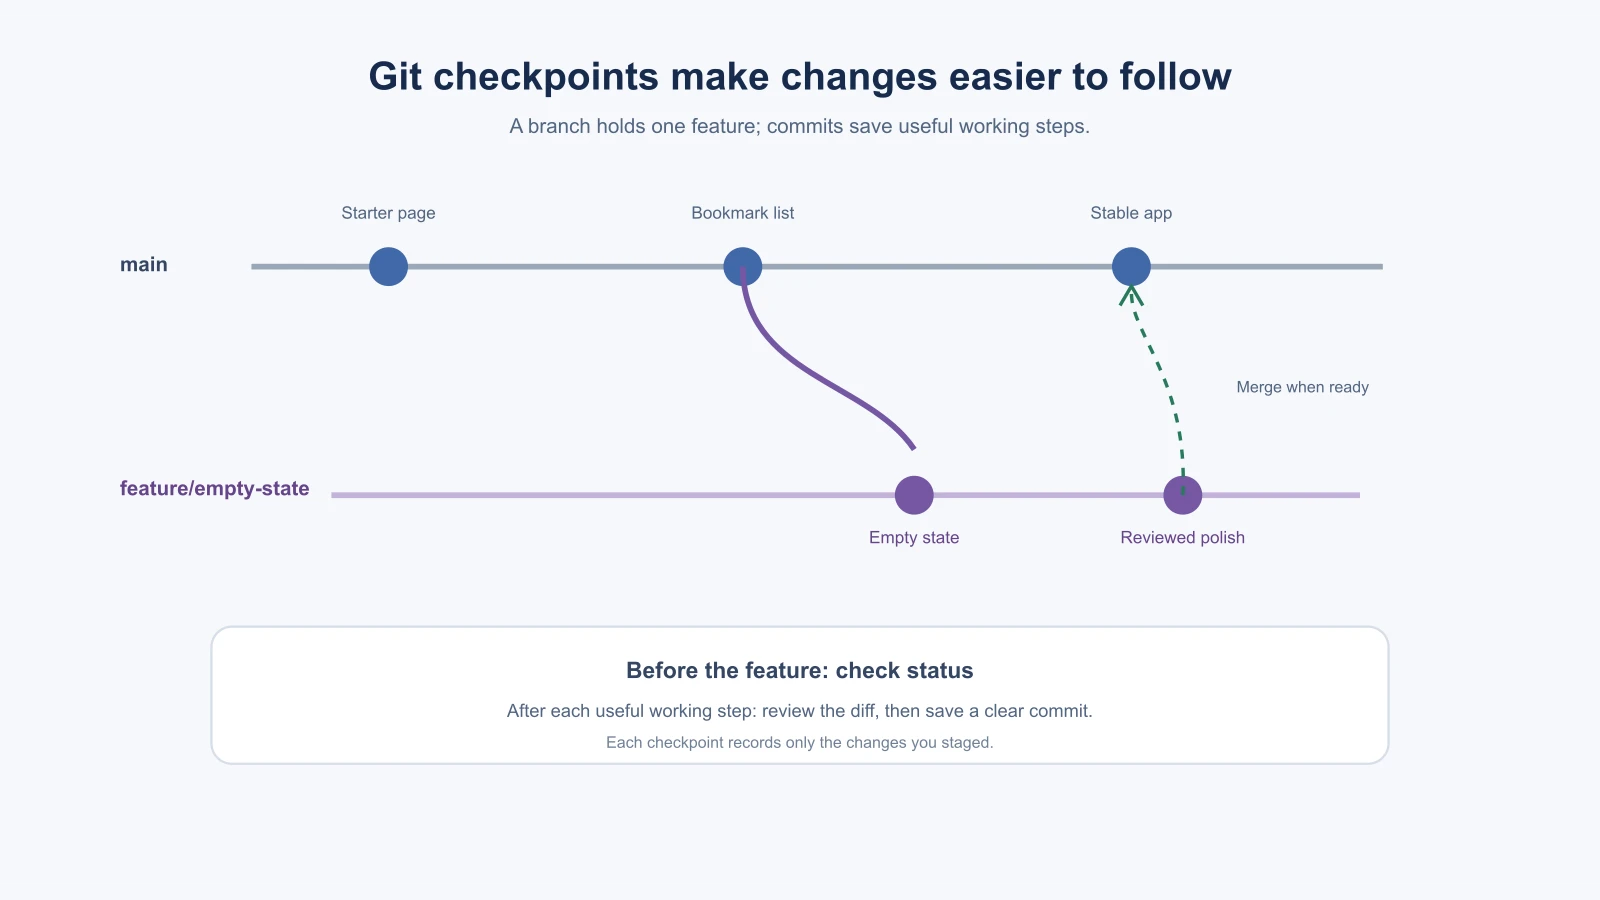
Git in plain language
Git is a version control system. It records snapshots of your project so you can see how it changed and return to a known version. A repository is the project folder and its Git history. A commit is a named snapshot of the changes you chose to save. A branch is a separate line of work where you can make a feature without immediately changing the main line.
Git runs on your computer. GitHub is a hosting service where you can store a copy of the repository and collaborate. A local commit is useful even without a GitHub account; pushing to a remote gives you an off-computer copy, but it is a separate step.
Start each feature from a known state
Before asking the AI to edit files, open the project terminal and check:
1git statusThis shows which files have changes that are not committed. If the working tree is clean, you know the feature starts from your last checkpoint. If it is not clean, inspect the changes. They may belong to work you want to keep. Do not discard or overwrite them just to get a “clean slate.”
For a feature that could affect several files, create a branch:
1git switch -c feature/bookmark-empty-stateThe branch gives the work a name and keeps it separate from your main branch until you choose to merge it. For a very small experiment, you may work on the current branch, but still check the status and review what changes.
Branches are enough for most solo features. Later, if you want separate working folders for parallel AI sessions, see Claude Code Git workflows and worktrees.
Review before you commit
After the AI makes one working change, inspect the result:
1git status
2git diff
git status lists changed and new files. git diff shows changes to tracked files. A diff marks lines that were added and removed. Read the file list first, then check whether each change belongs to the task. Ask the AI to explain any unfamiliar edit. The Git diff guide explains the different comparisons Git can show.
Choose which files belong in the checkpoint and stage them:
1git add app/page.tsx
2git diff --cached
The staging area is the set of changes prepared for the next commit. Review the staged diff because that is what the commit will contain. Avoid git add . until you understand every changed and untracked file; it may include unrelated work or local files you did not mean to save.
If the feature works and the staged diff is right, commit with a short message that says what changed:
1git commit -m "Add BookmarkBox empty state"Commit after a useful, working step rather than after every tiny keystroke. If a change is still broken, either fix it before committing or save it on a clearly named branch and do not mistake it for a working checkpoint.
Give the AI boundaries around Git
You can ask a coding tool to use Git, but tell it what it may do and inspect the commands it proposes. For example:
1Before editing, show me the output of `git status` and summarize any existing changes. Do not discard, restore, reset, commit, push or merge anything without asking me first.
2
3Make only the BookmarkBox empty-state change from the current task. After editing, show me the changed file list and the diff. Wait while I review it before staging or committing.
Once you are comfortable with the process, you can let the AI stage and commit a reviewed change. Keep asking it to show the files and staged diff first. Never approve a Git command you do not understand just because the AI says it is cleanup.
Undo with the right Git command
Different situations need different recovery steps:
- A committed change should be undone:
git revert <commit-id>makes a new commit that applies the opposite changes. This keeps existing history intact and is generally the safer choice for commits that have been shared. - An uncommitted edit should be discarded:
git restore <file>replaces a tracked file with its committed version. That can permanently remove uncommitted work in that file, so inspect and save anything you might need before running it. - A change is still in progress: ask the AI to fix it, or keep the work on its feature branch while you decide.
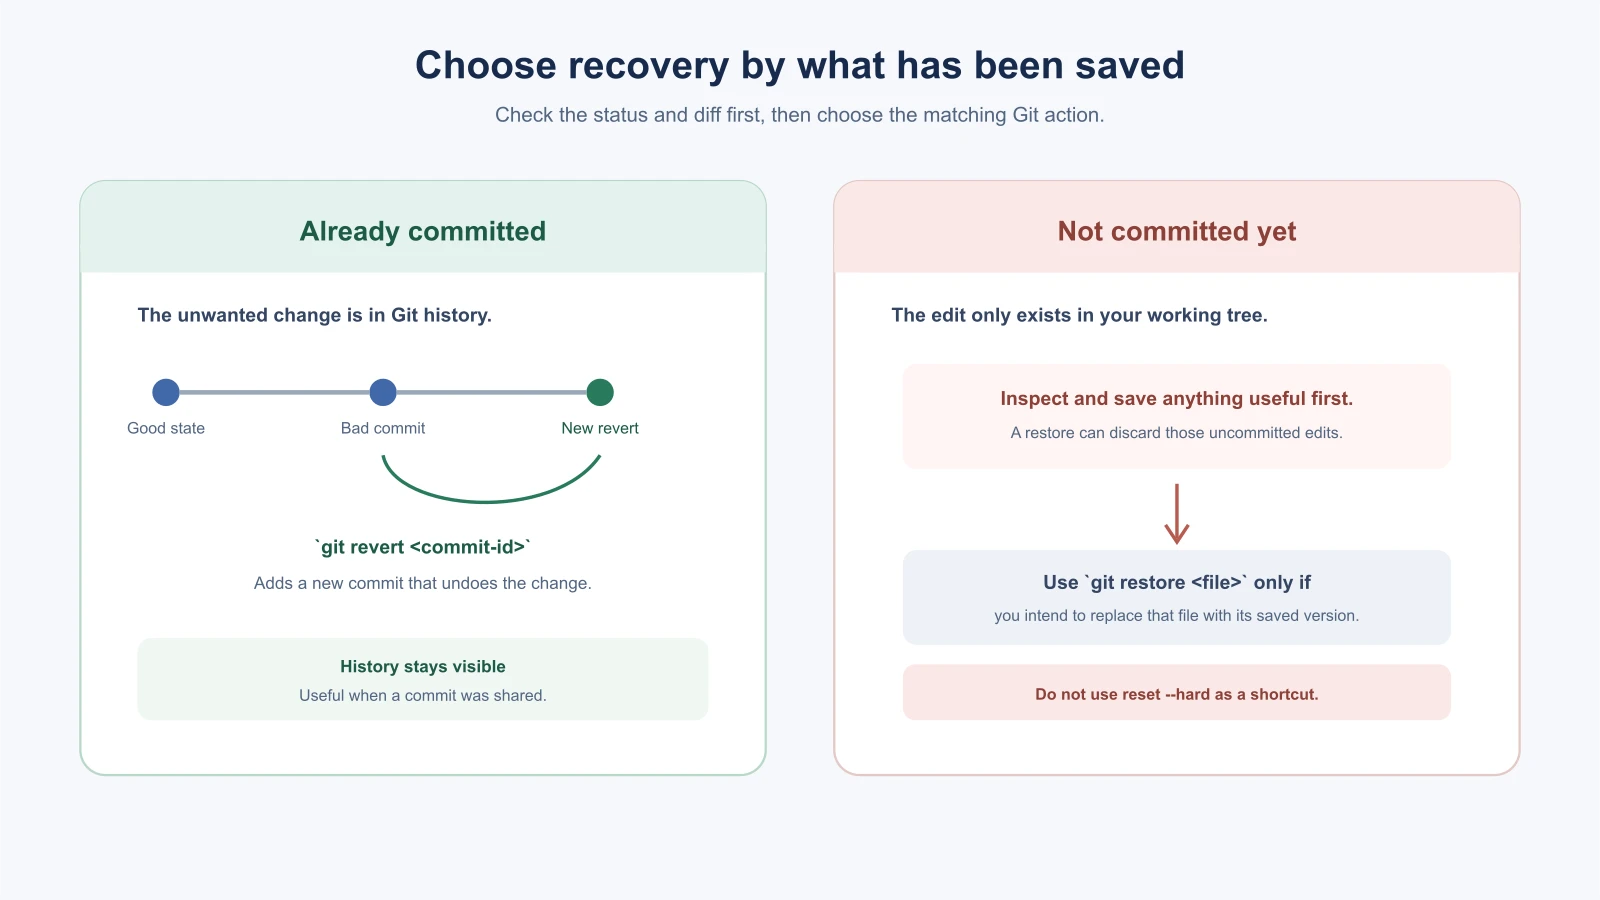
Avoid git reset --hard as a beginner recovery shortcut. It can remove uncommitted changes and move the branch history. The Git documentation distinguishes revert, which adds a commit reversing earlier work, from restore, which replaces file contents, and reset, which moves the branch tip. (Git command overview).
An AI tool's own undo or checkpoint feature can be helpful for its latest edits, but it may not cover changes from another program, another session or a command outside its editor. Git is the project's shared record. Keep commits small enough that the change you want to undo is easy to identify.
Push a copy to GitHub when ready
When you want an off-computer copy, use GitHub CLI (gh) or GitHub's website to connect a remote repository. If you are starting from your existing local project and do not already have a remote, the GitHub CLI can create a private repository and push your commits:
1gh repo create bookmarkbox --private --source=. --remote=origin --pushThis creates a repository on GitHub and sends your local commits there. Before running it, check that your project does not include passwords, API keys or private data, and confirm that you want this source code stored in your GitHub account. If the project already has a remote, inspect it instead of creating another one. The current GitHub CLI manual documents these options.
Write commit messages that help
A commit message is a note to your future self. It should say what the checkpoint contains, so you can find it later.
| Less helpful | More helpful |
|---|---|
update | Add empty state to BookmarkBox list |
fixes | Reject bookmarks with a blank title |
AI changes | Move bookmark validation into one function |
final version | Add sign-in and per-user bookmark access |
A short, specific line is enough. If a change needs more explanation, add a few more lines after a blank line. You can ask the AI to suggest a message, then edit it so it matches what you saw in the diff.
A small feature from start to finish
Here is the whole routine for one small feature, using the commands from this lesson. The names are examples.
1git status                                  # start from a known state
2git switch -c feature/bookmark-empty-state  # keep the work on its own branch
3# ask the AI for one change, then try it in the browser
4git status                                  # which files changed?
5git diff                                    # what changed in them?
6git add app/page.tsx                        # stage only the files for this task
7git diff --cached                           # check exactly what the commit will contain
8git commit -m "Add empty state to BookmarkBox list"
9git switch main                             # go back to your main branch
10git merge feature/bookmark-empty-state      # bring the finished work in
If the feature does not work, you stop before the merge, and your main branch is unchanged. If your main branch is named something else, such as master, use that name. Check the name with git branch.
Keep secrets out of your history
Before your first commit, check that the project's ignore file lists your private environment files, such as .env.local. An ignore file named .gitignore tells Git which files not to track. Starter projects usually include one, but check that it covers your private files, and look at git status to make sure no secret file is listed as a change to be committed.
If you commit a secret by mistake, deleting the file in a later commit does not remove it from history. Treat the secret as exposed: revoke or rotate it with the service that issued it, as the security lesson explains.
Mistakes beginners make
- Starting with unknown changes. Check
git statusand understand existing edits before work begins. - Committing everything at once. Stage the files for one task and inspect the staged diff.
- Using vague commit messages. Name the feature or fix so the history is useful later.
- Treating the AI undo button as the project history. Keep Git commits as durable checkpoints.
- Discarding uncommitted files to make the status clean. Save or commit work you want to keep first.
- Pushing without checking for secrets. Review files and ignore rules before sending the project to a remote.
Recap and try it yourself
Check the working tree before a task, use a branch for a larger feature, review the changed files and diff, stage only what belongs and commit a working step. Use revert for a committed change and be careful with commands that discard uncommitted work.
Try it: in a practice repository, run git status, make one small edit, inspect git diff, stage that file, review git diff --cached and commit it. Then run git revert on that practice commit and inspect the new history. In Debugging with AI, you will use a clear Git checkpoint while investigating a problem.