
DevOps course · lesson 6 of 24
- 1What Is DevOps?
- 2A Language and a Service to Operate
- 3Linux and the Terminal
- 4Bash Scripting for Ops
- 5Git and Collaboration
- 6Networking for DevOps
- 7Web Servers, Proxies and Load Balancers
- 8Docker for DevOps
- 9Docker Compose and Multi-Service Apps
- 10Cloud Providers: AWS, Azure and Google Cloud
- 11Serverless Functions and Platforms
- 12Terraform and Infrastructure as Code
- 13Ansible and Configuration Management
- 14Continuous Integration with GitHub Actions and GitLab CI
- 15Continuous Delivery and Deployment Strategies
- 16Secret Management
- 17Kubernetes Basics
- 18Kubernetes in Practice
- 19GitOps with Argo CD and Flux
- 20Service Mesh: Istio, Linkerd, Consul and Envoy
- 21Metrics and Alerting with Prometheus and Grafana
- 22Logs and Tracing with Loki, Elastic and OpenTelemetry
- 23Reliability, SLOs and Cloud Design Patterns
- 24Capstone: Pebble to Production
After this lesson, you will be able to place a networking problem on the right layer, explain IP addresses, ports and the difference between a service listening on 127.0.0.1 and 0.0.0.0, read and query DNS records, follow an HTTP request byte by byte, inspect a TLS certificate and its chain, log in to servers with SSH keys and reach a private service through an SSH tunnel, move files safely with SFTP, set up a host firewall with an allow list, and recognize the email protocols and DNS records that keep a domain's mail trustworthy.
Most "it doesn't work" reports in operations are networking questions in disguise. The service is fine, but the name points at the wrong address, the port is closed, the firewall drops the packets, the certificate expired, or the client is speaking HTTP to a port that expects HTTPS. Knowing how to test each of those, in order, is what turns an hour of guessing into five minutes of checking. Every example here uses Pebble, the fictional service you have built over the previous lessons and now run as a systemd service, as shown in Linux and the Terminal.
Two models of the network
Networking is easier to reason about in layers. Each layer does one job and relies on the one below it. Two models are in common use.
The OSI model has seven layers: physical, data link, network, transport, session, presentation and application. It is a teaching and troubleshooting vocabulary more than a description of real software. The TCP/IP model, which the internet actually runs on, has four: link, internet, transport and application. The mapping is straightforward:
| OSI layers | TCP/IP layer | What lives there | Pebble example |
|---|---|---|---|
| 7 Application, 6 Presentation, 5 Session | Application | HTTP, DNS, TLS, SSH, SMTP | POST /api/links, the DNS lookup for Pebble's name |
| 4 Transport | Transport | TCP, UDP, ports | TCP port 8080 |
| 3 Network | Internet | IP addresses, routing | 127.0.0.1, the server's public address |
| 2 Data link, 1 Physical | Link | Ethernet, Wi-Fi, MAC addresses, cables | The cloud provider's virtual network |
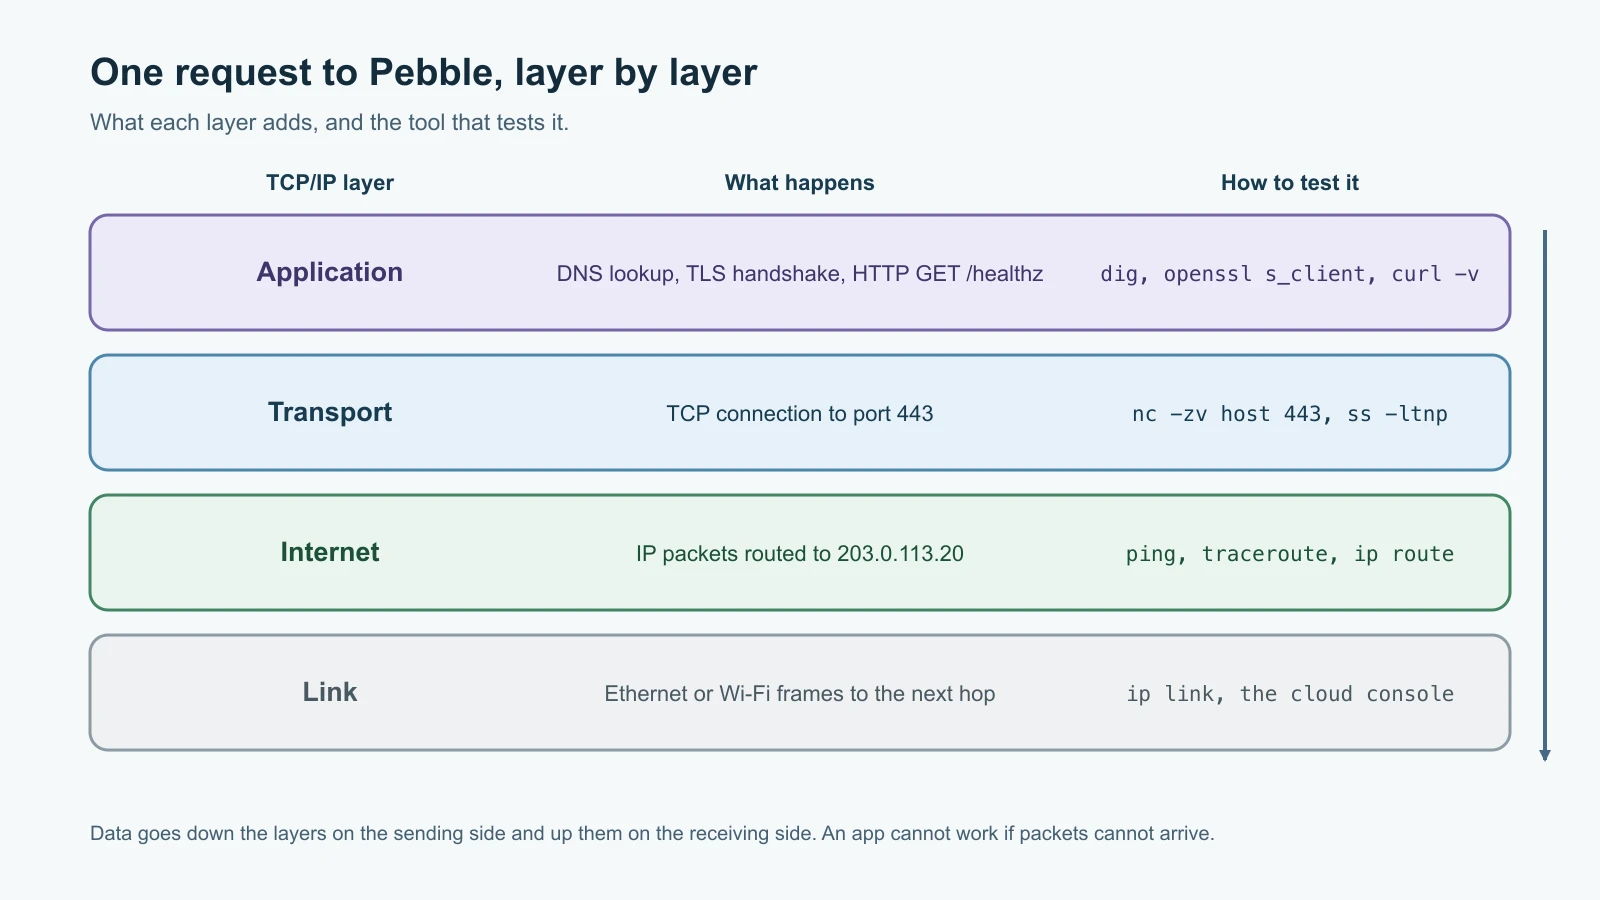
When people say "a layer 4 load balancer" they mean one that works with IP addresses and ports; "layer 7" means one that understands HTTP. The model also suggests a troubleshooting order. Once you know which address a name points to, confirm that packets can reach it and the port is open before you blame the application, because an application cannot work if packets cannot arrive. The Networking Fundamentals for Cyber Security lesson covers the layers, subnets and private address ranges in more depth.
IP addresses and ports
An IP address identifies a network interface. IPv4 addresses look like 104.20.23.154; IPv6 addresses look like 2606:4700:10::6814:179a. A few addresses are special. 127.0.0.1 (IPv4) and ::1 (IPv6) are loopback addresses: traffic to them never leaves the machine. Private ranges such as 10.0.0.0/8, 172.16.0.0/12 and 192.168.0.0/16 are used inside networks and are not reachable from the internet directly.
A port is a number from 1 to 65535 that picks one service on a machine. The address finds the machine; the port finds the program. Some ports are conventional: 22 for SSH, 53 for DNS, 80 for HTTP, 443 for HTTPS, 5432 for PostgreSQL. TCP gives a reliable, ordered connection and is used by HTTP, SSH and most databases. UDP sends individual packets without a connection, which suits DNS lookups, time synchronization and HTTP/3.
When a program listens, it chooses which address to listen on, and this decides who can reach it:
| Listen address | Who can connect |
|---|---|
127.0.0.1 | Only programs on the same machine, over IPv4 |
A specific address such as 10.0.1.15 | Anyone who can reach that address |
0.0.0.0 | Anyone who can reach any of the machine's IPv4 addresses |
Pebble listens on 127.0.0.1:8080 by default, so it is invisible from outside the server. That is deliberate: in the next lesson a reverse proxy will face the internet and pass requests to Pebble locally. It also explains one of the most common surprises in operations. Here is curl -v talking to Pebble on a laptop:
1curl -sv http://localhost:8080/api/links -H 'Content-Type: application/json' \
2 -d '{"url": "https://www.rfc-editor.org/rfc/rfc9110"}'1* Host localhost:8080 was resolved.
2* IPv6: ::1
3* IPv4: 127.0.0.1
4* Trying [::1]:8080...
5* connect to ::1 port 8080 from ::1 port 56211 failed: Connection refused
6* Trying 127.0.0.1:8080...
7* Connected to localhost (127.0.0.1) port 8080The name localhost resolves to both ::1 and 127.0.0.1. curl tries IPv6 first, gets "connection refused" because Pebble only listens on the IPv4 loopback address, and then succeeds over IPv4. Some clients do not retry, and the same setup then looks like an outage. When you see "connection refused", ask which address and port the client tried and which ones the server listens on. On Linux, sudo ss -ltnp shows the listening side; on any system, nc -zv 127.0.0.1 8080 tests a single TCP port.
DNS: names to addresses
The Domain Name System turns names such as example.com into addresses. When a program looks up a name, it asks a resolver, usually run by your network or a public service, which asks the authoritative name servers for that domain and caches the answer for a time set by the record's TTL (time to live, in seconds).
dig is the standard tool for querying DNS directly. These lookups were run on 13 November 2026; your answers may differ, because large sites change their records:
1dig +noall +answer example.com A
2dig +noall +answer example.com AAAA1example.com. 300 IN A 172.66.147.243
2example.com. 300 IN A 104.20.23.154
3example.com. 300 IN AAAA 2606:4700:10::ac42:93f3
4example.com. 300 IN AAAA 2606:4700:10::6814:179aEach line is a record: the name, the TTL (300 seconds), the class (IN for internet), the type and the value. Two addresses of each kind means clients can use either one. The record types you will use most:
| Type | Purpose | Example from a real lookup |
|---|---|---|
A | Name to IPv4 address | example.com to 104.20.23.154 |
AAAA | Name to IPv6 address | example.com to 2606:4700:10::6814:179a |
CNAME | Name is an alias for another name | www.python.org to dualstack.python.map.fastly.net. |
MX | Mail servers for the domain, with a priority | ubuntu.com mail goes to 10 mx.ubuntu.com. |
NS | The domain's authoritative name servers | ubuntu.com uses ns1.canonical.com. and others |
TXT | Free text, used for SPF, DMARC and domain verification | See the email section below |
PTR | Address back to a name, called reverse DNS | 1.1.1.1 to one.one.one.one. |
SOA | Administrative details for the zone, including default timers | Every zone has exactly one |
The CNAME example shows how content delivery networks work:
1dig +noall +answer www.python.org1www.python.org. 10327 IN CNAME dualstack.python.map.fastly.net.
2dualstack.python.map.fastly.net. 60 IN A 151.101.192.223
3dualstack.python.map.fastly.net. 60 IN A 151.101.128.223
4dualstack.python.map.fastly.net. 60 IN A 151.101.64.223
5dualstack.python.map.fastly.net. 60 IN A 151.101.0.223The site's name points to a name owned by its CDN provider, whose addresses have a short 60-second TTL so the provider can move traffic quickly. The alias itself has a long TTL because it rarely changes.
TTLs matter during changes. If Pebble's record has a TTL of one day and you move Pebble to a new server, some users will keep reaching the old address for up to a day. The usual practice is to lower the TTL a day or more before a planned move, make the change, then raise it again. "DNS propagation" is mostly caches expiring on this schedule. When a name does not resolve as expected, query a specific resolver to compare, for example dig example.com @1.1.1.1, and query the authoritative name servers directly to see the source of truth.
HTTP: the language of web services
HTTP is a request and response protocol. The client sends a method, a path, headers and sometimes a body; the server replies with a status code, headers and a body. Here is the rest of the curl -v exchange with Pebble from earlier, where > lines are sent and < lines are received:
1> POST /api/links HTTP/1.1
2> Host: localhost:8080
3> User-Agent: curl/8.7.1
4> Accept: */*
5> Content-Type: application/json
6> Content-Length: 49
7>
8< HTTP/1.0 201 Created
9< Server: BaseHTTP/0.6 Python/3.12.0
10< Date: Fri, 13 Nov 2026 09:32:37 GMT
11< Content-Type: application/json
12< Content-Length: 114
13<
14{"code": "sgj63gf", "short_url": "http://localhost:8080/sgj63gf", "url": "https://www.rfc-editor.org/rfc/rfc9110"}
The method says what the client wants: GET reads, POST creates, PUT replaces, PATCH updates part of something and DELETE removes. The Host header names the site, which lets one server host many sites on one address. The status code summarizes the result by its first digit:
| Range | Meaning | Codes you will see constantly |
|---|---|---|
| 2xx | Success | 200 OK, 201 Created, 204 No Content |
| 3xx | Go elsewhere | 301 Moved Permanently, 302 Found, 304 Not Modified |
| 4xx | The client made a mistake | 400 Bad Request, 401 Unauthorized, 403 Forbidden, 404 Not Found, 429 Too Many Requests |
| 5xx | The server failed | 500 Internal Server Error, 502 Bad Gateway, 503 Service Unavailable, 504 Gateway Timeout |
The 5xx codes are especially useful in operations. A 502 from a proxy usually means the application behind it is down or returned something invalid; a 504 means it answered too slowly; a 503 is what Pebble's /readyz returns when its database is unavailable. You will meet all three again behind Nginx in the next lesson.
Pebble's simple server speaks HTTP/1.0, the oldest version still in use. Modern sites use HTTP/2, which sends many requests over one connection, or HTTP/3, which runs over the QUIC protocol on UDP. curl against example.com shows the negotiation, as you will see next. The meaning of methods, headers and status codes is the same in every version; it is defined in RFC 9110, HTTP Semantics.
TLS and certificates
HTTPS is HTTP inside a TLS connection. TLS gives three guarantees: the traffic is encrypted, it cannot be altered without detection, and the client is talking to the server named in the certificate, not an impostor. Any plain-HTTP request crossing a network can be read by anyone on the path, including passwords and session cookies, so every public service should use HTTPS. The Secure Protocols and Wireless Security lesson explains the cryptography; here the focus is on operating it.
curl -v shows the TLS part of a connection:
1curl -sv -o /dev/null https://example.com/The lines worth reading, from a run on 13 November 2026:
1* Connected to example.com (104.20.23.154) port 443
2* ALPN: curl offers h2,http/1.1
3* SSL connection using TLSv1.3 / AEAD-CHACHA20-POLY1305-SHA256 / [blank] / UNDEF
4* ALPN: server accepted h2
5> GET / HTTP/2
6> Host: example.com
7< HTTP/2 200
The connection used TLS 1.3, the current version, and the two sides agreed through ALPN (application-layer protocol negotiation) to speak HTTP/2. The exact wording of these lines depends on how your copy of curl was built.
A certificate binds a name to a public key and is signed by a certificate authority (CA) that browsers and operating systems trust. openssl can fetch and decode one:
1echo | openssl s_client -connect example.com:443 -servername example.com 2>/dev/null \
2 | openssl x509 -noout -subject -issuer -dates -ext subjectAltName1subject=CN=example.com
2issuer=C=US, O=SSL Corporation, CN=Cloudflare TLS Issuing ECC CA 3
3notBefore=Sep 26 22:49:11 2026 GMT
4notAfter=Dec 25 22:56:35 2026 GMT
5X509v3 Subject Alternative Name:
6 DNS:example.com, DNS:*.example.comFour things to check on any certificate:
- The names. Browsers match the Subject Alternative Name list, not the older subject field. This certificate covers
example.comand any single-level subdomain through the wildcard*.example.com. A name missing from this list is the classic cause of "certificate is not valid for this name" errors. - The dates. This certificate is valid for about 90 days, from 26 September to 25 December 2026. Expired certificates cause outages that are entirely preventable.
- The issuer and chain. The server sends its certificate plus intermediate certificates that link it to a root the client already trusts. A server that forgets the intermediates works in some browsers and fails in other clients, which is confusing to debug.
openssl s_client -connect example.com:443 -servername example.com -showcertsprints the whole chain. -servername. This sends the name the client wants, a feature called SNI (Server Name Indication). Servers that host many sites use it to choose the right certificate. Leaving it out can return a different certificate and send you down the wrong path.
Certificate lifetimes are getting shorter across the industry. In April 2025, the CA/Browser Forum, which sets the rules public CAs follow, passed ballot SC-081, which reduces the maximum lifetime of public TLS certificates from 398 days to 47 days in steps between March 2026 and March 2029. The practical consequence is simple: renewing certificates by hand is no longer realistic. Automate issuance and renewal with the ACME protocol, which tools such as Certbot and the Caddy web server use with free CAs like Let's Encrypt, and monitor expiry dates anyway. You will set this up in the next lesson.
SSH: secure access to servers
SSH (Secure Shell) gives you an encrypted terminal on a remote machine, and it also copies files and forwards ports. Log in with a key pair rather than a password. The private key stays on your laptop; the public key goes on the server. Keys cannot be guessed the way passwords can, and you can revoke one without affecting others.
1ssh-keygen -t ed25519 -C "asha@laptop"
2ssh-keygen -lf ~/.ssh/id_ed25519.pub1256 SHA256:zbjEkMMM+qdWFmHqSXt/zhkQv18R5Iiu5T2qM6rBB8Q asha@laptop (ED25519)Ed25519 keys are short, fast and the recommended default. The second command prints the key's fingerprint, a short summary for comparing keys without reading the whole thing. Press Enter at the prompts to accept the default file name, and set a passphrase so a stolen laptop does not mean a stolen key. That fingerprint came from a throwaway key made for this lesson; yours will be different. Copy your public key to the server and connect:
1ssh-copy-id -i ~/.ssh/id_ed25519.pub asha@web-1.pebble.example
2ssh asha@web-1.pebble.example
The first time you connect to a server, SSH shows the server's fingerprint and asks whether to trust it. Check it against the value your cloud provider's console shows; then SSH remembers it in ~/.ssh/known_hosts and will warn loudly if it ever changes, which may mean someone is intercepting the connection, or simply that the server was rebuilt.
Once key login works, turn off password logins on the server. On Ubuntu, create /etc/ssh/sshd_config.d/01-hardening.conf with these lines, then check the configuration and reload SSH. The 01 prefix matters: for most settings, SSH uses the first value it reads, and files in that folder are read in name order, so this file wins over a cloud image's own file, which often sets PasswordAuthentication yes in a file such as 50-cloud-init.conf:
1PasswordAuthentication no
2PermitRootLogin no1sudo sshd -t
2sudo systemctl reload sshKeep your current session open while you test a new login in a second terminal. If you made a mistake, the open session lets you fix it instead of locking yourself out.
A ~/.ssh/config file on your laptop saves typing:
1Host pebble
2    HostName web-1.pebble.example
3    User asha
4    IdentityFile ~/.ssh/id_ed25519
Now ssh pebble is enough. SSH can also forward a port. Pebble listens only on the server's 127.0.0.1:8080, so you cannot reach it from your laptop directly, and should not. A tunnel solves that safely:
1ssh -L 8080:127.0.0.1:8080 pebbleWhile this session is open, curl http://localhost:8080/healthz on your laptop travels through the encrypted SSH connection and reaches Pebble on the server's loopback address. Nothing new is exposed to the internet. This is how operators reach admin pages, databases and dashboards that are deliberately private.
Moving files: FTP, SFTP, scp and rsync
FTP is an old file transfer protocol that sends usernames, passwords and files unencrypted. Do not use it across untrusted networks. SFTP is a different protocol that runs over SSH, so it uses the same keys and the same port 22, and it is encrypted. scp copies single files over SSH, and rsync copies only what changed, which makes it the right tool for large or repeated transfers:
1sftp pebble
2scp pebble.py pebble:/tmp/
3rsync -av --delete ./site/ pebble:/var/www/site/
Be careful with rsync --delete: it removes files at the destination that do not exist at the source, which is exactly what you want for a mirror and exactly what you do not want with the source and destination swapped. Run it once with --dry-run first.
Firewalls and allow lists
A firewall decides which traffic may pass. Two kinds matter in daily work: the host firewall on each server, and the cloud provider's network firewall, called a security group on AWS and firewall rules or network security groups on other clouds. Use both. Each protects you if the other is misconfigured.
The safest policy is default deny with an allow list: block all incoming traffic, then allow only what is needed. On Ubuntu, ufw (Uncomplicated Firewall) manages the host firewall. For Pebble's server, which today needs only SSH from outside:
1sudo ufw default deny incoming
2sudo ufw default allow outgoing
3sudo ufw allow OpenSSH
4sudo ufw enable
5sudo ufw status verbose
Allow SSH before enabling the firewall, or you will cut off your own session. When the reverse proxy arrives in the next lesson, you will add sudo ufw allow 80/tcp and sudo ufw allow 443/tcp. Pebble's port 8080 is never opened, because only the proxy on the same machine needs it. Where possible, narrow rules further: sudo ufw allow from 203.0.113.0/24 to any port 22 proto tcp allows SSH only from one office network.
An allow list, formerly often called a whitelist, names what is permitted and denies everything else. A deny list, or blacklist, names what is blocked and permits everything else. Allow lists are safer for administrative access because new, unknown sources are refused by default. Deny lists suit public services, where you block known bad sources while serving everyone else. Greylisting is a specific email technique: a mail server temporarily refuses mail from a sender it has not seen before, as described in RFC 6647. Legitimate mail servers retry later and get through; many spam tools never retry.
Email protocols you will meet
You may never run a mail server, but your services send email, and broken email configuration shows up as password-reset messages that land in spam or never arrive. Know the names:
| Protocol or record | What it does | Port |
|---|---|---|
| SMTP | Sends mail between servers and from apps to a mail service | 25 between servers, 587 for submission with authentication |
| IMAP | Lets a mail client read and organize mail kept on the server | 993 with TLS |
| POP3 | Downloads mail to one client, usually removing it from the server; POP3S is the TLS version | 995 for POP3S |
| SPF | A TXT record listing which servers may send mail for the domain | DNS |
| DKIM | Cryptographic signatures on outgoing mail, with the public key published in DNS; it grew out of Yahoo's earlier DomainKeys | DNS |
| DMARC | A TXT record telling receivers what to do when SPF or DKIM checks fail, and where to send reports | DNS |
You can read any domain's SPF and DMARC records with dig. These came from ubuntu.com on 13 November 2026:
1dig +short ubuntu.com TXT | grep 'v=spf1'
2dig +short _dmarc.ubuntu.com TXT1"v=spf1 include:_spf.canonical.com include:spf.forwardemail.net ~all"
2"v=DMARC1; p=none; pct=100; rua=mailto:dmarc-rua+ubuntu@admin.canonical.com"The SPF record says mail may come from servers listed in two other records, and ~all asks receivers to treat anything else as suspicious. The DMARC policy p=none means "report failures but do not block them", a normal first step before moving to quarantine or reject. If Pebble ever sends email through a provider, that provider will give you the SPF and DKIM records to add. The Social Engineering and Human Attacks lesson explains why these records matter for stopping spoofed mail.
A debugging order that works
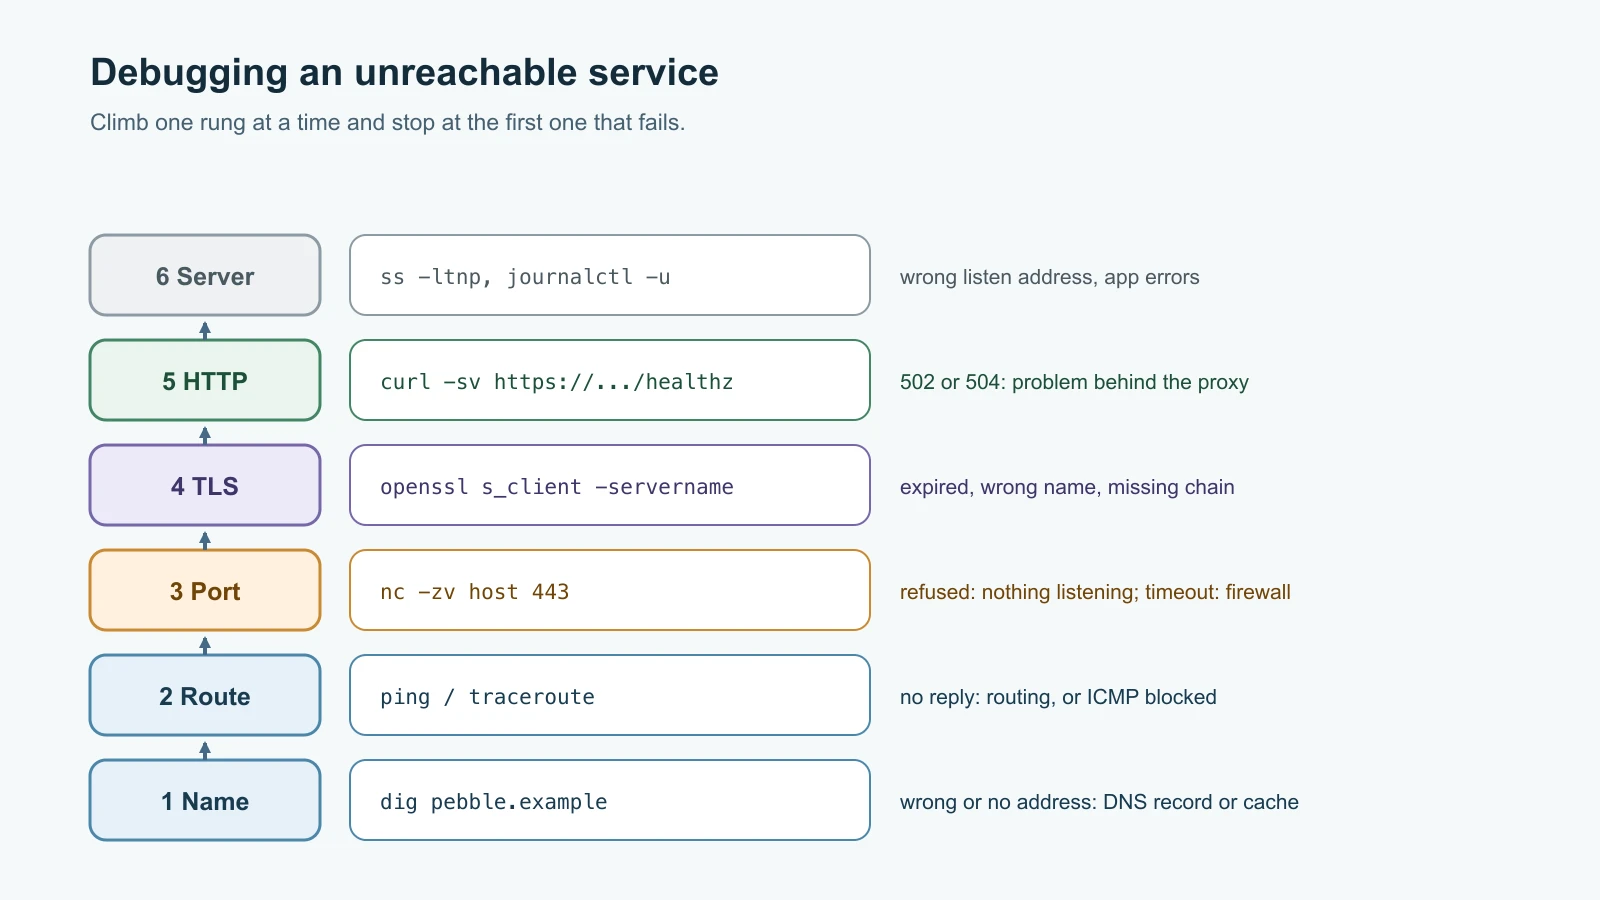
When someone reports that Pebble is unreachable, work up the layers from the client's side and stop at the first failure:
- Name:
dig pebble.examplereturns the address you expect? - Route:
pingthe address, ortracerouteto see where packets stop. Some networks block ping, so a failure here is a hint, not proof. - Port:
nc -zv <address> 443connects? "Connection refused" means nothing is listening there; a timeout usually means a firewall is dropping packets. - TLS:
openssl s_client -connect <address>:443 -servername pebble.exampleshows a valid, unexpired certificate with the right name? - HTTP:
curl -sv https://pebble.example/healthzreturns200? A502or504points behind the proxy. - Server side:
sudo ss -ltnpshows the expected listener, andjournalctlshows what the service said.
The Network Troubleshooting and Traffic Analysis Tools lesson goes further with packet capture using tcpdump and Wireshark, for when the answer is not in any log.
Mistakes beginners make
- Binding a service to
0.0.0.0"to make it work" and exposing it to the internet. - Testing with
localhostand not realizing it can mean IPv6::1or IPv4127.0.0.1. - Changing a DNS record with a long TTL just before a migration, then waiting a day for caches to expire.
- Checking a certificate's subject but not its Subject Alternative Names, or forgetting
-servernamewhen testing. - Installing only the server certificate and not the intermediate chain.
- Renewing certificates by hand and setting no expiry alert.
- Leaving SSH password login enabled on an internet-facing server.
- Enabling a firewall before allowing SSH, and locking yourself out.
- Opening application ports such as 8080 or 5432 to the world instead of using a proxy or an SSH tunnel.
- Using FTP for anything sensitive.
- Treating "ping fails" as proof that a host is down.
Recap and try it yourself
Layered models give you a vocabulary and a debugging order: name, route, port, TLS, HTTP, then the server. IP addresses find machines and ports find programs, and the address a service listens on decides who can reach it. DNS records map names to addresses, aliases, mail servers and policies, and TTLs control how long answers are cached. HTTP is a readable request and response protocol whose status codes tell you which side failed. TLS encrypts and authenticates traffic, certificates must match the name, chain to a trusted root and not expire, and their lifetimes are shrinking, so automation is required. SSH with keys is how you reach servers, and its tunnels reach private services safely. Firewalls should deny by default and allow only what is needed. SPF, DKIM and DMARC keep a domain's email trustworthy.
Try it yourself:
- Use
digto find theA,AAAA,MX,NSandTXTrecords for a domain you use. Find one record with a short TTL and one with a long TTL, and explain why each might be set that way. - Inspect the certificate of three HTTPS sites with
openssl s_clientandopenssl x509. Note each issuer and how many days each certificate is valid for in total. - On your Pebble server, set up key-only SSH login and the
ufwrules above, then reach Pebble from your laptop throughssh -L 8080:127.0.0.1:8080. - Stop Pebble and walk the debugging ladder against it from the server itself: which step fails first, and what exact message does it give?
Sources checked on 13 November 2026: IETF RFC 9110, HTTP Semantics, RFC 9114, HTTP/3, RFC 8446, TLS 1.3, RFC 1035, DNS, RFC 6647, Email Greylisting, RFC 7208, SPF and RFC 6376, DKIM; the CA/Browser Forum ballot SC-081v3; Let's Encrypt documentation; the OpenSSH manual pages; Ubuntu's firewall documentation; and the roadmap.sh DevOps roadmap. DNS, certificate and curl output is from real lookups on that date and will change over time. Pebble and its domain are fictional.