
DevOps course · lesson 8 of 24
- 1What Is DevOps?
- 2A Language and a Service to Operate
- 3Linux and the Terminal
- 4Bash Scripting for Ops
- 5Git and Collaboration
- 6Networking for DevOps
- 7Web Servers, Proxies and Load Balancers
- 8Docker for DevOps
- 9Docker Compose and Multi-Service Apps
- 10Cloud Providers: AWS, Azure and Google Cloud
- 11Serverless Functions and Platforms
- 12Terraform and Infrastructure as Code
- 13Ansible and Configuration Management
- 14Continuous Integration with GitHub Actions and GitLab CI
- 15Continuous Delivery and Deployment Strategies
- 16Secret Management
- 17Kubernetes Basics
- 18Kubernetes in Practice
- 19GitOps with Argo CD and Flux
- 20Service Mesh: Istio, Linkerd, Consul and Envoy
- 21Metrics and Alerting with Prometheus and Grafana
- 22Logs and Tracing with Loki, Elastic and OpenTelemetry
- 23Reliability, SLOs and Cloud Design Patterns
- 24Capstone: Pebble to Production
After this lesson, you will be able to explain what a container is and how it differs from a virtual machine, read and write a Dockerfile, use layers and the build cache to keep builds fast, write a multi-stage build that refuses to produce an image when tests fail, run a container as a non-root user with a health check and persistent storage, tag and push images to a registry, and scan them for known vulnerabilities. You will finish with Pebble packaged as an image that runs the same way on a laptop, a CI runner, a cloud server or a Kubernetes cluster.
So far Pebble runs as a systemd service that depends on whatever Python version the server happens to have installed. In Linux and the Terminal you installed Python with apt, and in Web Servers, Proxies and Load Balancers you ran two copies by hand. That works, but every server is a little different, and "it worked on my machine" is a real risk. A container image packages Pebble together with the exact Python version and files it needs, so what you test is exactly what you run.
Containers in one picture
A container is an ordinary Linux process that the kernel isolates from the rest of the machine. Two kernel features do most of the work. Namespaces give the process its own view of the system: its own process list, network interfaces, hostname and filesystem. Control groups (cgroups) limit how much CPU and memory it can use. To the process, it looks like it has a small machine to itself. To the host, it is just another process.
A virtual machine is different. A hypervisor emulates hardware, and each VM boots its own full operating system with its own kernel. That gives strong isolation, but each VM uses more memory and takes longer to start.
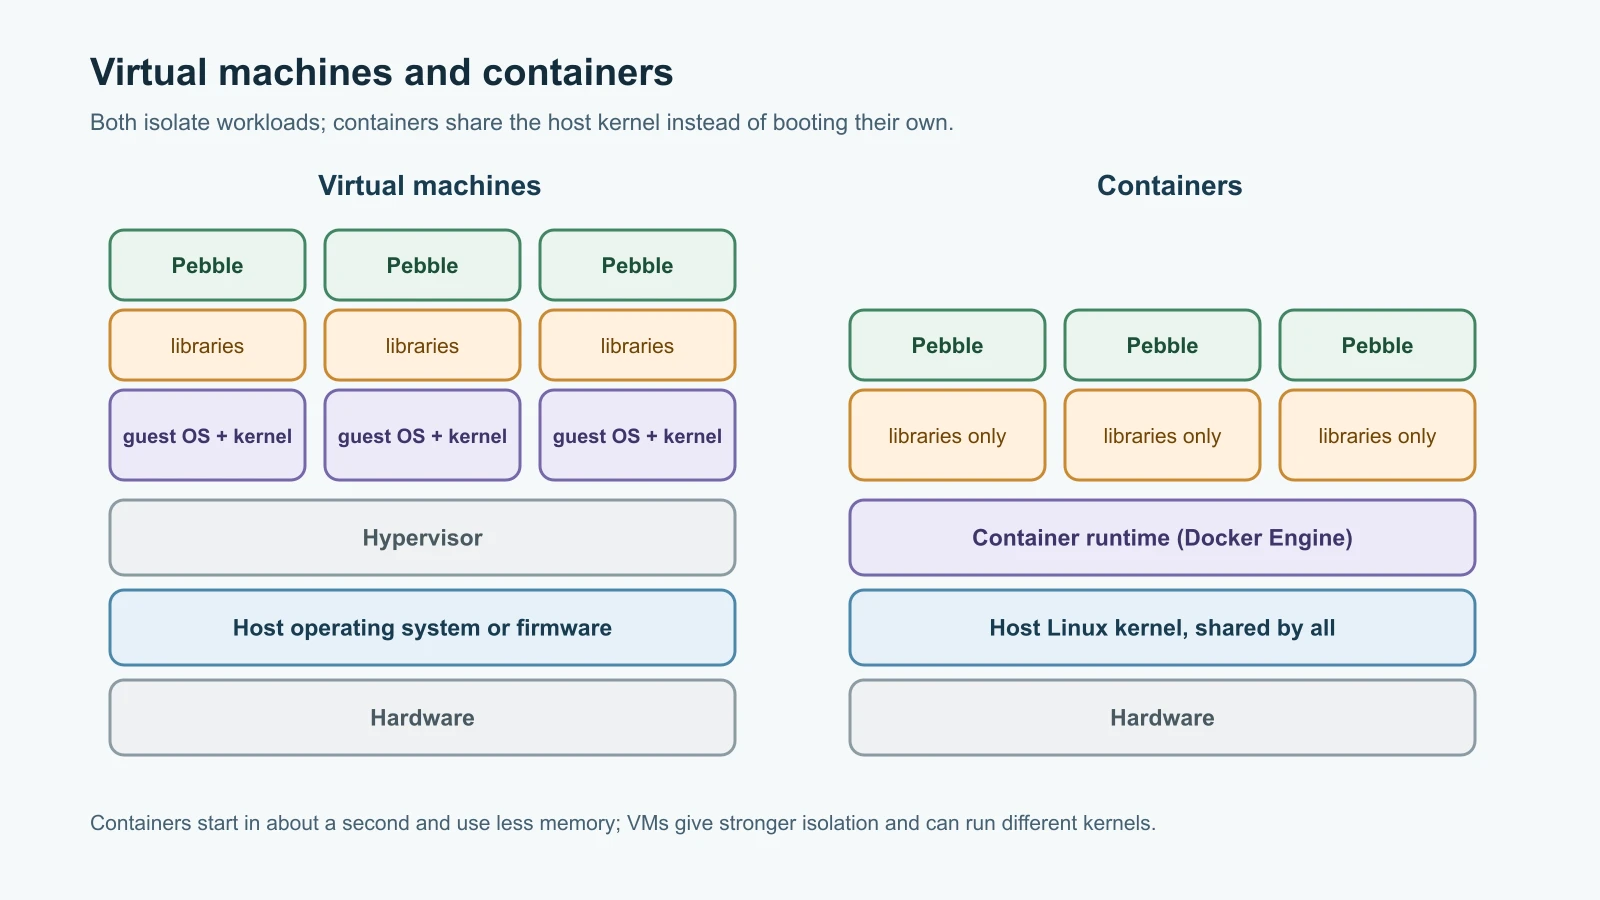
| Virtual machine | Container | |
|---|---|---|
| Isolation boundary | Hardware, through a hypervisor | Kernel features: namespaces and cgroups |
| Has its own kernel | Yes | No, shares the host kernel |
| Typical start time | Tens of seconds to minutes | Usually under a second |
| Typical size | Gigabytes | Megabytes to a few hundred megabytes |
| Good for | Different operating systems, strong tenant isolation | Packaging and running applications consistently |
The two are often combined: cloud servers are VMs, and they run containers. On macOS and Windows, Docker Desktop quietly runs a small Linux VM, because containers need a Linux kernel.
LXC (Linux Containers) is an older container technology that predates Docker. LXC, and the LXD and Incus managers built on it, run system containers: a whole Linux distribution with its own init system, used like a lightweight VM. Docker popularized application containers, which run one application and are rebuilt rather than patched. Both use the same kernel features.
Images, containers and registries
Three words come up constantly:
- An image is a read-only template: a filesystem plus metadata such as which command to run and which user to run it as. Images follow the Open Container Initiative (OCI) image format, so images built with Docker also run with Podman, containerd and Kubernetes.
- A container is a running instance of an image, with a thin writable layer on top. You can start many containers from one image.
- A registry stores and distributes images. Docker Hub is the default public registry; GitHub Container Registry (
ghcr.io), Amazon ECR, Google Artifact Registry, Azure Container Registry and GitLab's registry are common alternatives, and companies often run their own.
An image name has up to four parts: registry/namespace/repository:tag, for example ghcr.io/asha/pebble:0.2.0. Without a registry, Docker assumes Docker Hub, so python:3.15-slim really means docker.io/library/python:3.15-slim. A tag is a movable label: whoever publishes the image can point 3.15-slim at a newer build next week. A digest, such as python:3.15-slim@sha256:..., identifies one exact image and never changes.
Docker Hub limits how many images you can pull: at the time of writing, 100 pulls per 6 hours for unauthenticated users, counted per IP address, and 200 per 6 hours for free accounts. Busy CI systems hit these limits, which is one reason teams log in to registries in pipelines or mirror the images they depend on.
Install Docker
On Ubuntu, install Docker Engine from Docker's own package repository by following the official installation guide for Ubuntu; the version in Ubuntu's own archive is often older. Docker Engine 29.9.3, released on 3 November 2026, was the latest version when this lesson was written. After installing, add your user to the docker group so you can run commands without sudo, then log out and back in:
1sudo usermod -aG docker "$USER"
2docker version
3docker run --rm hello-world
Membership of the docker group is effectively root access to the machine, because anyone who can start containers can mount the host's filesystem into one. Give it only to people who already have administrator rights.
On macOS and Windows, use Docker Desktop. Its licence is free for personal use, education, open source projects and small businesses with fewer than 250 employees and less than 10 million US dollars in annual revenue; larger organizations need a paid subscription. Free alternatives such as Colima on macOS, Podman Desktop and Rancher Desktop provide a compatible environment.
Write Pebble's Dockerfile
A Dockerfile is a text file of instructions for building an image. Put these two files next to pebble.py and test_pebble.py in Pebble's repository. First the Dockerfile:
1# syntax=docker/dockerfile:1
2FROM python:3.15-slim AS base
3ENV PYTHONDONTWRITEBYTECODE=1 \
4 PYTHONUNBUFFERED=1
5WORKDIR /app
6
7FROM base AS test
8COPY pebble.py test_pebble.py ./
9RUN python -m unittest -q test_pebble
10
11FROM base AS runtime
12RUN groupadd --system --gid 10001 pebble \
13 && useradd --system --uid 10001 --gid pebble --no-create-home --shell /usr/sbin/nologin pebble \
14 && mkdir /data \
15 && chown pebble:pebble /data
16COPY /app/pebble.py ./
17ENV PEBBLE_HOST=0.0.0.0 \
18 PEBBLE_PORT=8080 \
19 PEBBLE_DB_PATH=/data/pebble.db
20USER pebble
21EXPOSE 8080
22VOLUME ["/data"]
23HEALTHCHECK \
24 CMD ["python", "-c", "import urllib.request; urllib.request.urlopen('http://127.0.0.1:8080/readyz', timeout=2)"]
25CMD ["python", "pebble.py"]Then a .dockerignore file, which keeps files out of the build context, the set of files Docker sends to the builder:
1.git
2.gitignore
3*.db
4backups/
5__pycache__/
6*.env
7*.sh
8Dockerfile
9.dockerignore
Without .dockerignore, the local database, Git history and any .env file with secrets could end up inside the build, and possibly inside the image. It also makes builds faster, because less is sent to the builder.
Here is what each part of the Dockerfile does.
Three stages. Each FROM starts a new stage. base sets up what both later stages share: the official Python 3.15 image in its slim variant, which leaves out compilers and documentation, two settings that stop Python writing bytecode files and buffering output, and the working folder /app. The python:3.15-slim tag is currently built on Debian 13 and published for amd64 and arm64, among other architectures, so the same Dockerfile works on Intel and Apple silicon machines.
The test stage. test copies Pebble and its tests and runs them. If any test fails, RUN fails, and the build stops.
The runtime stage. runtime starts again from base, so it contains no test files. Notice COPY --from=test /app/pebble.py ./. Copying from the test stage, rather than from the build context, is what makes the tests mandatory. Docker's builder, BuildKit, only builds the stages that the final image actually depends on. If the runtime stage copied pebble.py straight from the context, BuildKit would skip the test stage entirely and happily build an image without running a single test. This is one of the most common multi-stage mistakes, and it fails silently.
A non-root user. The RUN line creates a pebble user and group with a fixed ID, 10001, and a /data folder they own. USER pebble makes everything after it, including the running container, use that account. By default, processes in containers run as root, and if an attacker escapes the application, root inside the container is much closer to root on the host. A fixed numeric ID also makes file ownership on volumes predictable.
Configuration. The ENV line sets Pebble's defaults the twelve-factor way. Note PEBBLE_HOST=0.0.0.0. On a server, Pebble listens on 127.0.0.1 so nothing outside the machine can reach it. Inside a container, 127.0.0.1 is the container's own loopback interface, so a Pebble listening there could not be reached even from the host. The container's network namespace is its boundary, and you decide what to expose when you run it.
Port and volume. EXPOSE 8080 documents which port the application uses; it does not open or publish anything by itself. VOLUME ["/data"] marks the folder where Pebble keeps its database as persistent storage, which you will use when you run it.
Health check. HEALTHCHECK tells Docker how to test the container. The slim image has no curl, so the check uses Python's standard library to request /readyz: a 200 response exits with code 0, meaning healthy, and an error response or no response raises an exception, which exits with code 1, meaning unhealthy. Docker runs it every 15 seconds, allows 3 seconds per check, ignores failures during a 5-second start period, and marks the container unhealthy after 3 failures in a row. Plain Docker only reports the status; Docker Compose and orchestrators act on it.
The command. CMD ["python", "pebble.py"] uses the exec form, a JSON list. With the shell form, CMD python pebble.py, Docker would start /bin/sh -c as the main process, the shell would not pass on SIGTERM, and docker stop would wait 10 seconds and then kill Pebble abruptly. With the exec form, Python is process 1, receives SIGTERM directly, and Pebble's own handler from A Language and a Service to Operate shuts it down cleanly. A process 1 that has no signal handler ignores SIGTERM entirely, which is another reason Pebble installs its own.
Layers and the build cache
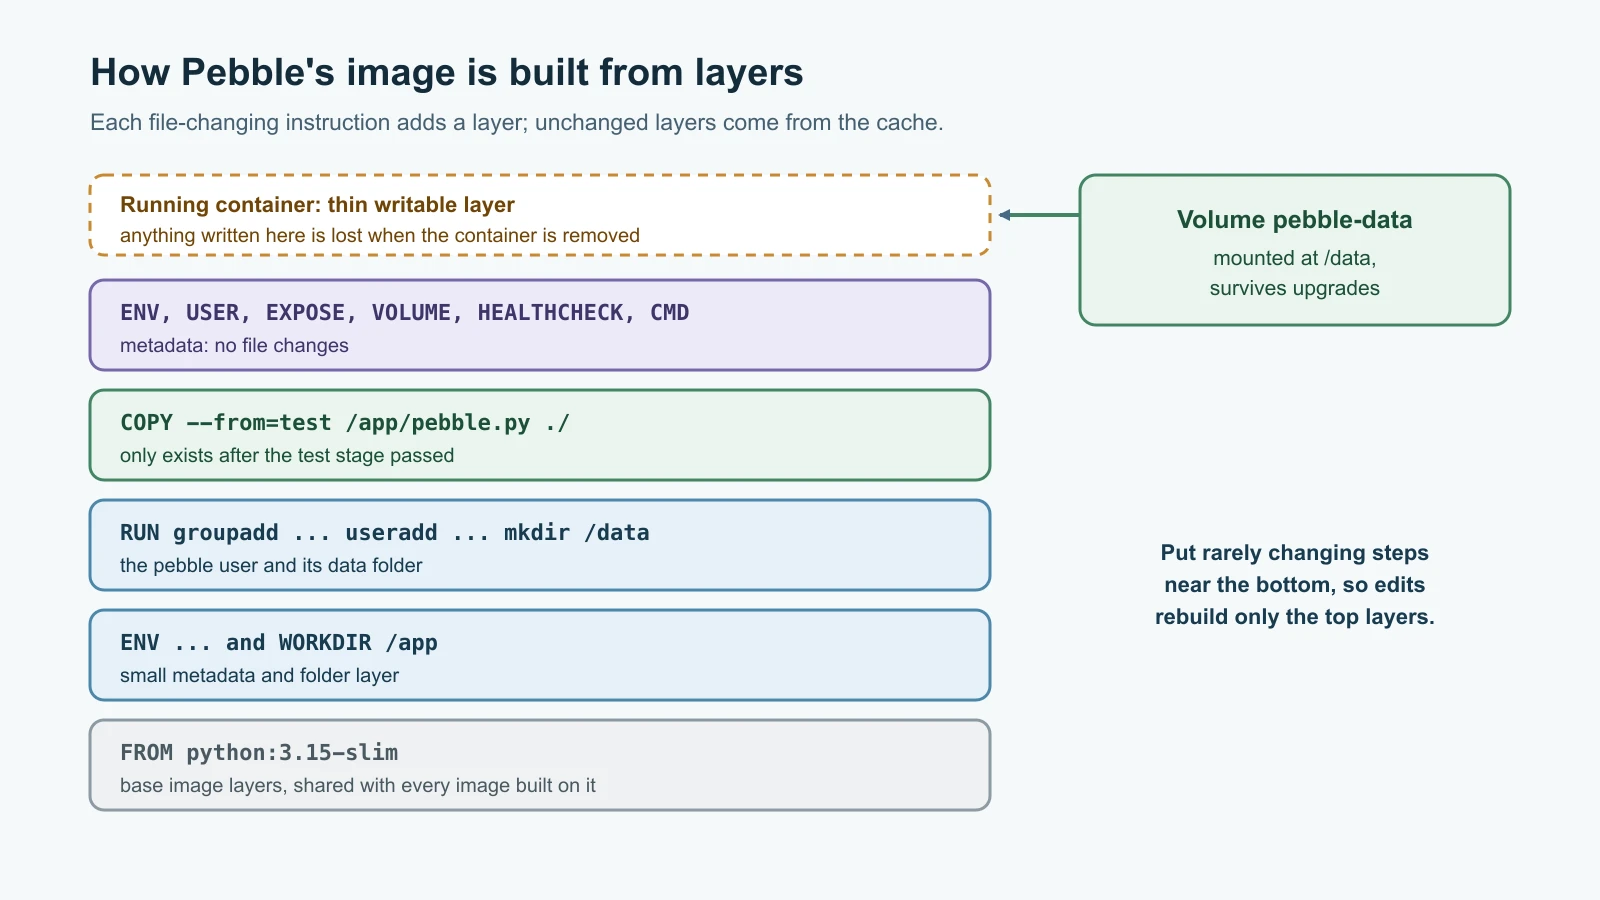
Each instruction that changes files, such as RUN and COPY, creates a layer: a set of filesystem changes stacked on the layers below. Layers are shared between images, so ten images built on python:3.15-slim store its layers only once.
When you rebuild, Docker reuses a cached layer if the instruction and its inputs have not changed. Once one layer changes, every layer after it must be rebuilt. That gives the most important rule for fast builds: put the things that change least at the top. Pebble has no third-party packages, but most applications do. For them, copy the dependency list and install it before copying the source code:
1COPY requirements.txt ./
2RUN pip install --no-cache-dir -r requirements.txt
3COPY . .
Now editing a source file only rebuilds the last layer, while the slow dependency installation comes from the cache. Copying all the source code first would reinstall every dependency after each one-line change.
Layers also explain a common security mistake. Deleting a file in a later layer hides it, but the earlier layer still contains it. If a secret is copied in one instruction and removed in the next, anyone who pulls the image can still extract it. Never copy secrets into an image. BuildKit's secret mounts, covered in Secret Management, provide credentials to a single build step without storing them in any layer.
Build and run Pebble
Build the image and give it a name and a version tag:
1docker build -t pebble:0.2.0 .BuildKit shows each step as it runs. In the output, look for the test stage's RUN python -m unittest -q test_pebble step: it runs the nine tests before the runtime stage copies pebble.py. Run the same command again without changing anything and every step reports CACHED, so the second build takes a second or two. Then look at the result:
1docker images pebble
2docker history pebble:0.2.0
docker images shows the image and its size; docker history lists its layers, newest first, with the instruction that created each one. You will see the layers of python:3.15-slim at the bottom and your few small layers on top.
Run it in the background:
1docker volume create pebble-data
2docker run -d --name pebble \
3  -p 127.0.0.1:8080:8080 \
4  -v pebble-data:/data \
5  --restart unless-stopped \
6 pebble:0.2.0-druns the container in the background and prints its ID.-p 127.0.0.1:8080:8080publishes container port 8080 on the host's port 8080, but only on the host's loopback address. Writing just-p 8080:8080would publish it on every interface, open to the network. Docker also adds its own firewall rules for published ports, which can bypassufwrules on the host, so binding to127.0.0.1and letting Nginx face the internet, as in the previous lesson, is the safe pattern.-v pebble-data:/datamounts a named volume at/data. Volumes live outside the container's writable layer, so the database survives when the container is removed and replaced by a new version. Without the volume, every link would vanish on each upgrade.--restart unless-stoppedrestarts the container if it crashes or the host reboots, much likeRestart=on-failurein systemd.
Check it:
1docker ps
2curl -s http://localhost:8080/healthz
3docker logs pebble
After the start period, the STATUS column of docker ps changes from Up 10 seconds (health: starting) to Up 20 seconds (healthy). curl returns {"status": "ok"}, and docker logs shows Pebble's JSON lines, including the startup line with "host": "0.0.0.0" and "db_path": "/data/pebble.db". Docker captures standard output, just as systemd's journal did: the twelve-factor idea of logs as event streams pays off again.
A few more commands you will use daily:
1docker exec -it pebble python -c "import os; print(os.getuid())"
2docker inspect --format '{{.State.Health.Status}}' pebble
3docker stop pebble
4docker logs --tail 3 pebble
5docker rm pebble
The first runs a command inside the running container and prints 10001, proving Pebble is not root. inspect reads any detail of a container; here, its health status. docker stop sends SIGTERM and waits up to 10 seconds; the last log lines show Pebble's shutting down and pebble stopped messages, proof that the exec-form CMD delivers the signal. docker rm deletes the stopped container, but not the pebble-data volume. Run the same docker run command again and your links are still there.
Multi-stage builds for compiled languages
For Python, the multi-stage build keeps tests out of the final image. For compiled languages, it keeps the entire compiler out. Here is the Go health endpoint from A Language and a Service to Operate, packaged in two stages:
1# syntax=docker/dockerfile:1
2FROM golang:1.27 AS build
3WORKDIR /src
4COPY healthz.go .
5RUN CGO_ENABLED=0 go build -o /healthz healthz.go
6
7FROM gcr.io/distroless/static-debian13:nonroot
8COPY /healthz /healthz
9EXPOSE 8080
10ENTRYPOINT ["/healthz"]The build stage uses the full Go image, which contains the compiler and tools. CGO_ENABLED=0 produces a fully static binary with no dependency on system C libraries. The final stage uses a distroless image: no shell, no package manager, essentially just the binary, some certificates and time-zone data, running as a non-root user. The resulting image is a tiny fraction of the build image's size, and with no shell inside, an attacker who breaks in has very little to work with. The trade-off is debugging: you cannot docker exec into a shell that does not exist. Distroless publishes debug variants with a minimal shell for that.
Tag, push and pull
To share an image, tag it with a registry name and push it. With GitHub Container Registry, log in with a personal access token that has the write:packages scope, passed on standard input so it does not appear in your shell history:
1echo "$GHCR_TOKEN" | docker login ghcr.io -u <your-account> --password-stdin
2docker tag pebble:0.2.0 ghcr.io/<your-account>/pebble:0.2.0
3docker push ghcr.io/<your-account>/pebble:0.2.0
Any machine with access can now run docker pull ghcr.io/<your-account>/pebble:0.2.0 and get the identical image. Treat tags carefully:
- Use a unique, immutable tag for every build, such as the version number or the Git commit hash. Deploy that exact tag.
- Avoid deploying
latest. It only means "the last image pushed without a tag", so two servers pullinglatestan hour apart can run different code, and rolling back becomes guesswork. - For base images in production Dockerfiles, consider pinning a digest, and let a tool such as Dependabot or Renovate propose updates. A pinned digest never changes underneath you, but it also never picks up security fixes unless someone updates it.
Scan images for known vulnerabilities
Every package in an image may have known vulnerabilities, published as CVEs. Image scanners compare an image's packages against vulnerability databases. Two widely used ones:
1docker scout cves pebble:0.2.0
2trivy image pebble:0.2.0
Docker Scout is built into recent Docker installations. Trivy, from Aqua Security, is open source and installed separately. Both list vulnerabilities by severity, the affected package and, when one exists, the version that fixes it. Most findings in a fresh image come from the base image's operating system packages, and the usual fix is to rebuild on an updated base image with docker build --pull, which fetches the newest version of the tag. A slim or distroless base has fewer packages and therefore fewer findings. Scanning once is not enough, because new vulnerabilities are published for old packages every day; in Continuous Integration you will scan on every build. The prioritization ideas from vulnerability management apply here too: a critical finding in a package your application never loads matters less than a moderate one in the code that handles every request.
Mistakes beginners make
- Running containers as root because the base image does by default.
- Leaving the application listening on
127.0.0.1inside the container, then wondering why the published port does not answer. - Publishing ports on all interfaces with
-p 8080:8080and assuming the host firewall still protects them. - Using the shell form of
CMD, sodocker stopwaits and then kills the process. - Writing a multi-stage build where the final stage does not depend on the test stage, so tests silently never run.
- Copying the source before installing dependencies, so every edit reinstalls everything.
- Building without
.dockerignoreand shipping the Git history, databases or secrets inside the image. - Deleting a secret in a later layer and believing it is gone.
- Storing data in the container's writable layer instead of a volume.
- Deploying
latestinstead of a unique version tag. - Scanning an image once and never rebuilding it.
Recap and try it yourself
Containers are isolated Linux processes that share the host's kernel, which makes them lighter and faster than virtual machines. Images are stacks of read-only layers in the OCI format, containers add a writable layer, and registries distribute images by name, tag and digest. Pebble's Dockerfile uses a shared base stage, a test stage that must pass, and a small runtime stage that depends on it, with a non-root user, environment-based configuration, a health check, a volume for data and an exec-form command that receives signals. Order instructions for the build cache, keep secrets out of every layer, publish ports only on 127.0.0.1 behind a proxy, deploy unique tags, and scan and rebuild images regularly.
Try it yourself:
- Build the image, then change one assertion in
test_pebble.pyso a test fails and build again. Confirm the build stops at the test stage. Then try changing the runtime stage toCOPY pebble.py ./and rebuild: do the tests still run? - Run Pebble with the volume, create three links, then
docker rm -f pebbleand start a new container from the same image and volume. Are the links still there? Repeat without-vand compare. - Change
CMDto the shell form, rebuild, and timedocker stop pebble. Compare with the exec form. - Scan the image with Docker Scout or Trivy, then rebuild it from
python:3.14-slimand scan again. Note what changes in the findings.
Sources checked on 13 November 2026: Docker documentation for Engine release notes, installing Docker Engine on Ubuntu, building best practices, the Dockerfile reference, multi-stage builds, Docker Hub usage and limits, Docker Desktop licensing, packet filtering and firewalls and Docker Scout; the python and golang official images; Google's distroless images; the OCI image specification; GitHub Container Registry; Trivy; Linux Containers (LXC); and the roadmap.sh DevOps roadmap. Pebble is fictional.