
DevOps course · lesson 10 of 24
- 1What Is DevOps?
- 2A Language and a Service to Operate
- 3Linux and the Terminal
- 4Bash Scripting for Ops
- 5Git and Collaboration
- 6Networking for DevOps
- 7Web Servers, Proxies and Load Balancers
- 8Docker for DevOps
- 9Docker Compose and Multi-Service Apps
- 10Cloud Providers: AWS, Azure and Google Cloud
- 11Serverless Functions and Platforms
- 12Terraform and Infrastructure as Code
- 13Ansible and Configuration Management
- 14Continuous Integration with GitHub Actions and GitLab CI
- 15Continuous Delivery and Deployment Strategies
- 16Secret Management
- 17Kubernetes Basics
- 18Kubernetes in Practice
- 19GitOps with Argo CD and Flux
- 20Service Mesh: Istio, Linkerd, Consul and Envoy
- 21Metrics and Alerting with Prometheus and Grafana
- 22Logs and Tracing with Loki, Elastic and OpenTelemetry
- 23Reliability, SLOs and Cloud Design Patterns
- 24Capstone: Pebble to Production
After this lesson, you will be able to explain regions and availability zones, set up cloud access the safe way with temporary credentials and multi-factor authentication, map the core building blocks of AWS, Azure and Google Cloud to each other, read the main drivers of a cloud bill and set a budget alert, and deploy Pebble to a cloud virtual machine from the command line with cloud-init, then delete everything so it stops costing money. You will also know where smaller providers such as Hetzner, DigitalOcean and Alibaba Cloud fit.
Until now Pebble has run on your laptop and on a server you were given. In Docker for DevOps you packaged it as an image and pushed it to a registry, which means any machine with Docker can run it. A cloud provider rents you those machines, and much more, on demand: you ask through a web console, a command-line tool or an API, and seconds later a server, a database or a load balancer exists and starts billing by the second or hour. That speed is the cloud's great strength and its main risk. It is as easy to create an expensive, insecure resource as a cheap, safe one.
What a cloud provider gives you
The three largest providers, Amazon Web Services (AWS), Microsoft Azure and Google Cloud, each offer hundreds of services. Almost all of them build on a few categories you already understand from earlier lessons:
| Building block | What it is | AWS | Azure | Google Cloud |
|---|---|---|---|---|
| Virtual machines | Servers you manage, like Pebble's Ubuntu host | EC2 | Virtual Machines | Compute Engine |
| Containers | Run images without managing servers, or managed Kubernetes | ECS, Fargate, EKS | Container Apps, AKS | Cloud Run, GKE |
| Object storage | Files at any scale, reached over HTTP | S3 | Blob Storage | Cloud Storage |
| Block storage | Disks attached to a VM | EBS | Managed Disks | Persistent Disk |
| Managed databases | PostgreSQL and others, run and backed up for you | RDS, Aurora | Azure Database for PostgreSQL | Cloud SQL, AlloyDB |
| Managed cache | Redis-compatible in-memory stores | ElastiCache | Azure Cache for Redis, Azure Managed Redis | Memorystore |
| Private networks | Your own isolated network with subnets and routes | VPC | Virtual Network (VNet) | VPC |
| Firewalls | Rules about which traffic reaches a resource | Security groups, network ACLs | Network security groups | VPC firewall rules |
| Load balancers | Managed versions of what Nginx did for Pebble | Elastic Load Balancing | Azure Load Balancer, Application Gateway | Cloud Load Balancing |
| DNS | Managed name servers and records | Route 53 | Azure DNS | Cloud DNS |
| Identity and access | Who and what may do which actions | IAM, IAM Identity Center | Microsoft Entra ID, Azure RBAC | Cloud IAM |
| Monitoring and logs | Metrics, logs, alerts | CloudWatch | Azure Monitor | Cloud Monitoring, Cloud Logging |
| Secrets | Store and rotate credentials | Secrets Manager | Key Vault | Secret Manager |
Product names change and new services appear constantly, so treat the table as a map for translating between providers, not a catalogue. A useful habit when you meet an unfamiliar service: ask which of these building blocks it really is, and what the provider manages for you that you would otherwise manage yourself.
Managed services are where the cloud saves the most work. Running PostgreSQL yourself, as Pebble does in Docker Compose, means you handle updates, backups, replication and failover. A managed database does those for you in exchange for a higher price and less control. The cloud security side of this trade-off, the shared responsibility model, is covered in Cloud Security Basics: the provider secures the physical infrastructure and the services it runs, and you remain responsible for your data, your identities and how you configure everything.
Regions and availability zones
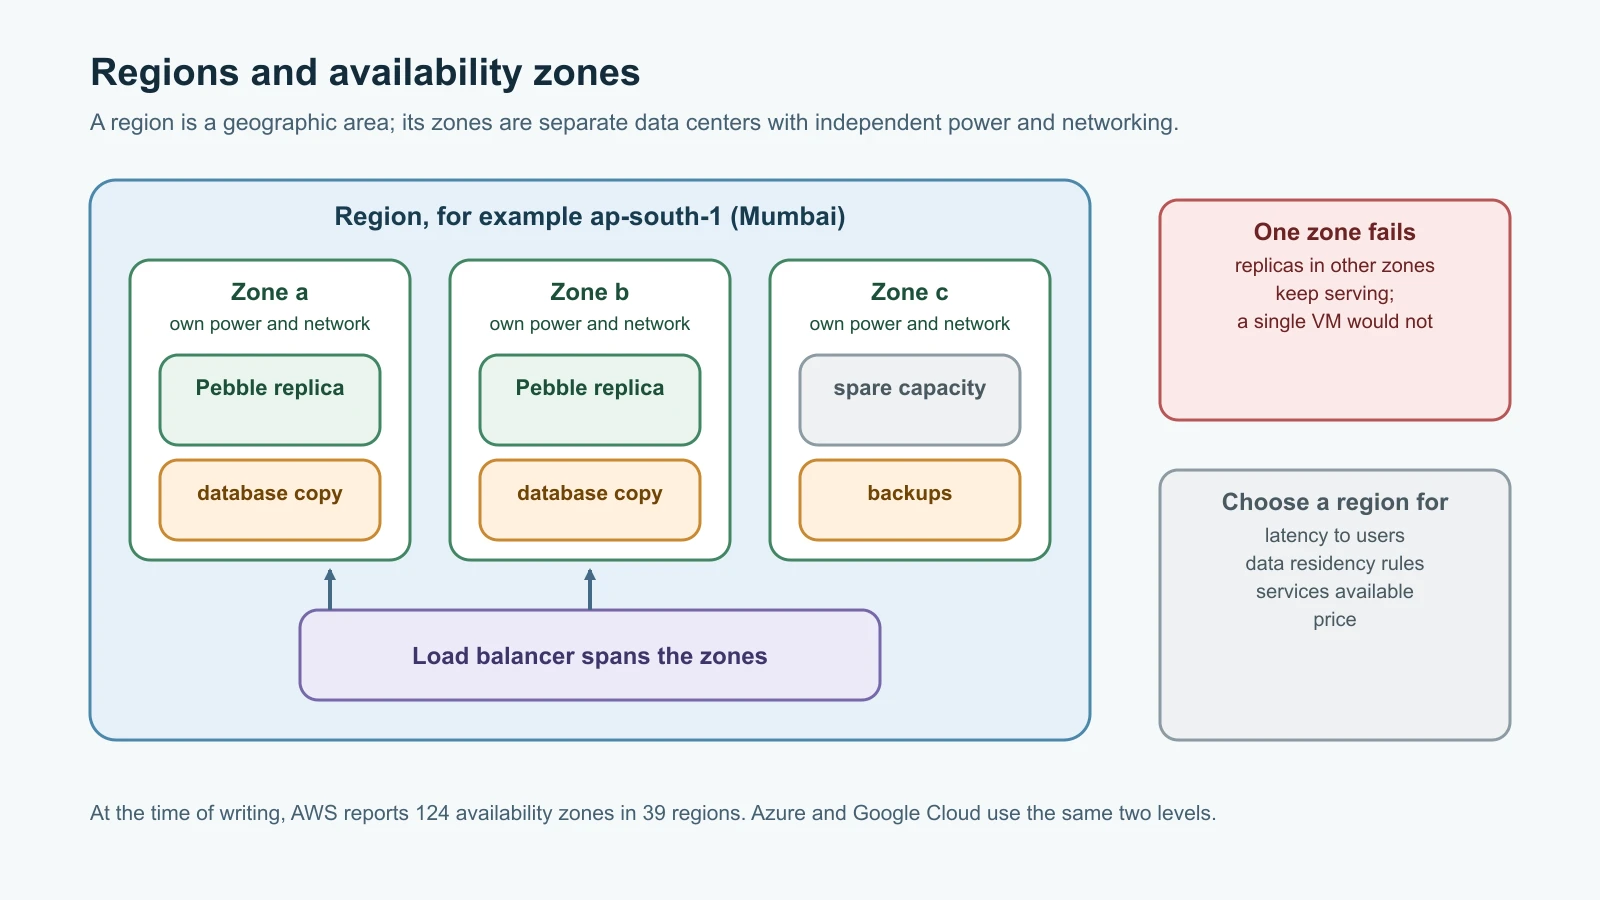
Cloud providers group their data centers by geography. A region is a separate geographic area, such as Mumbai, Frankfurt or Northern Virginia. Each region contains several availability zones (AZs): one or more data centers with their own power, cooling and networking, close enough for fast connections between them but far enough apart that a fire, flood or power failure in one should not affect another. At the time of writing, AWS reports 124 availability zones in 39 regions, with more announced. Azure and Google Cloud use the same two-level idea, with Google calling zones simply "zones".
Three decisions follow from this:
- Choose a region near your users to keep latency low, and check that it offers the services you need, because not every service is in every region.
- Respect data residency rules. Laws or contracts may require some data to stay in a particular country or region.
- Spread across zones for resilience. A single VM lives in a single zone. If that zone has a problem, the VM goes with it. Running Pebble's replicas in two or three zones behind a load balancer survives a zone failure. Spreading across regions protects against a whole-region outage, but costs much more and is harder to build, so reserve it for services that really need it.
Prices also differ between regions, sometimes noticeably, so compare before you commit.
Accounts, identity and access done safely
Every provider organizes resources into containers that set billing and access boundaries: accounts in AWS, grouped with AWS Organizations; subscriptions and resource groups in Azure, with identities in Microsoft Entra ID; and projects in Google Cloud, grouped into folders and an organization. Using separate accounts, subscriptions or projects for development and production is one of the simplest and strongest safety measures available: a mistake in one cannot touch the other.
Inside them, identity and access management (IAM) decides who may do what. The rules are the same everywhere, and AWS's own IAM best practices state them clearly:
- Protect the root or owner account. The email address you signed up with has unlimited power. Turn on multi-factor authentication for it, preferably a phishing-resistant passkey or security key, then stop using it for daily work.
- Give people temporary credentials. People should sign in through a central identity provider, such as AWS IAM Identity Center, Microsoft Entra ID or Google Workspace, and receive short-lived credentials. Long-lived access keys stored in a file on a laptop are the most common way cloud accounts get compromised.
- Give workloads roles, not keys. A program running on a cloud VM or function should use the identity the platform attaches to it: an IAM role on AWS, a managed identity on Azure, a service account on Google Cloud. The platform rotates the credentials automatically, and there is no secret to leak.
- Grant least privilege. Start from the minimum permissions a person or workload needs, and review and remove unused access regularly.
The Authentication and Access Control lesson in the Cyber Security course explains multi-factor authentication and least privilege in more depth.
For the command line, each provider has an official tool: the AWS CLI (aws), the Azure CLI (az) and the Google Cloud CLI (gcloud). Install them from the providers' own documentation. With the AWS CLI and IAM Identity Center, you sign in through your browser and get temporary credentials:
1aws configure sso
2aws sts get-caller-identity
configure sso walks you through choosing your organization's sign-in address, an account and a role, and saves them as a profile. sts get-caller-identity prints which account and role you are using, a good habit before you change anything. Azure's equivalent is az login, and Google Cloud's is gcloud auth login.
Cost basics: know what you pay for
Cloud bills surprise people because charges come from many small meters. The main ones:
- Compute time. VMs and containers are billed for as long as they run, usually per second or per hour, whether or not they are busy. A stopped VM stops compute charges, but its disk keeps billing.
- Storage. Disks, snapshots and object storage are billed per gigabyte per month, plus a charge per request for object storage.
- Data transfer. Data coming into the cloud is usually free. Data going out to the internet, called egress, is billed per gigabyte and is the cost people most often forget. Traffic between zones and regions can also cost money.
- Public IP addresses. AWS charges for every public IPv4 address, whether in use or idle, at 0.005 US dollars per hour at the time of writing. That works out to about 3.60 dollars for a 30-day month, per address.
- Managed services. Databases, load balancers and NAT gateways often charge per hour simply for existing, before any traffic.
Use each provider's pricing calculator before you build, and read the current price pages rather than relying on numbers in any tutorial, this one included. Then protect yourself with tags and budgets:
- Tag every resource with labels such as
project=pebbleandenv=dev, so the bill can be broken down by project and you can find forgotten resources. - Create a budget alert before you create anything else. It emails you when spending crosses a threshold. It does not stop resources automatically, but it turns a shock at the end of the month into a warning within a day.
Free tiers help you learn without paying, but read their terms carefully, because they changed recently and differ by provider. At the time of writing, new AWS customers can get up to 200 US dollars of credits for six months, with a free plan that closes the account when the credits or the six months run out unless you upgrade to a paid plan. Google Cloud's free trial gives 300 dollars of credit for 90 days, and its always-free tier includes one small e2-micro VM per month in three US regions. Azure offers 12 months of free monthly amounts of popular services and more than 65 always-free services. All of them have limits, and anything beyond the limits is billed.
Deploy Pebble to AWS with cloud-init
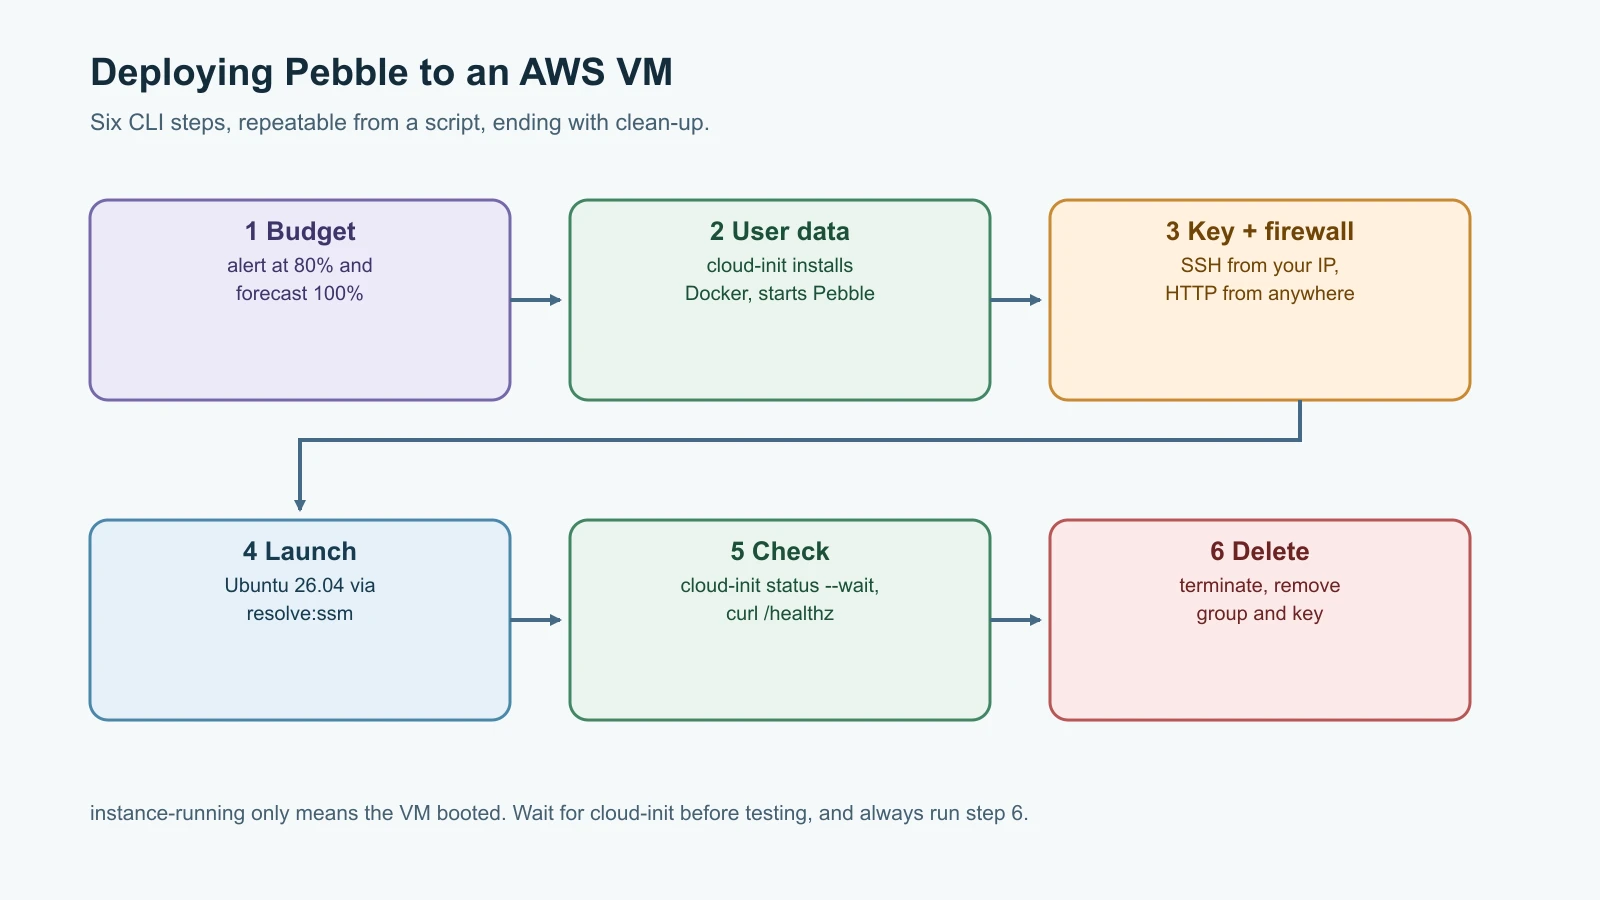
Now put Pebble on a cloud VM, using AWS as the example. The same steps exist on every provider, and the equivalents follow at the end of this section. The whole deployment uses commands you can save in a script, so it is repeatable, which is the first step towards infrastructure as code.
What you need first. An AWS account with access through IAM Identity Center and the AWS CLI configured as above; the SSH key from Networking for DevOps; and Pebble's image in GitHub Container Registry from the Docker lesson, with the package's visibility set to public in its GitHub package settings so the server can pull it without credentials.
Match the image to the server's CPU. This walkthrough uses a t4g.small instance, which runs on AWS's Arm-based Graviton processors. An image built on an x86 laptop will not run there and fails with an exec format error. Build and push an image for both architectures at once with Docker's buildx:
1docker buildx build --platform linux/amd64,linux/arm64 \
2  -t ghcr.io/<your-account>/pebble:0.2.0 --push .
Docker Desktop supports this directly. On Docker Engine for Linux, follow Docker's multi-platform build guide to enable emulation first. Alternatively, choose an x86 instance type such as t3.small and the Arm image question disappears.
Step 1: a budget. Save two small JSON files. budget.json sets a 10-dollar monthly cost budget:
1{
2  "BudgetName": "pebble-monthly",
3  "BudgetLimit": { "Amount": "10", "Unit": "USD" },
4  "BudgetType": "COST",
5  "TimeUnit": "MONTHLY"
6}
notifications.json emails you when actual spending passes 80 percent of the budget, and when AWS forecasts that you will pass 100 percent. Replace the email address with yours:
1[
2  {
3    "Notification": {
4      "NotificationType": "ACTUAL",
5      "ComparisonOperator": "GREATER_THAN",
6      "Threshold": 80,
7      "ThresholdType": "PERCENTAGE"
8    },
9    "Subscribers": [
10      { "SubscriptionType": "EMAIL", "Address": "you@example.com" }
11    ]
12  },
13  {
14    "Notification": {
15      "NotificationType": "FORECASTED",
16      "ComparisonOperator": "GREATER_THAN",
17      "Threshold": 100,
18      "ThresholdType": "PERCENTAGE"
19    },
20    "Subscribers": [
21      { "SubscriptionType": "EMAIL", "Address": "you@example.com" }
22    ]
23  }
24]
Create the budget for your account:
1ACCOUNT_ID=$(aws sts get-caller-identity --query Account --output text)
2aws budgets create-budget --account-id "$ACCOUNT_ID" \
3  --budget file://budget.json \
4  --notifications-with-subscribers file://notifications.json
Step 2: the user data. cloud-init is the standard tool that configures a cloud VM the first time it boots. Every major provider supports it, and Ubuntu's cloud images include it. You give it a file, called user data, and it installs packages, writes files and runs commands. Save this as cloud-init.yaml, replacing YOUR-ACCOUNT with your GitHub account name:
1#cloud-config
2package_update: true
3packages:
4  - docker.io
5  - docker-compose-v2
6
7write_files:
8  - path: /opt/pebble/compose.yaml
9    permissions: "0644"
10    content: |
11      services:
12        pebble:
13          image: ghcr.io/YOUR-ACCOUNT/pebble:0.2.0
14          volumes:
15            - pebble-data:/data
16          restart: unless-stopped
17        proxy:
18          image: caddy:2
19          command: caddy reverse-proxy --from :80 --to pebble:8080
20          ports:
21            - "80:80"
22          depends_on:
23            - pebble
24          restart: unless-stopped
25      volumes:
26        pebble-data:
27
28runcmd:
29  - systemctl enable --now docker
30  - docker compose -f /opt/pebble/compose.yaml up -d
The file must start with the exact line #cloud-config. It installs Docker and Compose from Ubuntu 26.04's own packages, writes a small Compose file to /opt/pebble, and starts it. The Compose file runs Pebble 0.2.0, the SQLite-based image from the Docker lesson, with its data in a volume, and puts Caddy in front of it on port 80. The single command caddy reverse-proxy --from :80 --to pebble:8080 is a complete reverse proxy with no configuration file; with a real domain name instead of :80, Caddy would also obtain an HTTPS certificate automatically, as you saw in Web Servers, Proxies and Load Balancers. Pebble itself publishes no port at all.
Step 3: SSH key and firewall. Import your public key, look up your own public IP address, and create a security group, AWS's virtual firewall, that allows SSH only from that address and HTTP from anywhere:
1aws ec2 import-key-pair --key-name pebble \
2  --public-key-material fileb://~/.ssh/id_ed25519.pub
3MY_IP=$(curl -s https://checkip.amazonaws.com)
4SG_ID=$(aws ec2 create-security-group --group-name pebble-web \
5  --description "Pebble web server" --query GroupId --output text)
6aws ec2 authorize-security-group-ingress --group-id "$SG_ID" \
7  --protocol tcp --port 22 --cidr "$MY_IP/32"
8aws ec2 authorize-security-group-ingress --group-id "$SG_ID" \
9  --protocol tcp --port 80 --cidr 0.0.0.0/0
Without --vpc-id, the security group is created in the region's default VPC, which every new AWS account has. Security groups deny all incoming traffic unless a rule allows it, the default-deny policy from the networking lesson, applied by the provider before traffic ever reaches your VM.
Step 4: launch the instance. Ask for the latest Ubuntu 26.04 image by name instead of copying an image ID. Canonical publishes the current IDs as public AWS Systems Manager parameters, and resolve:ssm: looks one up at launch:
1INSTANCE_ID=$(aws ec2 run-instances \
2  --image-id resolve:ssm:/aws/service/canonical/ubuntu/server/26.04/stable/current/arm64/hvm/ebs-gp3/ami-id \
3  --instance-type t4g.small \
4  --key-name pebble \
5  --security-group-ids "$SG_ID" \
6  --user-data file://cloud-init.yaml \
7  --tag-specifications 'ResourceType=instance,Tags=[{Key=Name,Value=pebble-web},{Key=project,Value=pebble}]' \
8  --query 'Instances[0].InstanceId' --output text)
9aws ec2 wait instance-running --instance-ids "$INSTANCE_ID"
10PUBLIC_IP=$(aws ec2 describe-instances --instance-ids "$INSTANCE_ID" \
11  --query 'Reservations[0].Instances[0].PublicIpAddress' --output text)
12echo "$PUBLIC_IP"
For an x86 instance type, replace arm64 in the parameter path with amd64. --query uses a small query language to pick one value out of the JSON response, so each command's result lands in a shell variable for the next step.
Step 5: check it. instance-running means the VM has started, not that cloud-init has finished installing Docker. Wait for cloud-init over SSH, then test Pebble through Caddy:
1ssh ubuntu@"$PUBLIC_IP" 'cloud-init status --wait && sudo docker compose -f /opt/pebble/compose.yaml ps'
2curl -s "http://$PUBLIC_IP/healthz"
Ubuntu's cloud images use the account name ubuntu. The first command prints status: done once cloud-init finishes, followed by both containers running. curl returns {"status": "ok"} from Pebble in the cloud. If something went wrong, sudo cat /var/log/cloud-init-output.log on the VM shows every command cloud-init ran and its output.
Step 6: delete everything. A forgotten VM keeps billing. When you are done, terminate the instance, wait until it is gone, and remove the security group and key pair:
1aws ec2 terminate-instances --instance-ids "$INSTANCE_ID"
2aws ec2 wait instance-terminated --instance-ids "$INSTANCE_ID"
3aws ec2 delete-security-group --group-id "$SG_ID"
4aws ec2 delete-key-pair --key-name pebble
Terminating deletes the VM and, by default for instances launched this way, its root disk. Keep the budget: it costs nothing and will warn you about anything you forget in future.
This VM is a single machine in a single zone, with plain HTTP and no backups. It is a learning deployment, not production. The next lessons fix that step by step: Terraform and Infrastructure as Code replaces these commands with a reviewed, repeatable definition, and the Kubernetes lessons spread Pebble across machines and zones.
The same deployment on Azure and Google Cloud
The concepts map directly; only the commands change. On Google Cloud, find the current Ubuntu 26.04 image family first, then create a VM with the same cloud-init file and a firewall rule for HTTP:
1gcloud compute images list --project=ubuntu-os-cloud --filter="family~ubuntu-2604"
2gcloud compute instances create pebble-web --zone=us-central1-a \
3  --machine-type=e2-small --image-project=ubuntu-os-cloud \
4  --image-family=<family-from-the-list> \
5  --metadata-from-file=user-data=cloud-init.yaml --tags=http-server
6gcloud compute firewall-rules create allow-http \
7  --allow=tcp:80 --target-tags=http-server
On Azure, everything lives in a resource group, which also makes clean-up a single command:
1az group create --name pebble-rg --location centralindia
2az vm image list --publisher Canonical --all --output table | grep 26_04
3az vm create --resource-group pebble-rg --name pebble-web \
4  --image <urn-from-the-list> --size Standard_B1s \
5  --admin-username azureuser --ssh-key-values ~/.ssh/id_ed25519.pub \
6  --custom-data cloud-init.yaml
7az vm open-port --resource-group pebble-rg --name pebble-web --port 80
8az group delete --name pebble-rg
Looking up the image name from the provider's own list, rather than copying one from a tutorial, means you always get a current, supported image.
Beyond the big three
The three largest providers are not the only choice. DigitalOcean and Hetzner offer simpler, cheaper virtual servers, managed databases and Kubernetes, with fewer services and a smaller learning curve; they suit small teams, side projects and workloads that need plain servers rather than a large catalogue. Alibaba Cloud is a major provider in China and the wider Asia-Pacific region. Platforms such as Heroku, Render and Railway hide the servers entirely, which the next lesson covers.
A sensible way to choose: start from what the workload needs (managed services, regions, compliance, support), what the team already knows, and total cost including people's time, not just the hourly price of a VM. Multi-cloud setups, running the same system on several providers, add real complexity; most teams are better served by using one provider well.
Mistakes beginners make
- Using the root or owner account for daily work, without multi-factor authentication.
- Creating long-lived access keys for people, saving them in files, and committing them to Git.
- Putting development and production in the same account, subscription or project.
- Opening SSH to
0.0.0.0/0instead of your own address, or better, using a managed access service. - Forgetting egress, public IP addresses and idle managed services when estimating cost.
- Creating resources without tags, then being unable to tell what they are for.
- Never setting a budget alert.
- Assuming
instance-runningmeans the application is ready. - Running an x86 image on an Arm instance, or the reverse.
- Running everything in one availability zone and calling it highly available.
- Leaving test resources running after a tutorial.
Recap and try it yourself
Cloud providers rent compute, storage, networking, databases and much more on demand. AWS, Azure and Google Cloud name things differently, but the building blocks map one to one. Regions are geographic areas and availability zones are independent data centers within them; spread across zones for resilience and choose regions for latency, residency and price. Protect the owner account with phishing-resistant MFA, give people temporary credentials through a central identity provider, give workloads roles instead of keys, and grant least privilege. Bills come from compute time, storage, data transfer out, public addresses and managed services, so estimate with the pricing calculator, tag everything and set a budget first. Pebble has now run on a cloud VM, configured entirely by cloud-init, and been deleted again with four commands.
Try it yourself:
- Create the budget and run the full AWS deployment, then delete it. Afterwards, check the billing console the next day and find the charges for the few minutes your instance ran.
- Add a rule to the cloud-init file that also writes a
/etc/motdmessage saying the server is managed by cloud-init, relaunch, and confirm the message appears when you log in. - Run the same deployment on Google Cloud or Azure using their commands, and write a short table comparing how each provider handled images, firewalls and clean-up.
- Use one provider's pricing calculator to estimate a month of running two small VMs in two zones plus a managed PostgreSQL database, and list which line items cost the most.
Sources checked on 13 November 2026: AWS global infrastructure, AWS Free Tier, Amazon VPC pricing, IAM security best practices, AWS CLI with IAM Identity Center and AWS Budgets with the CLI; Canonical's finding Ubuntu images on AWS; Google Cloud free features; Azure free services; the cloud-init documentation; Ubuntu's docker.io and docker-compose-v2 packages; Docker's multi-platform builds; Caddy's reverse-proxy command; and the roadmap.sh DevOps roadmap. Prices, free-tier terms and region counts change often; check the providers' pages before you rely on them. Pebble is fictional.