
Cyber Security course · lesson 4 of 24
- 1What Is Cyber Security?
- 2Fundamental IT Skills for Cyber Security
- 3Operating Systems for Security: Windows, Linux and macOS
- 4Virtualization and Your Safe Cyber Security Lab
- 5Networking Fundamentals for Cyber Security
- 6Network Services and Infrastructure for Cyber Security
- 7Network Troubleshooting and Traffic Analysis Tools
- 8Core Security Concepts Every Defender Uses
- 9Authentication and Access Control Explained
- 10Cryptography Basics for Cyber Security
- 11Secure Protocols and Wireless Security
- 12The Threat Landscape and Security Frameworks
- 13Social Engineering and Human Attacks
- 14Network and Wireless Attacks and How to Detect Them
- 15Web Attacks and the OWASP Top 10
- 16Malware, Exploits and System Attacks
- 17Hardening and Endpoint Security
- 18Network Defense, Logging and SIEM
- 19Vulnerability Management and Threat Hunting
- 20Incident Response and Digital Forensics
- 21Cloud Security Basics
- 22Scripting for Security
- 23Ethical Hacking, CTFs and Penetration Testing
- 24Cyber Security Standards, Certifications and Capstone
After this lesson, you should be able to explain what a hypervisor and a virtual machine are, tell a type 1 hypervisor from a type 2, choose between VirtualBox, VMware, ESXi and Proxmox for a given job, describe what Kali Linux and Parrot OS are for, and build an isolated practice lab with two virtual machines and a snapshot you can roll back to. This lab is where every hands-on exercise in the rest of the course happens. It is how you practise attacks legally: on machines you own, on a network that cannot reach anyone else.
Why a lab, and why virtual
The rule from What Is Cyber Security? still applies: test only what you own or have written permission to test. A lab gives you something you own that is safe to break. You can scan it, misconfigure it, attack it and watch the logs without risk to your home network, your employer or a stranger.
You could build a lab from old physical computers, but virtual machines are cheaper, faster and easier to reset. One laptop can run several of them at once, and a snapshot lets you undo a mistake in seconds. Professional teams use virtualization for the same reasons: to test software, to analyze suspicious files in isolation and to run training ranges.
Virtualization terms
Virtualization is running one or more complete computers in software, on top of one physical computer. NIST's guide to security for full virtualization (SP 800-125) describes it as running operating systems and their applications on virtual hardware, which lets one machine run software for several operating systems at once.
- A virtual machine (VM) is one of those software computers. It has a virtual processor, memory, disk and network card, and it runs a normal operating system that does not need to know it is virtual.
- The host is the physical computer, and the host OS is the operating system installed on it.
- The guest OS is the operating system running inside a VM. The VirtualBox manual defines it the same way: the OS that is running inside a virtual machine.
- The hypervisor is the software that creates and runs VMs. It shares the real processor, memory and devices between them and keeps them apart.
Hypervisors come in two types:
- A type 1 or bare-metal hypervisor runs directly on the hardware with no ordinary operating system underneath. Servers in data centers and cloud platforms use this type. VMware ESXi and Proxmox VE are examples.
- A type 2 or hosted hypervisor is an application installed on an existing operating system, such as Windows, macOS or Linux. The VirtualBox manual describes VirtualBox as a hosted, or type 2, hypervisor that runs alongside the host's other applications. VMware Workstation Pro and Fusion Pro are also type 2.
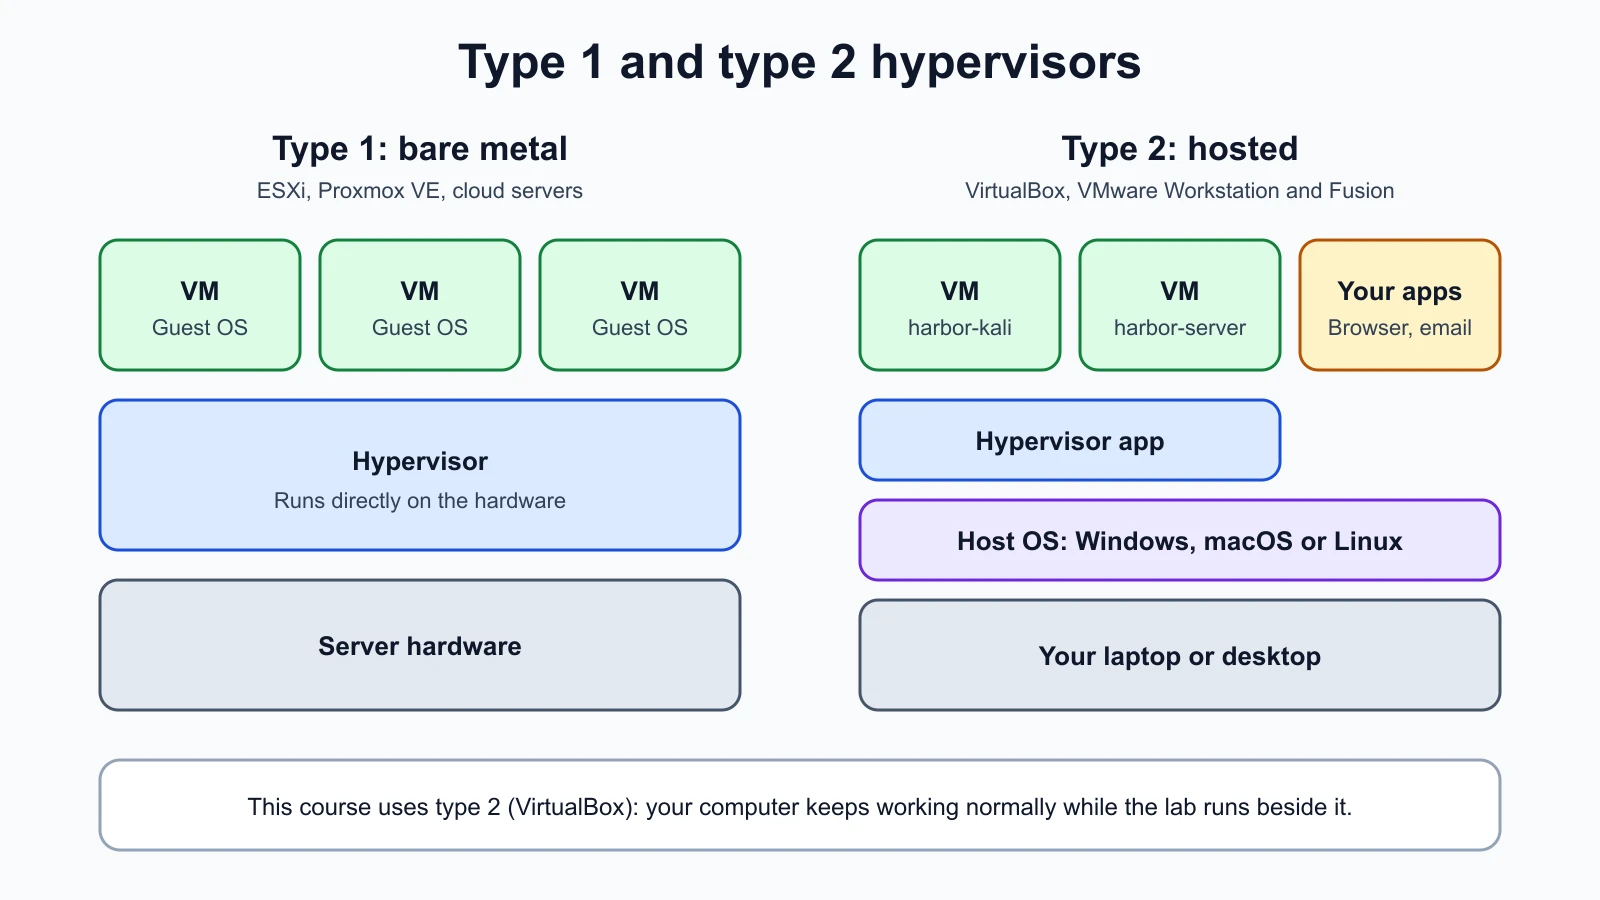
For a personal lab, a type 2 hypervisor on your own laptop or desktop is the simplest start. You keep using the computer as normal and open the lab when you need it.
Isolation is a security feature, not a guarantee
The hypervisor keeps VMs apart from each other and from the host. That is why analysts open suspicious files inside VMs. But isolation depends on software, and hypervisors have bugs like any other software. Keep the hypervisor updated, do not share folders or the clipboard between the host and a VM that runs anything risky, and do not put real personal files inside lab VMs. In this course you will not handle real malware; the lab is for scanning, configuration and practice targets you install yourself.
Choosing a hypervisor
All four products below are widely used in security work. Facts were checked on the vendors' sites on 12 November 2026; licensing in particular changes, so check again before you rely on it.
| Product | Type | Runs on | Cost and licence (as checked) | Good for |
|---|---|---|---|---|
| Oracle VirtualBox | Type 2 | Windows, Linux, macOS on Intel and Apple Silicon | Free; platform packages under GPL version 3 | Learning labs, this course |
| VMware Workstation Pro (Windows, Linux) and Fusion Pro (macOS) | Type 2 | Windows, Linux, macOS | Free for commercial, educational and personal use since November 2024 | Labs, many prebuilt security images |
| VMware ESXi | Type 1 | Dedicated server hardware | Broadcom offers a free licence for ESXi 8.0 Update 3e, aimed at home labs and testing, with no official support | Learning how enterprises run VMs |
| Proxmox VE | Type 1 | Dedicated server hardware | Open source | Home servers, larger labs |
VirtualBox is the choice for this course because it is free, open source and runs on all three desktop operating systems. Its current version at the time of writing is 7.2.22. If you already use VMware Workstation or Fusion, the same lab design works there; only the menu names differ. ESXi and Proxmox need a spare machine that you dedicate to virtualization, so they are a later step, not a starting point.
A note for Apple Silicon Macs
Macs with Apple processors (M-series chips) use the ARM architecture, not the x86 architecture of most Windows PCs. The VirtualBox manual lists only 64-bit ARM guests for Apple Silicon hosts. In practice that means you must download the ARM64 version of each operating system for the lab. Both distributions used below offer one. If a later lesson mentions a practice target that exists only for x86, the lesson will give an ARM-friendly alternative.
Kali Linux and Parrot OS
Two Linux distributions are built for security testing and come with hundreds of tools preinstalled:
- Kali Linux. The current release is 2026.3. Kali offers installer images for x86_64 and ARM64 (including Apple Silicon) and ready-made VM images for VirtualBox, VMware, Hyper-V and QEMU on x86_64. Kali's own documentation says it is aimed at professional penetration testers and is not a recommended distribution for people unfamiliar with Linux, and suggests trying it in a virtual machine first.
- Parrot OS. The current release is 7.4. Its Security edition is for penetration testing and lists 4 GB of memory as the minimum and 8 GB as recommended. Parrot offers a VirtualBox image and an image for UTM, a virtualization app for Apple Silicon Macs.
Both are fine. This course uses Kali in its examples because more tutorials and books use it, which makes it easier to find help. Treat it as a toolbox you open in the lab, not as your everyday operating system.
The prebuilt Kali VM images ship with a default username and password of kali and kali, which Kali documents publicly. Change the password the first time you sign in, with the passwd command. Default credentials that everyone knows are one of the first things an attacker tries, and a security lab is a good place to build the habit.
The Harbor Books lab
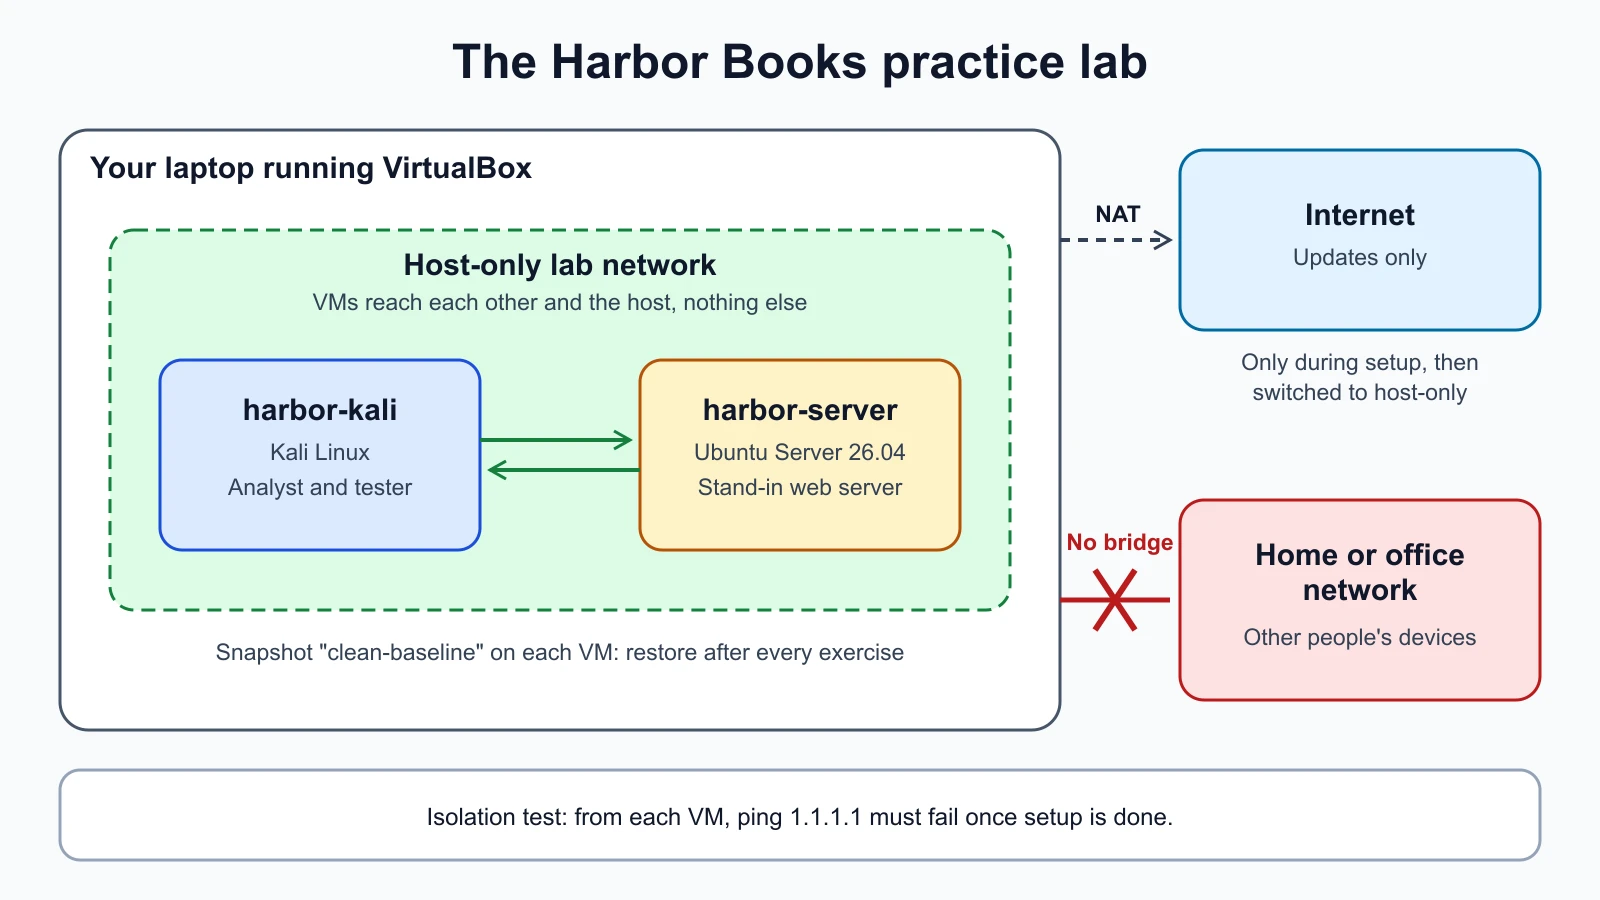
Harbor Books is the fictional bookshop used throughout this course. The lab gives it a small, safe twin:
| VM name | Operating system | Role in the course |
|---|---|---|
harbor-kali | Kali Linux | Your analyst and tester machine: scanning, packet capture, attack demonstrations |
harbor-server | Ubuntu Server 26.04 LTS | A stand-in for the shop's web server; later lessons install a practice web shop on it and harden it |
Two machines are enough to start. Later lessons may add a third, and each will say exactly what to add.
Choosing the network mode
This is the most important design decision in the lab. VirtualBox offers several network modes for each virtual network card. The manual's overview table shows what each can reach:
| Mode | Lab VMs reach each other | Host and VMs reach each other | VMs reach the internet or your home network |
|---|---|---|---|
| NAT (default) | No | VM to host only | Yes, outbound |
| NAT Network | Yes | VM to host only | Yes, outbound |
| Bridged | Yes | Yes | Yes, both ways: the VM sits on your real network |
| Host-only | Yes | Yes | No |
| Internal | Yes | No | No |
For a lab that will run scanners and deliberately weak software, you want the VMs to reach each other and nothing else. Host-only does that while still letting you reach the VMs from your own computer, and it includes a DHCP server (a service that hands out IP addresses automatically) that is enabled by default. Internal is even stricter: not even the host can reach the VMs. Never put a vulnerable practice target on Bridged, because that places it on your real home or office network, where other people's devices can reach it and it can reach them.
The practical plan has two phases. While you install and update the VMs, they use NAT so they can download packages. When setup is finished, you switch them to host-only and they stay there.
Build steps
The steps below follow the VirtualBox, Kali and Ubuntu documentation. They were not run for this lesson, because installing a hypervisor needs administrator rights on the machine that hosts it. Menu names can differ slightly between VirtualBox versions.
1. Check your computer. Hardware virtualization must be enabled in the firmware on most PCs (look for Intel VT-x or AMD-V in the firmware settings). Each VM needs its own memory, so a machine with more memory can run more VMs at once. Parrot's minimum of 4 GB for its Security edition is a useful guide for the security VM. Leave enough memory for your host to stay responsive.
2. Install VirtualBox. Download it from virtualbox.org only, choosing the package for your host (Windows, macOS on Intel, macOS on Apple Silicon, or Linux). Keep it updated.
3. Create the host-only network. Open VirtualBox's Network Manager and create a host-only network. On recent macOS hosts the manual says to use the Host-Only Network option, because those hosts do not support the older host-only adapters. Leave its DHCP server enabled.
4. Create harbor-kali. On an x86 PC, download the Kali VirtualBox image from kali.org and import it (File, Import Appliance). On an Apple Silicon Mac, download the Kali ARM64 installer image and create a new VM from it. Keep the network card on NAT for now. Start it, sign in, change the default password with passwd, then update the system:
1sudo apt update
2sudo apt full-upgrade
5. Create harbor-server. Download Ubuntu Server 26.04 LTS from ubuntu.com (the ARM64 version on Apple Silicon), create a new VM from it and install it. Choose a strong password for the account you create during installation. When it is installed, update it:
1sudo apt update
2sudo apt upgrade
6. Switch both VMs to the lab network. Shut both VMs down. In each VM's settings, under Network, Adapter 1, change "Attached to" from NAT to the host-only network you created. If you prefer the command line, the VirtualBox manual documents an equivalent VBoxManage modifyvm option for each network card. For example, this attaches the first card of harbor-server to an internal network called harborlab, the stricter option. An internal network has no address server unless you set one up, so the VMs would need fixed addresses; that is why this lesson starts with host-only.
1VBoxManage modifyvm "harbor-server" --nic1=intnet --intnet1=harborlab7. Check the isolation. Start both VMs. In each one, run ip addr and note its address on the lab network. From harbor-kali, ping harbor-server's address: it should answer. Then try to reach the internet:
1ping -c 3 1.1.1.1This should fail. If it succeeds, the VM still has a route to the internet, and you should recheck the network settings before going any further. A lab that cannot reach the outside world is the point.
8. Take a clean snapshot. Shut both VMs down and take a snapshot of each, named something like clean-baseline. In the VirtualBox window this is under the machine's Snapshots view. From the command line:
1VBoxManage snapshot "harbor-server" take "clean-baseline" --description="Fresh install, updated, host-only network"Snapshots: your undo button
A snapshot saves the state of a VM at one moment. The VirtualBox manual explains that restoring a snapshot returns the VM to exactly that state, and that the current state is lost, including any files created or changed on its virtual disks since the snapshot. If the VM was running when you took the snapshot, its memory is saved too.
That behavior makes snapshots perfect for a lab. Before each exercise that changes a VM, take a snapshot. If you break something, restore it:
1VBoxManage snapshot "harbor-server" restore "clean-baseline"Two cautions. First, restoring throws away everything since the snapshot, so if you want to keep notes or results, copy them off the VM first or take a new snapshot before you restore. Second, a snapshot is not a backup. It lives alongside the VM's own files, so if the host disk fails or the VM folder is deleted, the snapshots go with it. You will learn about real backups in the lesson on core security concepts.
Keep the lab safe and legal
The lab is safe because of a few rules. Write them down and keep them:
- Lab traffic stays in the lab. Lab VMs use host-only or internal networking after setup. Never bridge a practice target onto a real network.
- Targets are yours. Run scans and attack demonstrations only against VMs in your lab, or against legal practice platforms within their terms, as covered later in the course.
- No real data inside. Use invented names and fake accounts. Harbor Books' "customers" are made up.
- Update and reset. Update the hypervisor and the VMs, and roll back to a clean snapshot after each exercise that changes a machine.
- Do not share host folders or the clipboard with a VM where you run something you do not trust.
Mistakes beginners make
-
Using bridged networking for a vulnerable VM. It puts a deliberately weak machine on your real network.
Fix: Use host-only or internal networking for every lab machine after setup, and test isolation with a ping to the internet.
-
Leaving default passwords on lab VMs. Habits formed in the lab follow you to real systems.
Fix: Change the default Kali password at first sign-in and use a unique password on every VM.
-
Downloading VM images from unofficial sites. A ready-made "hacking VM" from a forum can contain anything.
Fix: Download only from the official sites (virtualbox.org, kali.org, parrotsec.org, ubuntu.com) and check any checksums they publish.
-
Treating snapshots as backups. They disappear with the VM's folder or the host disk.
Fix: Use snapshots to undo lab mistakes, and keep separate backups of anything you need to keep.
-
Using Kali as an everyday operating system. Kali itself says it is not designed for that.
Fix: Keep Kali inside the lab and use your normal OS for everything else.
Recap and try it yourself
A hypervisor runs virtual machines: type 1 runs directly on hardware (ESXi, Proxmox), type 2 runs as an app on your normal OS (VirtualBox, VMware Workstation and Fusion). The host is the physical machine, the guest OS runs inside a VM, and isolation between them is strong but not perfect. VirtualBox is free and runs on Windows, Linux and macOS, including Apple Silicon with ARM guests. Kali and Parrot are security-focused Linux distributions for use inside the lab. The Harbor Books lab has two VMs, harbor-kali and harbor-server, on a host-only network with no route to the internet, and a clean snapshot of each so any mistake can be undone.
Try it: build the lab using the eight steps above. When it works, write a one-page lab record with each VM's name, operating system and version, IP address on the lab network, network mode, and the date of its clean snapshot. Prove isolation by recording that ping -c 3 1.1.1.1 fails from each VM. Keep this record next to your inventory from the earlier lessons. In the next module, you will use this lab to learn how networks work, starting with IP addresses, subnets and ports.
Sources checked on 12 November 2026: NIST SP 800-125, Guide to Security for Full Virtualization Technologies; VirtualBox downloads; VirtualBox manual, introduction; VirtualBox manual, networking; VirtualBox manual, working with VMs and snapshots; VBoxManage reference; VMware, Fusion and Workstation free for all users; Broadcom, ESXi 8.0 Update 3e free hypervisor; Proxmox VE overview; Get Kali; Kali default credentials; Should I use Kali Linux?; Parrot OS download; Ubuntu release cycle.