
OpenClaw course · lesson 7 of 22
- 1What Is OpenClaw, and Is It Right for You?
- 2OpenClaw vs Claude Code: Which Tool Fits the Task?
- 3How OpenClaw Works: Gateway, Sessions, and Agents
- 4OpenClaw Context and Memory: What Carries Forward?
- 5OpenClaw Workspace Files: Shape Your Agent Safely
- 6Where Should OpenClaw Run? Local, VPS, or Isolated
- 7Install OpenClaw and Start Its Gateway Safely
- 8Choose an OpenClaw Model and Provider
- 9Add Your First OpenClaw Channel Safely
- 10Choose Another OpenClaw Chat Channel Carefully
- 11Control OpenClaw Sessions and Commands
- 12Separate OpenClaw Agents and Route Messages
- 13Schedule OpenClaw Checks with Heartbeats and Automations
- 14Secure OpenClaw Hooks and Webhooks
- 15Use and Create OpenClaw Skills
- 16Vet OpenClaw Skills and Plugins Before Installing
- 17Extend OpenClaw with Plugins and MCP
- 18Understand the OpenClaw Security Model
- 19Secure an OpenClaw Gateway with Ten Checks
- 20Back Up, Update, and Troubleshoot OpenClaw
- 21Control OpenClaw Costs and Improve Reliability
- 22Capstone: Build a Safe OpenClaw Personal Assistant
This is the first lesson that walks through an installation. The previous lesson helped you choose where the Gateway should run. Now we will install OpenClaw in that environment, complete its first-run setup, register a supervised service, and confirm that it is healthy.
We will use Mira, our fictional learner, as a guide. She chose a disposable virtual machine with a non-root user, a new test account, and no access to her work files. She will connect no personal chat accounts in this lesson. The goal is a local Gateway that she can start and stop safely, not a fully connected assistant with access to her life.
This walkthrough focuses on macOS and Linux, where the official installer supports a common shell path. Windows has its own native app and PowerShell options, so Windows users should follow the current Windows instructions instead of pasting these shell commands into PowerShell. OpenClaw changes quickly: command names and setup prompts below were checked against its official documentation on 7 November 2026. Verify the docs again before installing on another date.
Before you install
Pause if you have not chosen the host yet. The Gateway can hold configuration, credentials, sessions, memory, and workspace files. For a first installation, use a disposable environment or spare device, run as a normal non-root user, and keep the test workspace separate from your personal files.
Do not connect your work chat, primary messaging account, personal email, or production API credentials. If onboarding asks you to configure a model provider, use a test credential with a spend cap if available. If you do not have a safe test credential, stop at that step and finish provider setup in lesson 8.
OpenClaw's install documentation currently lists macOS, Linux, and Windows support. As of 7 November 2026, the docs show Node.js 24.16.0 or newer in the 24 line, or 26.1.0 or newer in the 26 line, with newer security-patched releases recommended. The installer detects the operating system and can install a supported Node runtime when one is missing. Check the live system requirements before running an installer, because those minimums change.
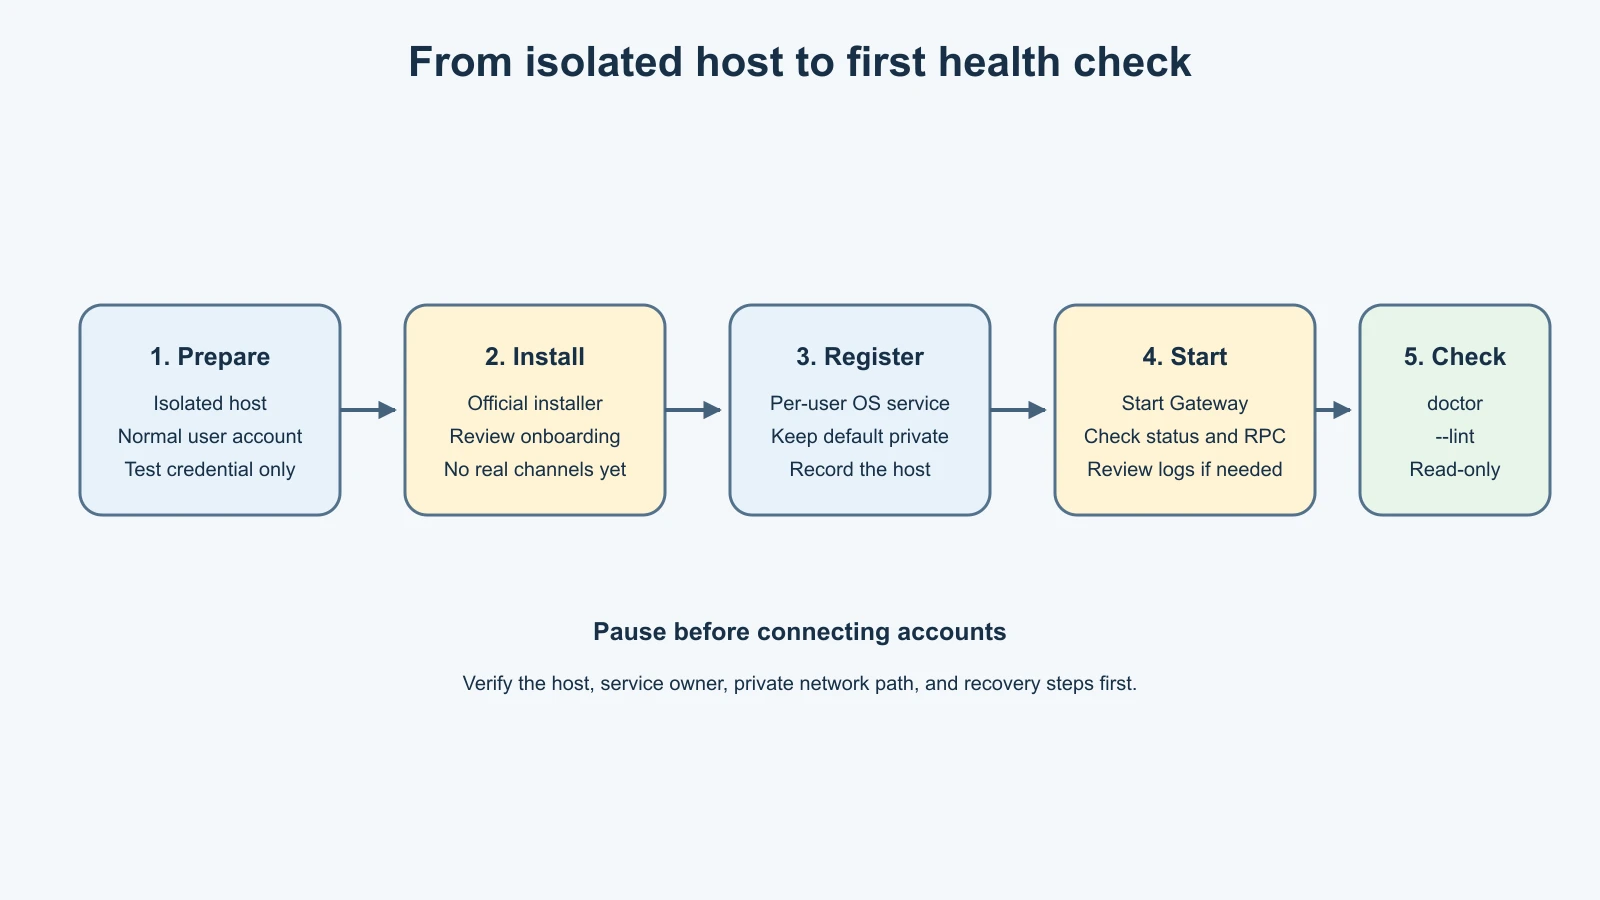
The official install guide currently recommends its installer script for macOS, Linux, and WSL2. Like any command that downloads and executes a script, it gives that script the permissions of the account running it. Read the official page, confirm the host and account, and do not run it with administrator privileges just to get past a permissions error.
Step 1: Install in the chosen environment
On a disposable macOS or Linux environment, the documented installer command is:
1curl -fsSL https://openclaw.ai/install.sh | bashThis downloads and runs the official installer. If you prefer to read the script before it runs, save it first with curl -fsSL https://openclaw.ai/install.sh -o install.sh, read it, and then run bash install.sh. Piping a download straight into a shell trusts whatever the server sends at that moment. Current docs say it detects the operating system, installs Node if needed, installs OpenClaw, and launches onboarding. Use it only in the isolated environment you chose. Do not run the same command on a work laptop or personal computer with broad access just because it is convenient.
If the installer finishes but onboarding did not open, start the guided setup with:
1openclaw onboardThe guided flow may ask for an agent name, how much access setup can inspect, an AI provider, and gateway choices. Read each screen. Select the least-access option that lets you continue. Avoid approving discovery of unrelated local apps, keys, or runtimes if the environment contains anything private. Stop if the prompt asks you to connect an account or provide a credential you have not prepared as a test credential.
The guided flow establishes model inference before completing the rest of setup. Provider choices and authentication deserve a careful review, so we handle them separately in lesson 8. Do not paste a token into a chat, a source file, or a screenshot. Keep the token in the supported authentication flow, and use a test key with a spending limit.
Onboarding is not the same as connecting a chat channel. This lesson leaves Telegram, Slack, WhatsApp, and other channels unconfigured. We will first verify that the local Gateway works; adding a new bot account with a sender allowlist comes in lesson 9.
Step 2: Understand what onboarding changed
Onboarding writes configuration and initializes the workspace and other local state used by the Gateway. It may also make choices about how the Gateway is accessed and whether a background service is installed. Review the summary before accepting. Record the host, operating system account, workspace path, and any provider selected in your private setup notes. Never record secrets in those notes.
The default Gateway bind is currently loopback on ordinary local installs, which keeps its listener on the local host. The default port is 18789 unless configuration or an environment variable changes it. A local control interface is not automatically safe to publish on a public network. Do not change the bind address to a LAN or public interface as a shortcut to reaching it from your phone; private remote access is a separate configuration topic.
Check that onboarding did not use the wrong profile or an existing installation's state. If you see unexpected existing agents, sessions, or credentials, stop before proceeding. Do not use repair or reset commands to guess your way through an unfamiliar state directory. The onboarding reference explains current guided and classic flows and their configuration choices.
Step 3: Register the Gateway service
The Gateway can run in a foreground terminal for a brief local experiment, or it can be supervised by the operating system so it can restart and run in the background. For the supervised path, install the service using the current CLI command:
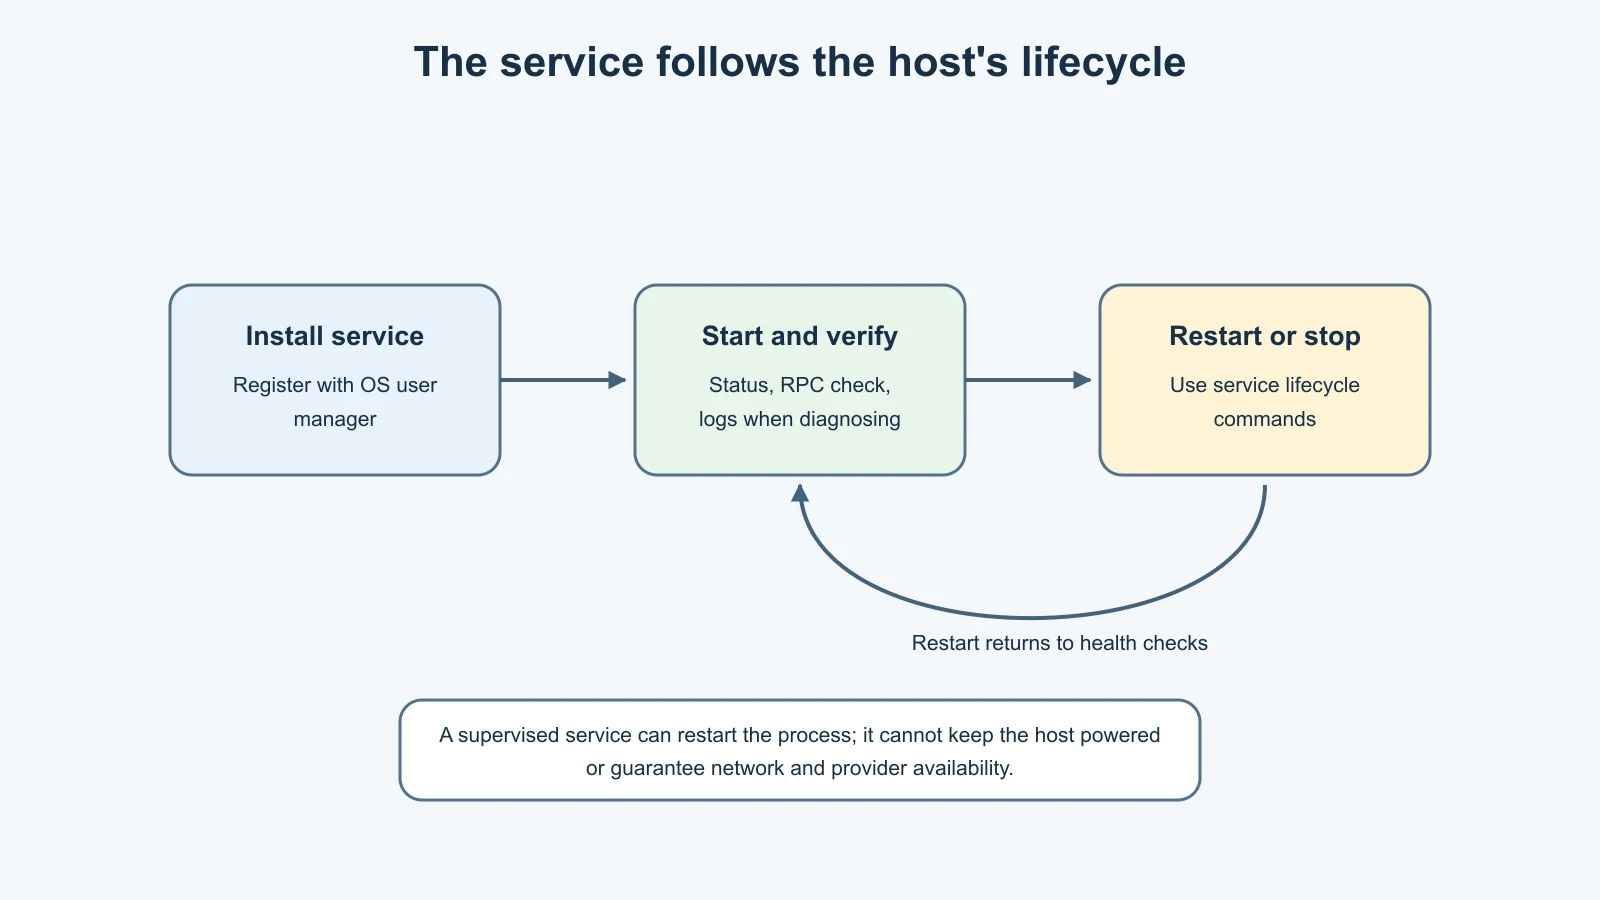
1openclaw gateway installThe service manager depends on the platform. OpenClaw currently installs a per-user LaunchAgent on macOS, a systemd user service on Linux and WSL2, and a Scheduled Task on native Windows. A registered service can start at login or restart after a failure according to that service manager. It does not mean that the host itself will remain powered on or connected to the internet.
After registration, start the service and check its status:
1openclaw gateway start
2openclaw gateway status
gateway start waits for health and readiness checks; if the Gateway is already running, it does not restart it. The status output should show a running runtime and a successful connectivity check. If it reports a different profile, port, configuration file, or service owner than you expected, stop and investigate before attaching any channels.
The documented default port is 18789. Treat this as a default, not a promise: configuration and environment overrides can select another port. Do not open that port in a firewall or router for this local lesson.
Step 4: Check health and inspect logs
Use the service status to confirm the Gateway is running. For a stronger local check that includes an RPC readiness check, the current CLI supports:
1openclaw gateway status --require-rpcThis checks more than whether a process exists. It helps confirm that the CLI can reach the Gateway and perform the required read-scope health check. A process can be running while a provider or channel is not ready, so do not treat “running” as proof that every feature works.
For a read-only structured health check, use:
1openclaw doctor --lintThe --lint posture is read-only. It reports health findings without prompting for repairs or writing migrations. By contrast, bare openclaw doctor is a guided check that can propose or apply certain migrations and repairs as part of its flow. Read each prompt and review proposed changes before accepting them. Do not use --fix or --force as a generic first troubleshooting step.
To watch logs while diagnosing a problem, use:
1openclaw logs --followLogs can contain sensitive operational details. Do not paste them into a public issue or chat without reviewing and redacting them. If setup looks healthy, send a harmless test message through the local Control UI. Confirm that a response arrives, then stop there. This verifies the local path without attaching a real messaging account.
Step 5: Stop, start, and restart the right way
Use the service commands when the Gateway is running under the operating-system supervisor:
1openclaw gateway stop
2openclaw gateway start
3openclaw gateway restart
The first two commands stop and later start the service. If the intention is simply to restart it, use openclaw gateway restart; the runbook warns against treating stop followed by start as a restart substitute. On macOS, stopping unloads the LaunchAgent for the current boot session without permanently disabling its recovery behavior. A persistent disable is a separate choice. Avoid that unless you understand the service manager behavior.
The service is registered for the current OS user. Do not use sudo to install or run the normal user service. On a headless Linux server, a systemd user service may need the user manager configured to remain available after logout. Follow the current Gateway runbook for that host rather than switching to a system service or root account without a deliberate operations plan.
If a command says that a service belongs to another user or another OpenClaw installation, do not delete service files manually. First identify which account owns it and whether a second Gateway is already running. The current runbook documents service status and recovery workflows for macOS, Linux, and Windows.
A small first-run checklist
Before you connect a real channel, check these items:
- The Gateway runs under a normal, non-root account.
- You installed it in the isolated host selected in lesson 6.
- The workspace is separate from personal and work folders.
- You know which model provider and test credential onboarding configured.
- You did not connect personal accounts or production keys.
- The Gateway is local and not exposed through a router or public interface.
openclaw gateway status --require-rpcsucceeds.openclaw doctor --linthas no unexplained errors.- You know how to stop and restart the service.
- You know what state must be backed up and where the backup will be stored.
If something is wrong, pause before granting more access. A successful install is only the beginning. Provider credentials, messaging channels, permissions, and automation each widen the system's reach and will be handled in later lessons.
Common problems and a calm response
The openclaw command is not found
The installer may have completed without adding the executable to the current shell's search path, or the terminal may need to be reopened. Read the installer output and the official troubleshooting section. Do not rerun multiple installers or change shell startup files blindly.
Gateway status says it is stopped
Check whether the service was installed, whether onboarding completed, and whether the expected user account is active. Use the status and logs commands. If the setup is new and no important state exists, the official onboarding guide may help identify the missing step. Avoid manually starting a second Gateway until you know whether a service is already supervising it.
The CLI and service show different settings
The CLI process and background service can use different environment variables or configuration paths if the service was installed under another account or before a configuration change. Compare the reported service owner and config path. Do not edit generated service files as a first fix; follow Doctor's guidance and the service runbook.
The health check succeeds but replies fail
A healthy Gateway does not prove the model provider has working authentication or that a channel is connected. In this lesson, only the local Control UI test is expected. Provider setup is lesson 8 and channel pairing is lesson 9.
Mistakes beginners make
Running the installer on the wrong machine
Once connected, the Gateway may have access to files, credentials, and accounts on its host. Install on the isolated host you chose, not whichever terminal happens to be open.
Using administrator privileges to get past an error
The service is intended to run for the current user. Root privileges widen the impact of mistakes and can create a service owned by the wrong account. Stop and diagnose the permission issue instead.
Treating doctor as always read-only
Bare Doctor can perform guided migrations and repairs. Use openclaw doctor --lint when you want a read-only check, and review any proposed repair before accepting it.
Assuming a registered service means the host is always on
A LaunchAgent or systemd user service can supervise the Gateway, but it cannot prevent a laptop from sleeping, a server from losing power, or the network from failing.
Publishing the default Gateway port
The local default port is not an invitation to open it on a router. Keep the local setup private. Remote access requires a deliberate authenticated design.
Connecting a real channel too early
Verify the host, account, status, and stop path first. Add a new test bot and minimal sender allowlist in lesson 9, after the local service behaves as expected.
Recap and try it yourself
Install OpenClaw only in the isolated environment you chose, under a normal user account. Follow the official installer and guided onboarding, review each prompt, and use only a test provider credential. Register the per-user Gateway service, start it, inspect status, and run the read-only openclaw doctor --lint check. Use logs to diagnose issues, and use the service's restart command when you intend a restart.
The host's uptime, Gateway service supervision, and provider health are separate concerns. A registered daemon can recover from some process failures, but it cannot keep a laptop awake or guarantee a model provider is available. Keep the Gateway local for this first check and wait to connect messaging channels until the next lessons.
Try it yourself as a paper exercise before running any command: write down which host you will use, which OS account owns the service, what onboarding should be allowed to inspect, which test credential you will use, how you will verify status, and how you will stop the Gateway. If you cannot answer one of those, resolve it before installing.
Sources, checked 7 November 2026
- OpenClaw, Install and system requirements
- OpenClaw, CLI onboarding
- OpenClaw, Gateway runbook
- OpenClaw, Doctor CLI
- OpenClaw, Run Doctor
- OpenClaw, Gateway service and process troubleshooting