
Over the last four lessons you built extensions one at a time: skills, subagents, hooks and MCP servers. A plugin packages several of them together so someone else can install them with one command. After this lesson you will know what a plugin is, how to find and install one, who gets it, how to keep it updated, and what to check before you trust one. This lesson finishes Module 4.
What a plugin is
A plugin is a bundle of extensions. Installing it adds its skills, agents, hooks and MCP servers to Claude Code on your computer.
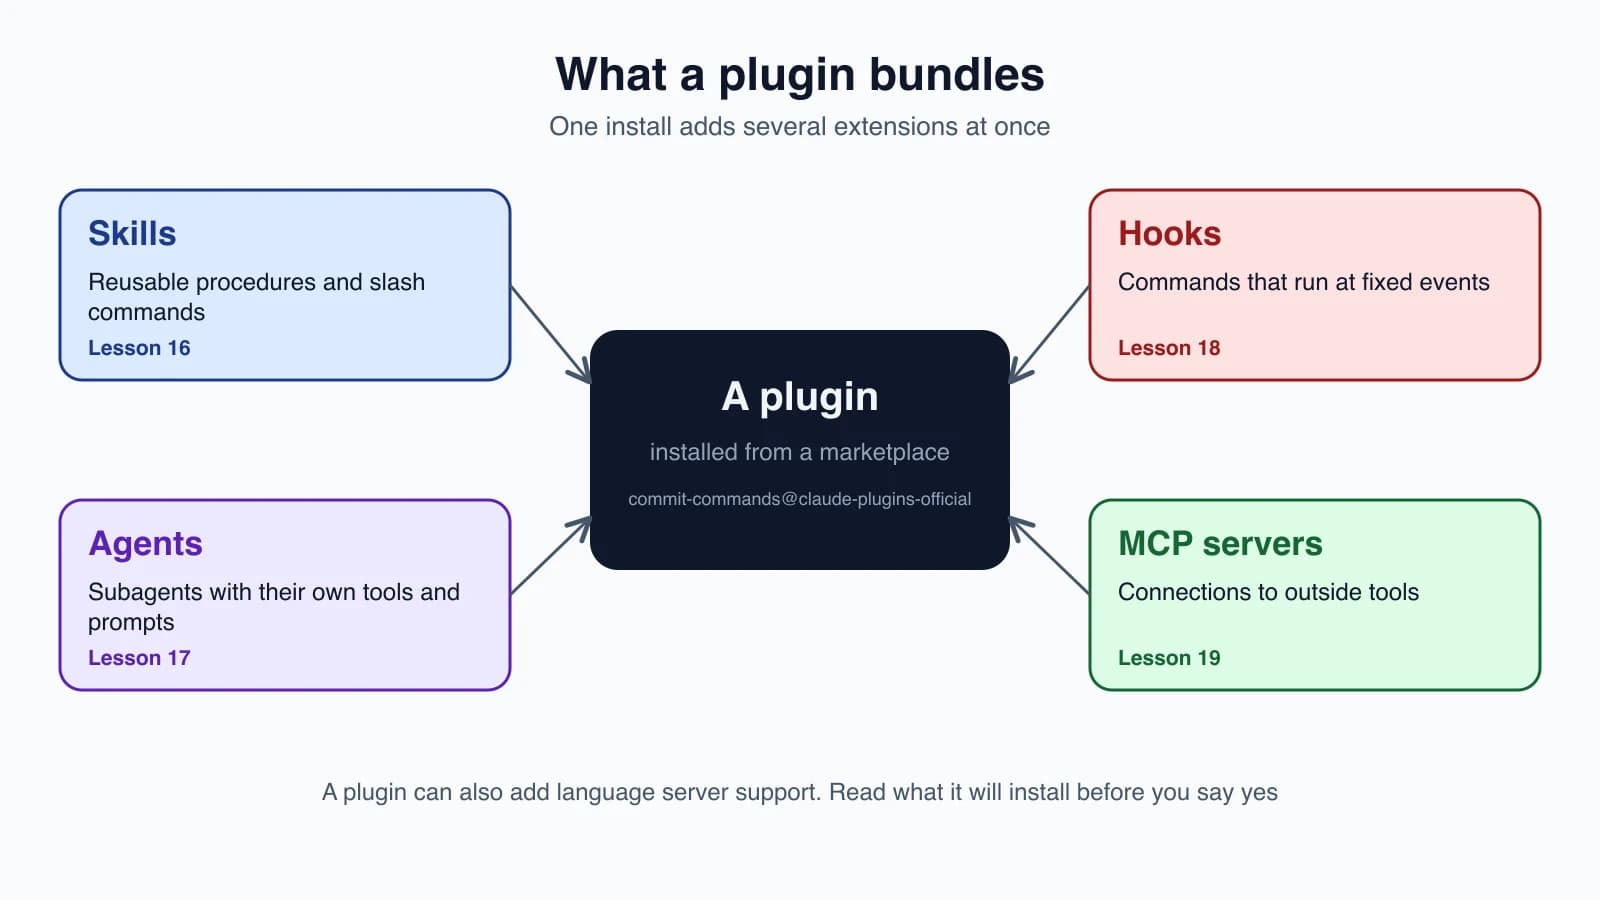
Plugins matter because they are easy to share. Instead of copying a skill file, writing a subagent and editing settings for a hook, a teammate installs one plugin and gets all of it. You can also use plugins other people have published.
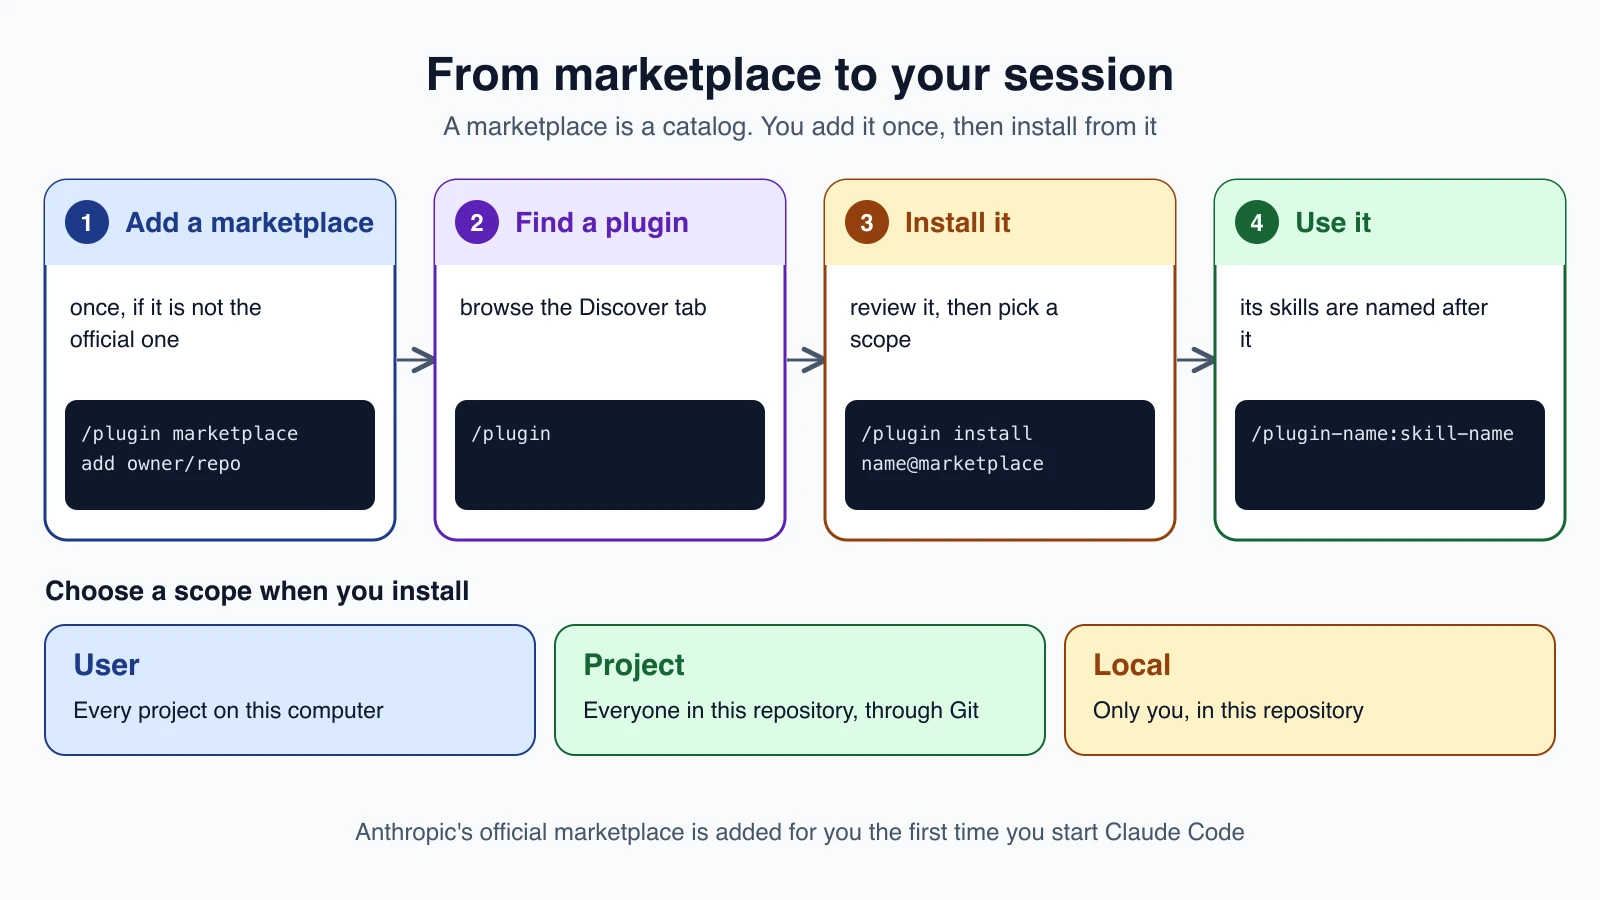
A marketplace is a catalog of plugins. Claude Code has to know about a marketplace before you can install from it. Anthropic runs an official one, called claude-plugins-official, and Claude Code adds it for you the first time you start an interactive terminal session.
From marketplace to your session
Install your first plugin
This walkthrough installs commit-commands from the official marketplace. It adds commands for committing, pushing and opening pull requests. The same steps install any plugin: swap in its name and its marketplace's name.
Start Claude Code in your project and run:
1/plugin install commit-commands@claude-plugins-officialIn a session, this does not install right away. It opens the /plugin panel on the plugin's details, so you can review it first.
To browse instead, run /plugin with no name. The panel opens on the Discover tab, which lists plugins from your marketplaces. Type to search, then press Enter on a plugin to open its details. The panel has four tabs: Discover, Installed, Marketplaces and Errors.
Review what it adds
The details pane shows the plugin's description, and it can also show:
- Will install: the commands, agents, skills, hooks and servers the plugin adds.
- Last updated: shown for plugins in Anthropic's official marketplace.
- Context cost: for official plugins, two estimates in tokens. Every turn is what the plugin adds to each message you send. When invoked is what its skills and agents add once Claude loads them. This connects to the context lessons earlier in the course: a plugin that adds a lot to every turn uses space you could spend on your work.
Read this pane before you install. A plugin can run hooks and MCP servers, which means it can run commands on your computer.
Choose a scope
You choose who gets the plugin:
- Install for you (user scope). Every project on this computer. The entry goes in
enabledPluginsin~/.claude/settings.json. - Install for all collaborators on this repository (project scope). Everyone who works in the repository. The entry goes in
.claude/settings.json, which you commit. - Install for you, in this repo only (local scope). Only you, in this repository. The entry goes in
.claude/settings.local.json.
If the same plugin is set at more than one scope, local beats project, and project beats user. These are the same settings files you met in settings.json.
Project scope has a catch. Committing the entry turns the plugin on for your teammates, but it does not download the plugin to their computers. Each person also runs this once:
1claude plugin install commit-commands@claude-plugins-official --scope projectRead the install summary
Claude Code installs the plugin and any plugins it depends on, then prints a summary. Its last sentence tells you what to do:
Plugin is now active.Nothing more is needed.Run /reload-plugins to apply.Claude Code runs the reload for you when the panel closes.The plugin couldn't be loaded.Open the Errors tab in/pluginto see why.
Use the plugin
Type / and look for the plugin's skills under its name, in the form /<plugin>:<skill>. For this plugin you will see /commit-commands:commit. The plugin name in front is called a namespace, and it stops two plugins from clashing when each has a skill called commit. To list what is installed, open the Installed tab, or run this in your shell:
1claude plugin listAdd a marketplace
You only need this when the plugin is not in the official marketplace, for example one a coworker published. In a session, run /plugin marketplace add followed by the source:
| Source | What you type | Example |
|---|---|---|
| A GitHub repository | owner/repo, with #ref to pin a branch or tag | /plugin marketplace add your-org/plugins#v1.2.0 |
| A Git repository anywhere | The full clone URL | /plugin marketplace add https://gitlab.example.com/your-group/your-marketplace.git |
| A local folder | A path starting with ./ or ../ | /plugin marketplace add ./my-marketplace |
A hosted marketplace.json | Its https:// address | /plugin marketplace add https://example.com/marketplace.json |
Include https:// on every URL. A bare gitlab.example.com/... is read as GitHub shorthand and rejected. /plugin market works as a shorter form of /plugin marketplace. When it succeeds you see Successfully added marketplace: <name>, and its plugins show up on the Discover tab.
To add a marketplace and install from it in one step, name the source with --marketplace:
1/plugin install deploy-helper --marketplace your-org/pluginsIf you have not added that marketplace yet, Claude Code shows you the source it resolved and asks you to confirm.
A private marketplace works the same way. Claude Code clones it with the Git credentials already on your computer and never prompts, so set up access first, for example with gh auth login.
Manage your plugins
Open /plugin and press Tab to reach the Installed tab. It lists your plugins with their scope. On the list:
- Type to filter by name.
- Press
Spaceto enable or disable the selected plugin. - Press
Enterto open its details, where you can choose Update now or Uninstall.
You can also run /plugin enable, /plugin disable and /plugin uninstall. When you close the panel after making changes, Claude Code runs /reload-plugins for you. You can run that command yourself to apply changes without restarting.
Without starting a session, use your shell:
1claude plugin disable formatter@your-org
2claude plugin enable formatter@your-org
3claude plugin uninstall formatter@your-org --scope project
Two helpful checks. In your shell, claude plugin details <name> shows how many tokens a plugin adds to every session, and which of its parts contributes most. On the Installed tab, plugins you have not used for a while appear under Not used recently. They still cost startup time and context, so disable or uninstall them.
If a plugin is already enabled in a project's .claude/settings.json and you uninstall it, Claude Code asks whether to disable it just for you or remove it for everyone.
Keep plugins updated
Plugins update on their own when the marketplace they came from has auto-update turned on. That is on by default for the official marketplace, and off for others, including community and third-party ones. Your running session keeps the version it loaded. After an update you see Plugin updated: <name> · Run /reload-plugins to apply, and the next session loads the new version.
To update one plugin now, open it on the Installed tab and choose Update now, or run:
1claude plugin update <plugin>@<marketplace>To turn auto-update on or off for a marketplace, open the Marketplaces tab in /plugin, select it and choose Enable auto-update or Disable auto-update. The same tab lists, updates and removes marketplaces. Removing a marketplace also uninstalls every plugin you installed from it.
Stay safe
A plugin can run hooks and start MCP servers. That is real code running on your computer with your permissions, so treat installing a plugin like installing software.
- Read the details pane before you install, especially the Will install list.
- Trust the marketplace. Add marketplaces from sources you know. A plugin from an unknown marketplace deserves the same caution as any download.
- Check updates for plugins you rely on. Auto-update is off for most marketplaces, which means you choose when new code arrives.
- Remove what you do not use. Fewer plugins means less context cost and less to trust.
- Remember the other protections. Permission rules from Permission modes and your own hooks still apply to what a plugin does.
The official documentation has a page on plugin security and trust that is worth reading before you install from a marketplace you do not know.
Where plugins do not load
- Cloud sessions, including the browser at claude.ai/code, do not load the plugins you installed on your own computer.
- Non-interactive runs with
claude -pdo not run/plugin. Plugins you already installed do load, and you manage them from your shell withclaude plugincommands.
Mistakes beginners make
- Installing without reading the details pane. Check what the plugin will add.
- Assuming project scope installs for teammates. It enables the plugin for them. Each person still needs to run the install once.
- Forgetting the namespace. Skills appear as
/plugin-name:skill-name, not just/skill-name. - Adding a bare URL. Start with
https://or useowner/repofor GitHub. - Leaving unused plugins on. They add startup time and context cost.
- Trusting every marketplace equally. Add only marketplaces from sources you know.
Quick recap
- A plugin bundles skills, agents, hooks and MCP servers, so one install adds several extensions.
- A marketplace is a catalog. Anthropic's official one is added automatically.
- Use
/pluginto browse,/plugin install name@marketplaceto review and install, and choose a scope: user, project or local. - Skills from a plugin are named
/plugin-name:skill-name. - Add other marketplaces with
/plugin marketplace add, and apply changes with/reload-plugins. - Review plugins before installing, and remove ones you do not use.
Try it yourself
In your claude-practice folder, start Claude Code and run /plugin. Browse the Discover tab and open the details for commit-commands. Read the Will install list and, if shown, the context cost. Install it at local scope, then type / and find /commit-commands:commit. Run claude plugin list in your shell to confirm. When you are done, remove it with claude plugin uninstall commit-commands@claude-plugins-official.
Module 4 is complete. Next lesson, the start of Module 5: Git workflows and worktrees.