
Claude Code can read your files, edit them and run commands. That is useful, and it is also why you need control over it. This lesson explains the controls. You will learn the permission modes, how to switch between them, what a permission prompt is asking you, and how to write rules that always allow or always block specific actions. By the end you will know how to be careful when the work is sensitive and relaxed when it is safe.
Why permissions exist
Every action Claude takes has a different level of risk. Reading a file changes nothing. Editing a file changes your project, but you can undo it. Running a command might delete files, install software or push code to a server. Permissions let you decide, in advance, which of these Claude may do on its own and which need your approval.
You control permissions in two layers:
- A permission mode sets the baseline for the whole session.
- Permission rules layer on top and handle specific actions, such as "always allow
npm test" or "never read my.envfile".
The permission modes
A permission mode controls which actions Claude can take without asking you first.
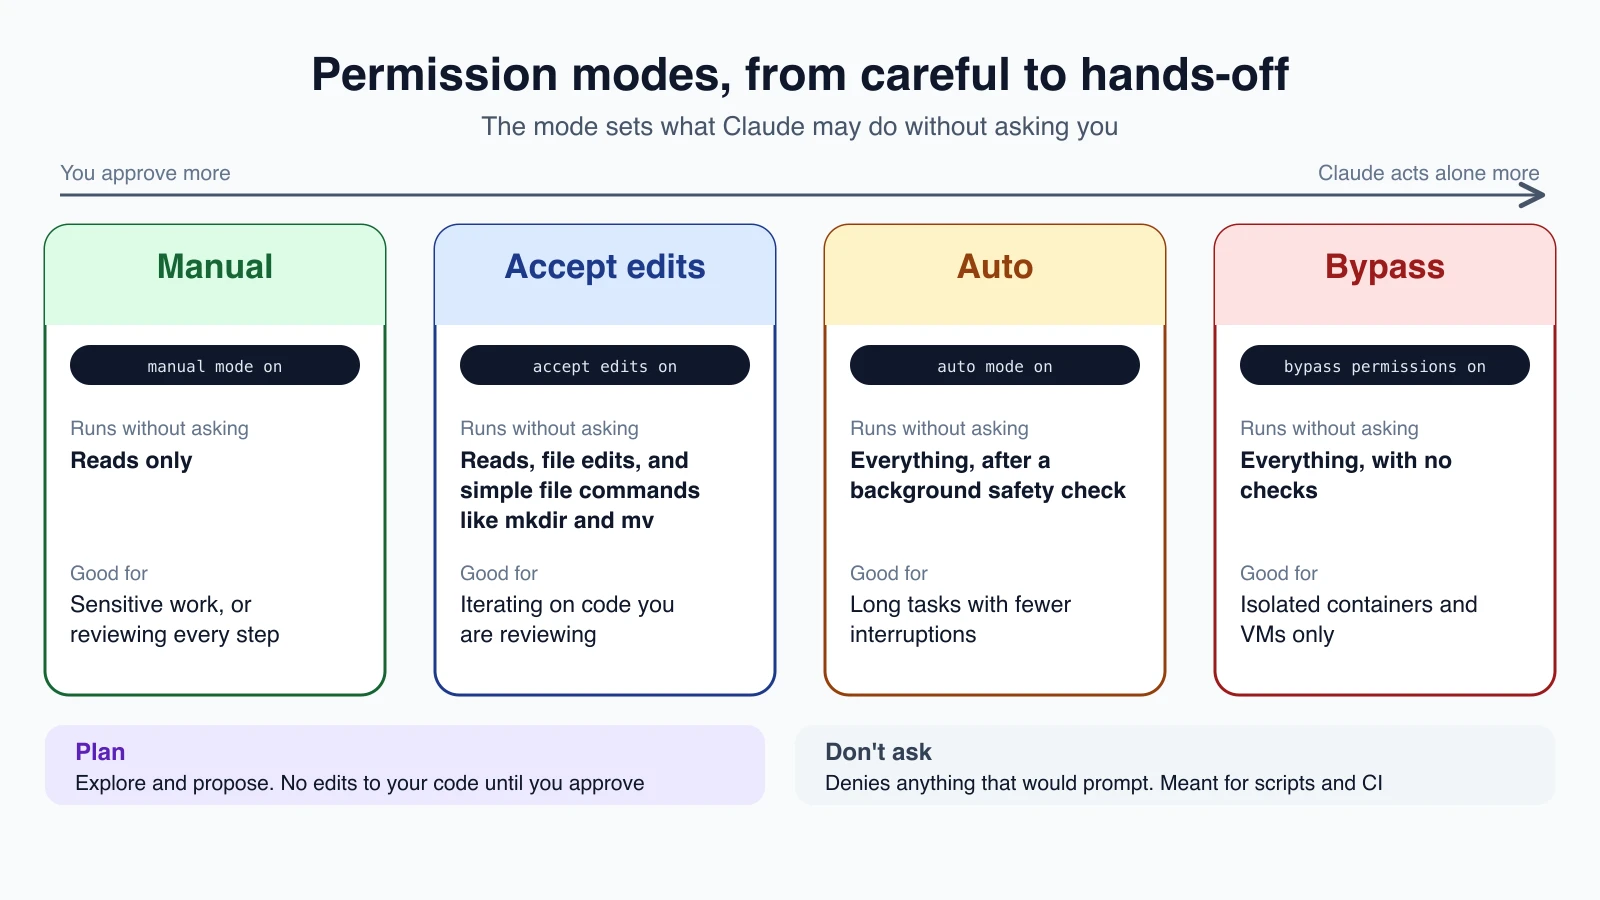
| Mode | What runs without asking | Good for |
|---|---|---|
| Manual | Reads only | Sensitive work, or reviewing every action |
| Accept edits | Reads, file edits, and simple file commands such as mkdir, touch, mv and cp | Iterating on code you are reviewing |
| Plan | Reads, plus commands a safety check approves when Auto mode is available | Exploring before changing anything |
| Auto | Everything, with background safety checks | Long tasks with fewer interruptions |
| Don't ask | File reads in your folders and tools you pre-approved. Anything that would prompt is denied | Locked-down scripts and CI |
| Bypass permissions | Everything | Isolated containers and virtual machines only |
You met Plan mode in lesson 7. Manual is also called default in settings files. Don't ask never appears when you press Shift + Tab, because it is meant for automation.
Switching modes
During a session, press Shift + Tab to cycle. The cycle runs Manual, then Accept edits, then Plan. If you start in Auto, the first press takes you to Manual and the cycle continues from there. The status bar near the prompt shows where you are, with labels such as manual mode on, accept edits on, plan mode on and auto mode on.
At startup, use a flag:
1claude --permission-mode planAs a default, set defaultMode in your settings (lesson 14 covers settings files):
1{
2  "permissions": {
3    "defaultMode": "default"
4  }
5}
One safety detail: auto and bypassPermissions are ignored when set in a project's .claude/settings.json. A project you downloaded cannot quietly switch you into a hands-off mode.
Which mode you start in
Recent versions of Claude Code (v2.1.283 and later) start terminal and VS Code sessions in Auto mode. That is why you may not see many prompts in a fresh session. If Auto is not available to you, the session starts in Manual instead. Running Claude Code with claude -p for scripts starts in Manual, and anything that needs approval is denied unless a rule allows it.
Manual mode and the permission prompt
In Manual mode, Claude asks before it edits a file or runs a command. A permission prompt shows you what Claude is about to do and then offers choices. For a command, it looks something like this:
1Bash command
2  Run the test suite
3  npm test
4  This command requires approval
5
6Do you want to proceed?
7  1. Yes
8  2. Yes, and don't ask again for: npm test *
9  3. Yes, and switch to auto mode
10  4. No
The wording varies by prompt, and the "switch to auto mode" choice does not appear on every one. Here is what each option does:
- Yes runs this one action.
- Yes, and don't ask again approves it now and saves a rule. For commands and web domains, the rule is saved permanently for this repository in
.claude/settings.local.json. For file edits, the approval lasts only until the session ends. - No declines. You can add a note first: move to Yes or No, press
Tab, type a comment, and pressEnter. Claude receives the comment and can adjust. Esccancels the prompt, which counts as a decline.
Accept edits mode
This mode is a good middle ground when you are reviewing code as you go. Claude edits files and runs simple filesystem commands without asking. It still asks before other commands, such as installing packages or running scripts. You then review the result with git diff or /diff instead of approving each edit.
Auto mode
Auto mode lets Claude work with far fewer interruptions. Before a command or network request runs, a separate classifier reviews it in the background. A classifier is a model that checks whether the action fits what you asked for.
By default it allows things like local file work in your project, installing the dependencies your project already lists, and read-only web requests. It blocks things like these:
- Downloading and running code, such as
curl | bash - Production deploys and database migrations
- Force pushing to a repository
- Irreversibly destroying files that existed before the session
- Sending sensitive data to outside servers
If the classifier blocks an action three times in a row, or twenty times in total, Auto mode pauses and Claude Code goes back to asking you. When you approve the action, Auto mode resumes.
Auto mode is convenient, and it is not a guarantee. The documentation says plainly that it reduces prompts without guaranteeing safety. It also has a limit worth knowing: if you tell Claude "don't push to the repository" in chat, the classifier respects that, but a long conversation can be compacted and lose the instruction. For a firm guarantee, use a deny rule, which is next.
Permission rules: allow, ask and deny
Rules give you exact control. There are three kinds:
- Allow rules let Claude use a tool without asking.
- Ask rules always prompt, even when a mode would allow the action.
- Deny rules block an action completely.
Rules are written as Tool or Tool(specifier). Some examples:
| Rule | What it matches |
|---|---|
Bash | Every shell command |
Bash(npm run build) | Exactly the command npm run build |
Read(./.env) | Reading the .env file in the current folder |
WebFetch(domain:example.com) | Web requests to example.com |
Put them in a settings file under permissions:
1{
2  "permissions": {
3    "allow": ["Bash(npm run build)"],
4    "deny": ["Read(./.env)"]
5  }
6}
The easy way to manage rules is the /permissions command, which opens a dialog listing every rule and the file it comes from. You can add and remove rules there without editing JSON.
How the decision is made
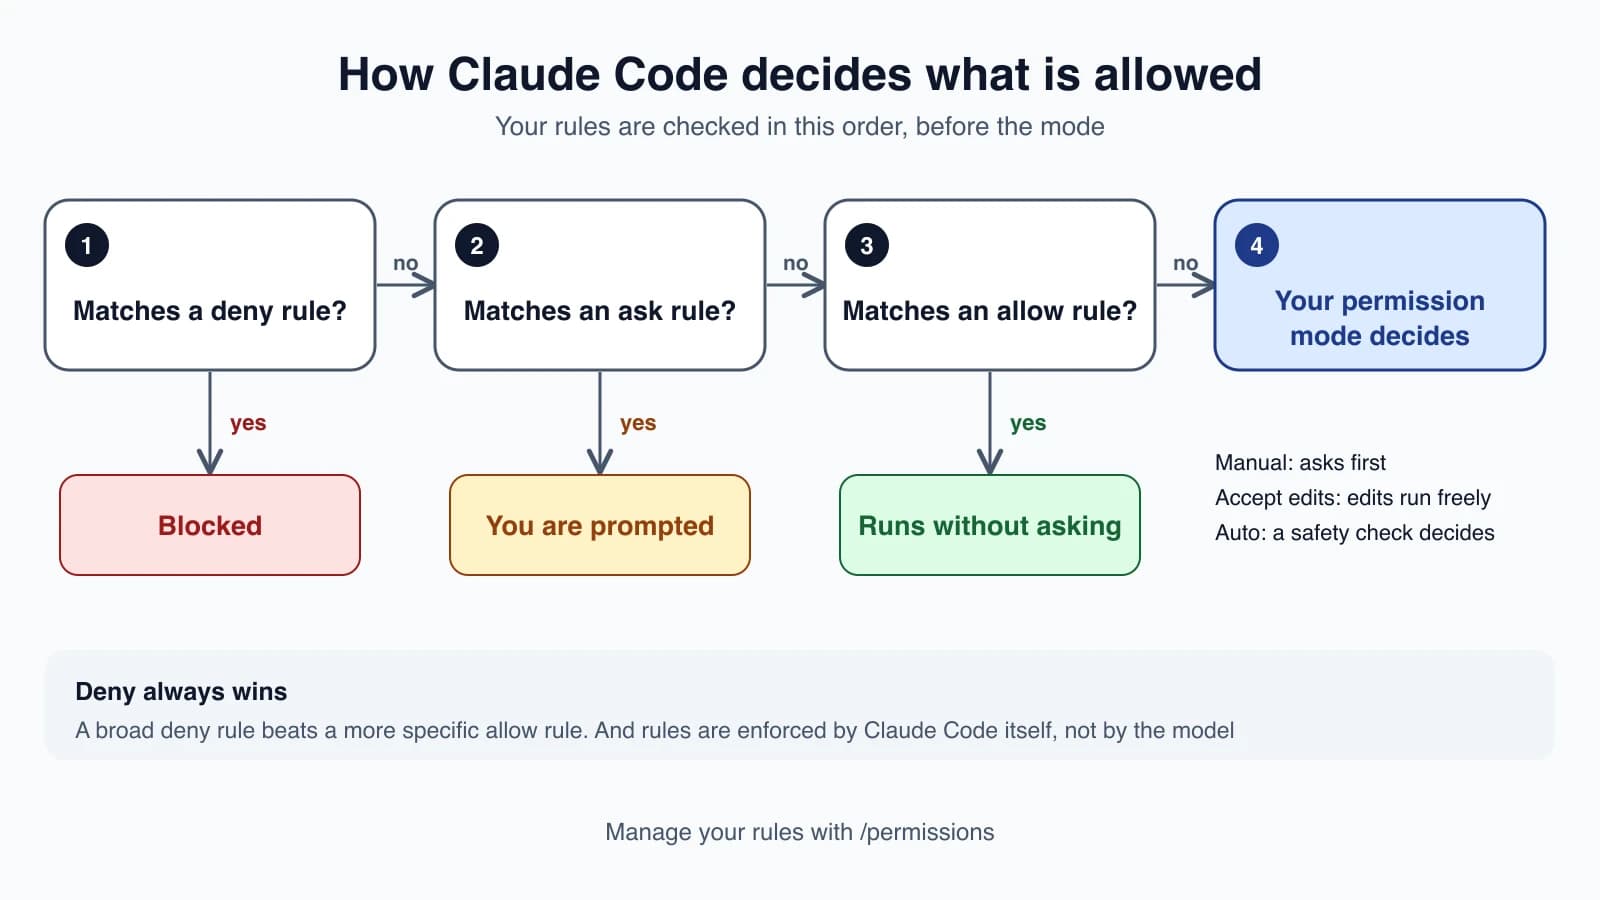
Rules are checked in a fixed order: deny, then ask, then allow. The first match wins, and being more specific does not change that. A broad rule like Bash(aws *) in the deny list blocks every matching command, even if you also allowed Bash(aws s3 ls). If no rule matches, your permission mode decides.
One more point matters a lot. Rules are enforced by Claude Code itself, not by the model. Writing "never touch the production folder" in a prompt or in your CLAUDE.md shapes what Claude tries to do, but it does not change what Claude Code allows. For an action that must never happen, write a deny rule.
Protected paths
Some places get extra protection. Writes to folders such as .git, .vscode, .idea and .claude, and to files such as .bashrc, .zshrc, .gitconfig, .npmrc and .mcp.json, are never silently auto-approved. In Manual and Accept edits modes they prompt, and in Auto mode they go to the classifier. These files can change how your tools behave, so the extra care is deliberate.
The mode to avoid
Bypass permissions mode turns off prompts and safety checks, including for those protected paths. The documentation says to use it only in isolated environments such as containers or virtual machines with no internet access, because it offers no protection against unintended actions or hostile instructions hidden in content Claude reads. Skip it unless you know exactly why you need it. If you want fewer prompts, use Auto mode or Accept edits.
Mistakes beginners make
- Assuming Claude asks before everything. In Auto mode it usually does not. Check the mode label near your prompt, and read the changes afterward.
- Clicking "Yes, and don't ask again" too quickly. For commands, it saves a lasting rule for that repository. Make sure you are comfortable with that command always running.
- Relying on a chat instruction for safety. "Don't delete anything" can be lost when the conversation is summarized. Use a deny rule instead.
- Using Bypass permissions to save time. It removes the safety checks. Auto mode gives you most of the speed with a safety net.
- Forgetting
/permissions. It shows every rule in force and where it came from, which is the quickest way to understand surprising behavior.
Quick recap
- A permission mode sets what runs without asking, and rules add exact control on top.
- Switch with
Shift + Tab,--permission-mode, ordefaultModein settings. - Manual asks before edits and commands, Accept edits allows edits, Plan proposes without editing, and Auto uses a background safety check.
- Rules are checked as deny, then ask, then allow. Deny always wins.
- Claude Code enforces rules. A prompt or
CLAUDE.mdline is guidance, not a lock. - Avoid Bypass permissions outside isolated containers.
Try it yourself
In your practice folder, press Shift + Tab until the label reads manual mode on. Ask Claude to create a new file and watch the permission prompt. Press Tab on Yes, add a short comment, and submit it. Then run /permissions and look at the rules listed. Finally, add a deny rule for reading a file called .env and ask Claude to read that file to see it get blocked.
Next lesson: managing context with /clear, /compact, /rewind and resuming sessions.