
In the last lesson you learned what MCP is. Now you will build a server. We will take the notes tools from earlier lessons and turn them into a real MCP server in Python, test it, connect it to a desktop app, and then look at what changes when you run it remotely instead of on your own machine. By the end you will have a working server of about 60 lines, a clear picture of local versus remote deployment, and a checklist of security basics. The server is small on purpose, because the interesting part is the shape, which stays the same however big the server grows.
The plan
Five steps, the same whatever language you use:
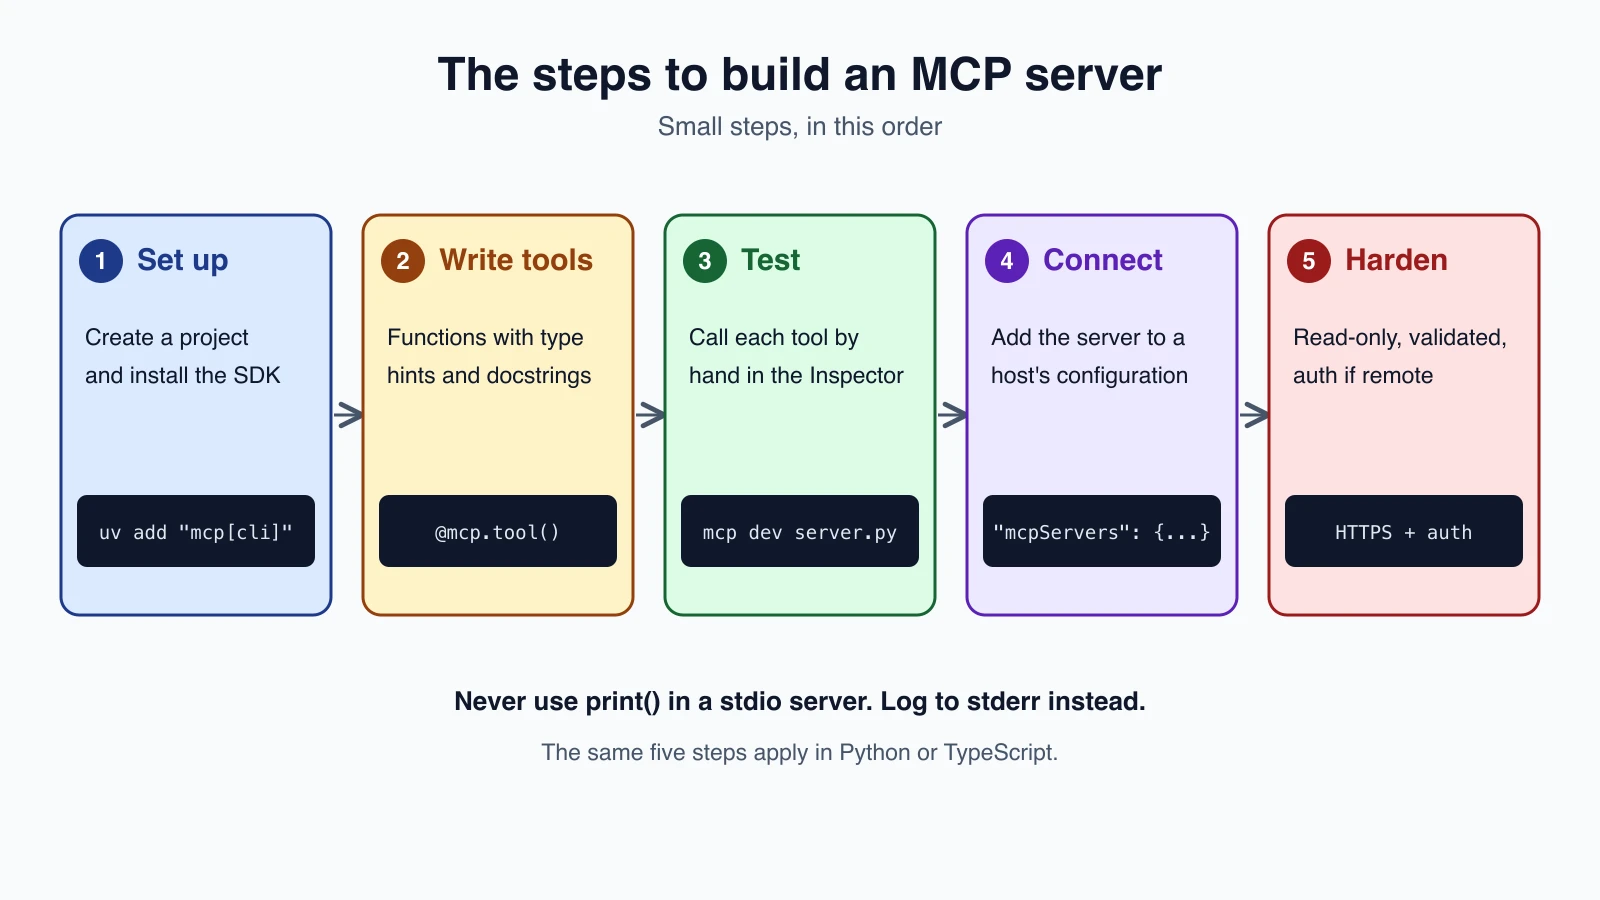
- Set up a project and install the SDK.
- Write tools as ordinary functions.
- Run the server and test it.
- Connect it to a host.
- Harden it, and deploy it if it needs to be remote.
Anthropic's and the MCP project's tutorial builds a weather server in either Python or TypeScript. This lesson uses Python and our notes example, so the code connects with what you already built. If you prefer TypeScript, the same tutorial uses the @modelcontextprotocol/server package with zod, and needs Node.js 20 or higher.
Step 1: Set up
The MCP tutorial uses uv, a fast Python package manager, to create the project and install the SDK:
1uv init notes-server
2cd notes-server
3uv venv
4source .venv/bin/activate
5uv add "mcp[cli]"
The [cli] extra adds command-line tools such as the inspector. The tutorial states that you must use version 2.0.0 or higher of the Python MCP SDK. Python version requirements differ slightly between the tutorial and the SDK page (3.10 and 3.11), so use a recent one, 3.11 or newer, and check the SDK's page if the install complains. The MCP SDK is evolving, so if an import or command below fails, the SDK's own documentation is the source of truth.
Create a folder named notes next to your server file, and put a few small text files in it, such as todo.txt with "Pay rent by the 5th".
Step 2: Write the server
Here is the whole server. Read it first, and then we will go through it piece by piece:
1import difflib
2import logging
3from pathlib import Path
4
5from mcp.server import MCPServer
6
7logger = logging.getLogger(__name__)
8
9mcp = MCPServer("notes")
10
11NOTES = Path(__file__).parent.joinpath("notes").resolve()
12
13
14def note_names():
15    return sorted(p.name for p in NOTES.iterdir() if p.is_file())
16
17
18@mcp.tool()
19def list_notes() -> str:
20    """List the file names of all saved notes. Use this first to see what exists."""
21    return "\n".join(note_names()) or "There are no notes yet."
22
23
24@mcp.tool()
25def read_note(name: str, max_chars: int = 2000) -> str:
26    """Read one saved note by its exact file name.
27
28    Args:
29        name: The file name, for example todo.txt. Use a name from list_notes.
30        max_chars: The most characters to return. Longer notes are cut and marked.
31    """
32    path = (NOTES / name).resolve()
33    if path.parent != NOTES or not path.is_file():
34        close = difflib.get_close_matches(name, note_names(), n=3)
35        hint = f" Did you mean: {', '.join(close)}?" if close else " Call list_notes to see the names."
36        return f"There is no note called '{name}'.{hint}"
37    logger.info("read_note %s", name)
38    text = path.read_text()
39    if len(text) <= max_chars:
40        return text
41    return f"{text[:max_chars]}\n[Truncated: showed {max_chars} of {len(text)} characters.]"
42
43
44@mcp.tool()
45def search_notes(query: str, response_format: str = "concise") -> str:
46    """Find notes that contain a word or short phrase, ignoring case.
47
48    Args:
49        query: The word or phrase to look for, for example deadline.
50        response_format: 'concise' returns file names only. 'detailed' also returns
51            the line number and the matching line.
52    """
53    hits = []
54    for name in note_names():
55        for number, line in enumerate((NOTES / name).read_text().splitlines(), 1):
56            if query.lower() in line.lower():
57                hits.append((name, number, line))
58    if not hits:
59        return "No notes matched. Try a shorter or different word."
60    if response_format == "detailed":
61        return "\n".join(f"{n}:{i}: {text[:120]}" for n, i, text in hits)
62    return "\n".join(sorted({n for n, _, _ in hits}))
63
64
65if __name__ == "__main__":
66    mcp.run(transport="stdio")
What each part does
The server object. MCPServer("notes") creates the server and gives it a name. The tutorial's description is that the class "uses Python type hints and docstrings to automatically generate tool definitions". That is the heart of the Python experience.
Tools from functions. Decorate an ordinary function with @mcp.tool() and it becomes a tool. The SDK builds the tool definition for you:
- The function name becomes the tool name.
- The docstring becomes the description. Everything you learned in Tool definitions and structured output and Designing tools that work applies here. The docstring is the only thing the model reads, so write it for the model, with what the tool does, when to use it, and what each argument means. The
Args:section is how the tutorial documents arguments. - The type hints become the input schema.
name: strandmax_chars: int = 2000tell the model thatnameis a required string andmax_charsis an optional integer.
A path that does not depend on where you start. NOTES is built from __file__, the location of the server file itself, instead of a relative "notes" path. This matters because a host launches your server as its own process, usually from a different working directory than the one you tested in. A relative path that worked in your terminal will quietly fail inside the host. The tutorial makes a related point about using absolute paths in the host's configuration.
Safe behavior, carried over. The path.parent != NOTES check from Build your first agent is still here, so a request for ../something is refused. Results are capped, and the error message suggests the right file name, as in the tools lesson. One caution: the code returns friendly messages for expected problems. How the SDK reports an exception that your function raises is a detail to check in its documentation, so do not assume it behaves like the is_error result from Errors, retries and rate limits.
Read-only by design. Every tool here only reads. A first server should be read-only, because anything a host connects to can call these tools, and you may not control which model or prompt is on the other end.
The run line. mcp.run(transport="stdio") starts the server and listens for messages from a host over standard input and output.
The most important logging rule
The MCP tutorial gives a warning that catches almost everyone. For a stdio server, never write to standard output. A stdio server sends its JSON-RPC messages on stdout, so anything else you print there corrupts them and breaks the connection. In Python, print() writes to stdout by default, so keep it out of the server entirely.
Use the logging module instead, which writes to stderr, as the server above does with logger.info(...). The tutorial's advice is one logger per module, created with logging.getLogger(__name__). For servers that run over HTTP, standard output logging is fine, because it does not share a channel with the responses.
Step 3: Run and test
Before connecting a real host, test the server by itself. The SDK page lists a development command that opens the MCP Inspector, a tool for calling a server's tools by hand:
1uv run mcp dev notes_server.pyIn the inspector you can list the tools, see the generated schemas, and call each tool with arguments. Check three things:
- The tool list shows
list_notes,read_noteandsearch_notes, with the descriptions you wrote. If a description looks thin, improve the docstring. read_notewith a name that does not exist returns your helpful message.- Nothing unexpected is written to the terminal output of the server process apart from logs on stderr.
Then write the habit down: test the tools directly first, and only then involve a model. If a tool misbehaves on its own, a model will not fix it.
Step 4: Connect it to a host
A local desktop host. To use the server in Claude Desktop, add it to the app's configuration file under the mcpServers key. The tutorial describes the file location and this shape:
1{
2  "mcpServers": {
3    "notes": {
4      "command": "uv",
5      "args": [
6        "--directory",
7        "/ABSOLUTE/PATH/TO/notes-server",
8        "run",
9        "notes_server.py"
10      ]
11    }
12  }
13}
This tells the host there is a server named notes, and how to start it: run uv in that folder with run notes_server.py. The host launches the process and talks to it over stdio. Replace the path with the real absolute path to your project (on macOS and Linux you can get it by running pwd in the folder). The tutorial warns that you may need the full path to the uv program in the command field, which you can find with which uv. After saving, restart the app. Your tools then appear in the host and the model can use them.
Your own agent. You can also use the server from the loop you wrote. The MCP SDK includes a client, and the host-side bridge from MCP concepts for agents turns the listed tools into Claude tool definitions. The simpler route for a remote server is Claude's MCP connector, covered next.
Step 5: Harden it, and decide where it runs
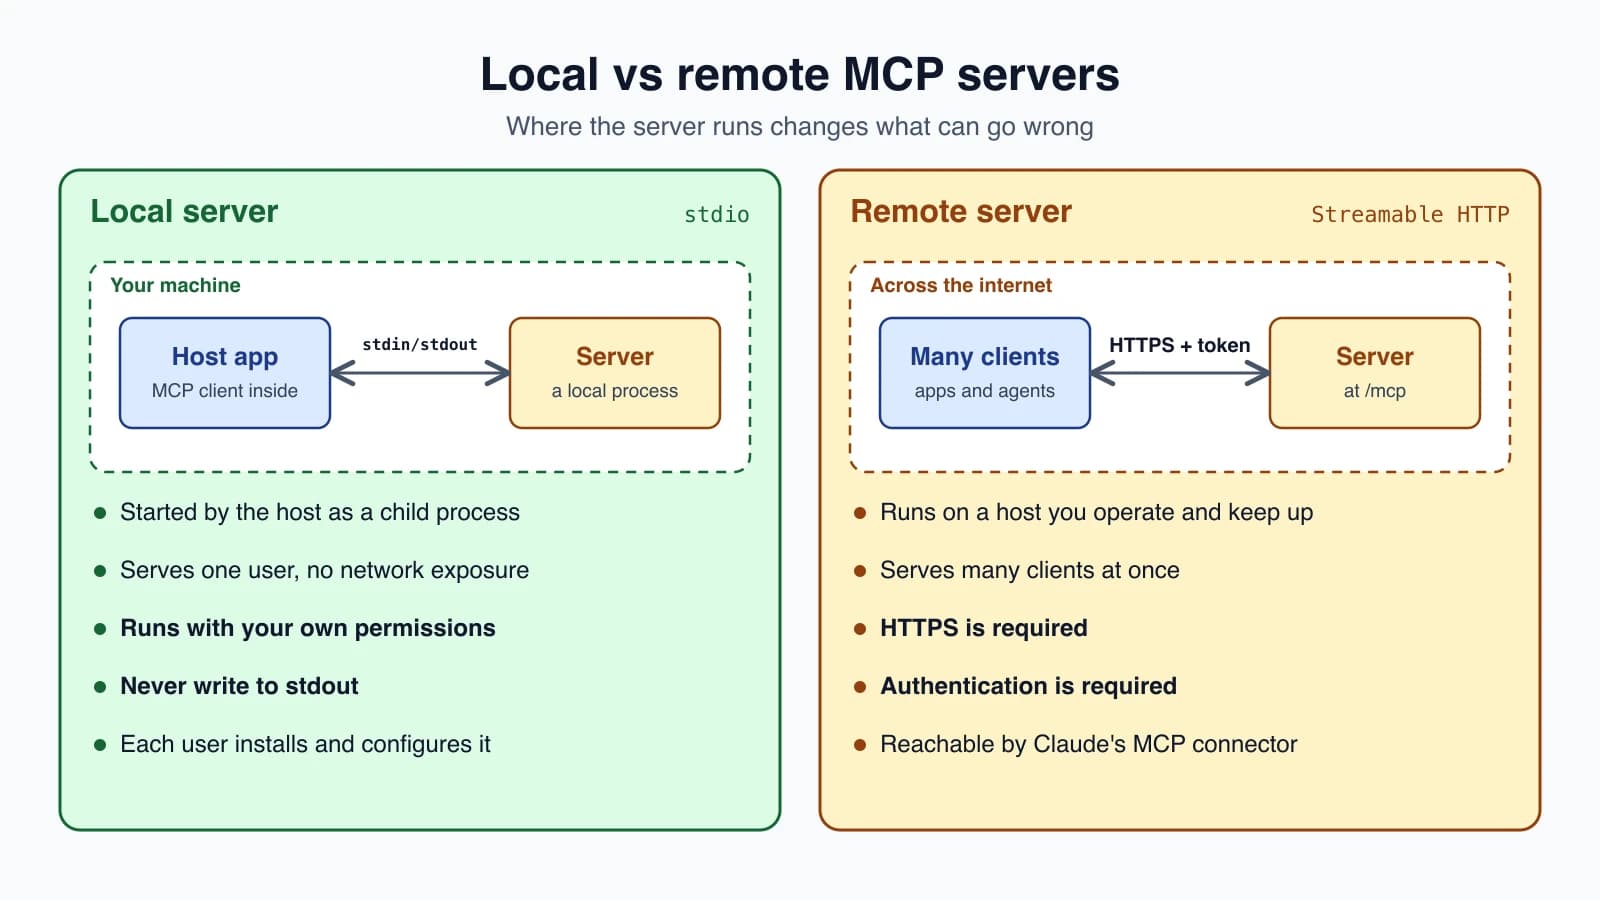
Where a server runs changes what can go wrong.
Local servers (stdio)
A local server is the simplest. The host starts it as a child process on your machine, they talk through standard input and output, and it usually serves a single client.
- Good for: personal tools, anything that touches your own files, and development.
- No network exposure. Nothing can reach it except the host that started it.
- It runs with your permissions. Whatever your user account can do, the server can do. That is why a local server should be read-only unless you have a reason, and why it should not have your secrets lying around where its tools can read them.
- Each user installs it on their own machine and adds it to their own host.
Remote servers (Streamable HTTP)
A remote server runs somewhere on a network, uses the Streamable HTTP transport, and typically serves many clients. The SDK page shows how to run a server that way and says the example client connects to http://localhost:8000/mcp:
1uv run mcp run notes_server.py --transport streamable-httpThat command works for testing on your own machine. To make it a real remote server you also need:
- A host to run it on, such as a container or a small cloud service, with the process kept running.
- HTTPS. Claude's MCP connector, for instance, requires the URL to start with
https://. - Authentication. The MCP documentation says Streamable HTTP supports standard methods such as bearer tokens and API keys, and recommends OAuth for obtaining tokens. An open endpoint that anyone can call is a mistake, however harmless the tools look.
- Public reachability, if you want to use Claude's connector. The connector requires a server exposed over HTTP and cannot connect to a local stdio server directly.
Once it is deployed, a request to Claude can use it through the connector from the last lesson:
1response = client.beta.messages.create(
2    model="claude-opus-5-5",
3    max_tokens=1000,
4    messages=[{"role": "user", "content": "Which of my notes mention rent?"}],
5    mcp_servers=[
6        {
7            "type": "url",
8            "url": "https://your-server.example.com/mcp",
9            "name": "notes",
10            "authorization_token": "YOUR_TOKEN",
11        }
12    ],
13    tools=[{"type": "mcp_toolset", "mcp_server_name": "notes"}],
14    betas=["mcp-client-2025-11-20"],
15)
Keep the connector's limits in mind: it is in beta, and only tool calls are supported, not resources or prompts. Check the current beta header in Anthropic's documentation before you use it.
Security basics for any server
A server is a door into your data and systems, so treat it like one:
- Start read-only. Add tools that change things only when you must, one at a time, with approval steps as in Common agent tools.
- Validate every input. The model, or anyone calling a remote server, controls the arguments. Check paths, ranges and formats, as the notes tools do.
- Confine the scope. One folder, one database user with minimal rights, one API token with the smallest permissions.
- Authenticate remote servers, and never expose one without it.
- Keep secrets out of tool results and out of the code. Read tokens from environment variables.
- Cap output. Truncate long results and say so.
- Log to the right place. Standard error for stdio, and never put secrets or full note contents in logs.
- Remember that your descriptions are prompts. Anything a tool returns goes into a model's context, so do not return text from untrusted sources without thought. Prompt injection and tool sandboxing explains why.
- Version and review. Treat the server like any other service: keep it in version control and review changes to tool descriptions as carefully as code.
Mistakes beginners make
- Using
print()in a stdio server. It corrupts the messages. Uselogging. - Relative paths. The host starts your server from a different folder. Build paths from
__file__. - A thin docstring. The model cannot guess what the tool does.
- Giving a first server write access.
- Skipping the inspector and debugging through a model.
- Exposing a remote server without authentication.
- Plain HTTP for a remote server. Use HTTPS.
- Putting secrets in the code or in tool results.
- Forgetting to restart the host after editing its configuration.
- Assuming the SDK matches an old tutorial. The SDK changes. Check its documentation for your version.
Quick recap
- An MCP server in Python is a few decorated functions. Type hints become the input schema, docstrings become descriptions, and
mcp.runstarts it. - Write docstrings for the model, and build file paths from
__file__so they do not depend on where the host starts the server. - A stdio server must never write to standard output. Log to stderr.
- Test tools in the MCP Inspector before connecting a model.
- A local server is started by the host over stdio and runs with your permissions. A remote server uses Streamable HTTP, needs HTTPS and authentication, and can serve many clients.
- Claude's MCP connector can use a public HTTPS server, tool calls only, in beta.
- Start read-only, validate inputs, confine scope, authenticate, and keep secrets out.
Try it yourself
Build the server above on your machine and open it in the inspector. Break it on purpose: add a print("hello") line to a tool and see what the host reports, then replace it with a logger.info call. Add a fourth tool, count_notes, that returns how many notes exist, and note what the inspector shows for its description if you leave the docstring out. If you use Claude Desktop, add the mcpServers entry and ask it which notes mention a word. Finally, write down what you would need to change before the server could run remotely: where it would live, how it would authenticate callers, and which tools you would turn off.
Next lesson: Prompting for agents.