
Claude Code works the same way for everyone at first, but you can tune how it talks to you and what it shows on screen. This lesson covers two ways to do that. Output styles change how Claude responds, for example shorter answers or explanations of every choice. The status line adds a bar at the bottom of the screen that shows things like the model and how full the context window is. After this lesson you will know how to switch styles, write your own, and set up a status line without writing code.
This lesson finishes Module 3.
Output styles
An output style is a set of instructions that sets Claude's role, tone and response format for every response in a session. You pick it once, and you do not have to repeat "keep it short" or "explain your reasoning" in each prompt.
The built-in styles
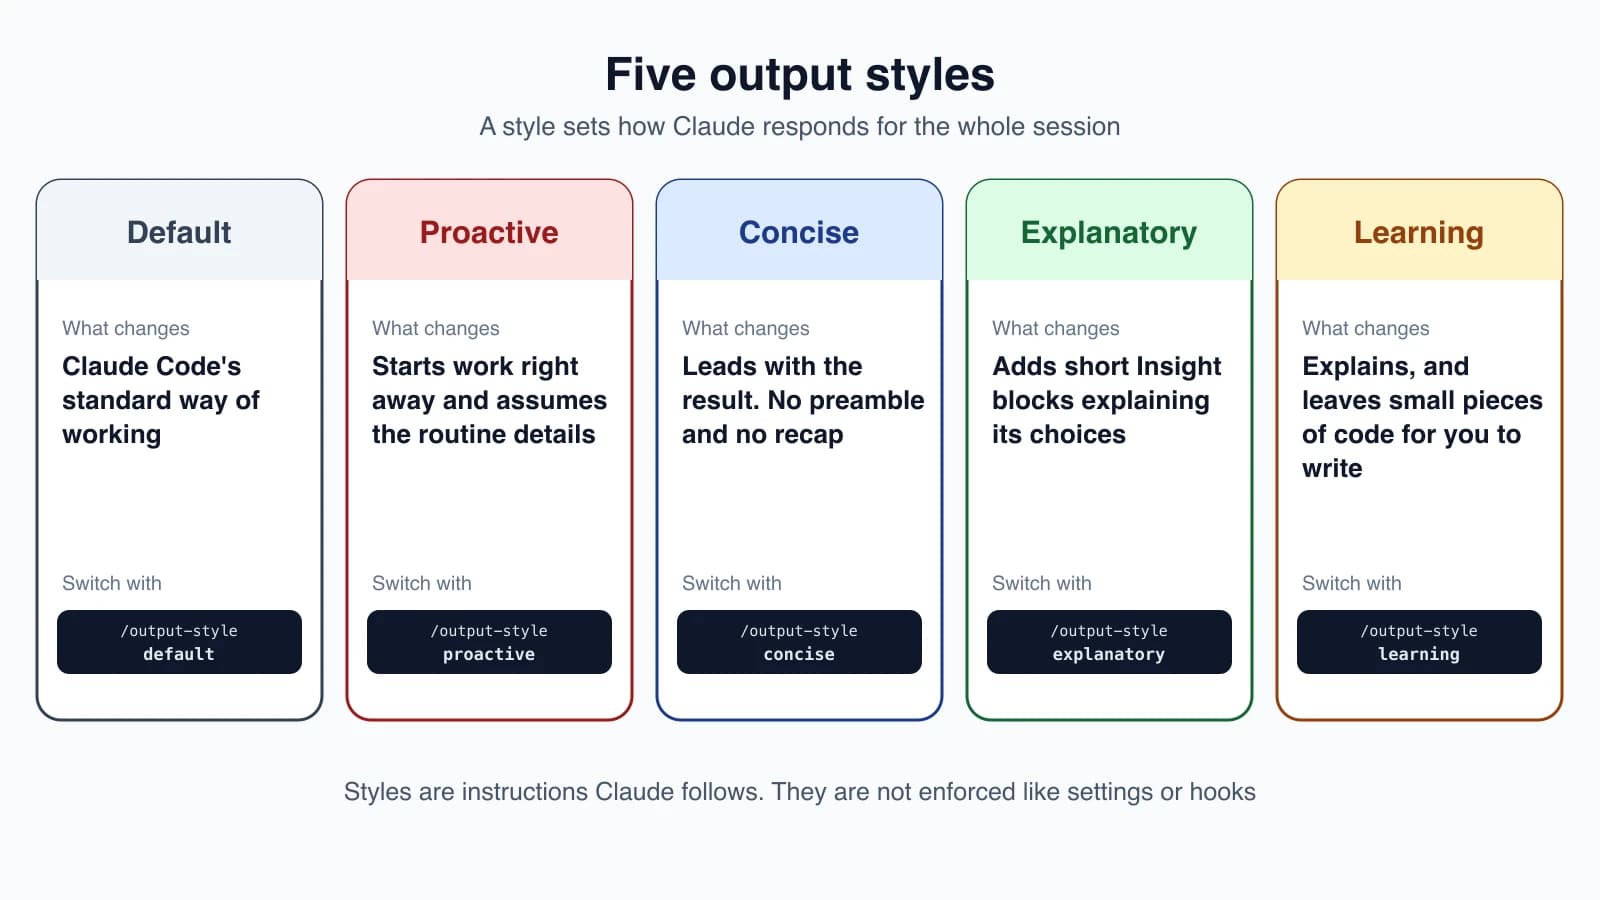
Claude Code starts in the Default style, which is its standard way of working on software tasks. Four other styles are built in, and each keeps the standard behavior and adds its own.
| Style | What changes | Use it when |
|---|---|---|
| Proactive | Claude starts work right away and makes reasonable assumptions instead of asking about routine choices | You want Claude to keep moving, and you will correct it if an assumption is wrong |
| Concise | Answers lead with the result, with no preamble, narration or recap | Default answers are longer than you want |
| Explanatory | Claude adds short Insight blocks that explain the reasons behind its choices | You are learning a codebase, or want the reasoning along with the change |
| Learning | Claude explains its choices and also leaves small pieces of code for you to write | You want hands-on practice while the task still gets done |
A few details worth knowing:
- Proactive does not change your permission mode. Permission prompts appear exactly as before. Its instructions do tell Claude to check with you before deleting data or changing a shared or production system, but that is an instruction Claude follows, separate from permission prompts.
- Concise still writes at full length when you ask for an explanation, and for error reports, failing test output and security warnings, where you need the whole message.
- Explanatory shows its notes in the conversation, in a block like this. They are not written into your files as comments:
1★ Insight ─────────────────────────────────────
2- Every route in this repo goes through the withAuth wrapper, so the new endpoint gets session checks without its own middleware.
3- Rate limits are set per route in limits.ts, which is why this change adds an entry there rather than a global default.
4─────────────────────────────────────────────────- Learning leaves a
TODO(human)comment in a file where there is a real design decision, then asks you to write that part. It waits until you say you are done, comments on your code, and carries on.
Switch styles
The quickest way is the command:
1/output-style conciseWith no name, /output-style lists the available styles and marks the current one. You can also run /config and choose Output style from the menu. The change takes effect from your next message.
Your choice is saved in .claude/settings.local.json, the project-local file from lesson 14. To set a style by hand, use the outputStyle key. The value is case-sensitive, so write Concise, not concise, in a settings file. A value that does not match a style exactly gives you the Default style.
1{
2  "outputStyle": "Explanatory"
3}
To make a style your default in every project, put outputStyle in ~/.claude/settings.json. A project's own settings files take precedence over it.
Create your own style
A custom output style is a markdown file with a short header and your instructions. Save it in one of these folders. The file name becomes the style name.
~/.claude/output-stylesfor all your projects.claude/output-stylesfor one project
Here is an example that makes Claude lead every explanation with a diagram:
1---
2name: Diagrams first
3description: Lead every explanation with a diagram
4keep-coding-instructions: true
5---
6
7When explaining code, architecture, or data flow, start with a Mermaid diagram showing the structure, then explain in prose.
8
9Use flowchart TD for control flow and sequenceDiagram for request paths. Keep diagrams under 15 nodes.
The header fields are all optional:
nameis the name shown in the picker. It defaults to the file name.descriptionis shown in the picker.keep-coding-instructionsset totruekeeps Claude Code's built-in software engineering instructions alongside your style. Set it when you only want to change how Claude communicates, and leave it out when Claude will do something other than coding.
Claude Code reads style files when it starts, so restart it after you create or edit one. Then switch with /output-style.
Styles are not enforced
An output style is an instruction Claude follows, so nothing guarantees it. Pick the right tool for the job:
| You want | Use |
|---|---|
| Every response in a certain voice, length or format | An output style |
| Claude to know your project's commands and conventions | CLAUDE.md (lesson 12) |
| Instructions for one kind of task | A skill (lesson 16) |
| Something that must happen every time | A hook (lesson 18) |
Styles also cost tokens. A style's instructions are sent with every request, and Explanatory and Learning produce longer answers on purpose. Concise does the opposite.
The status line
The status line is a bar at the bottom of Claude Code that shows whatever your script prints. It is useful when you want to see, at a glance, how full the context window is, how much a session has cost, which Git branch you are on, or which of several sessions you are looking at.
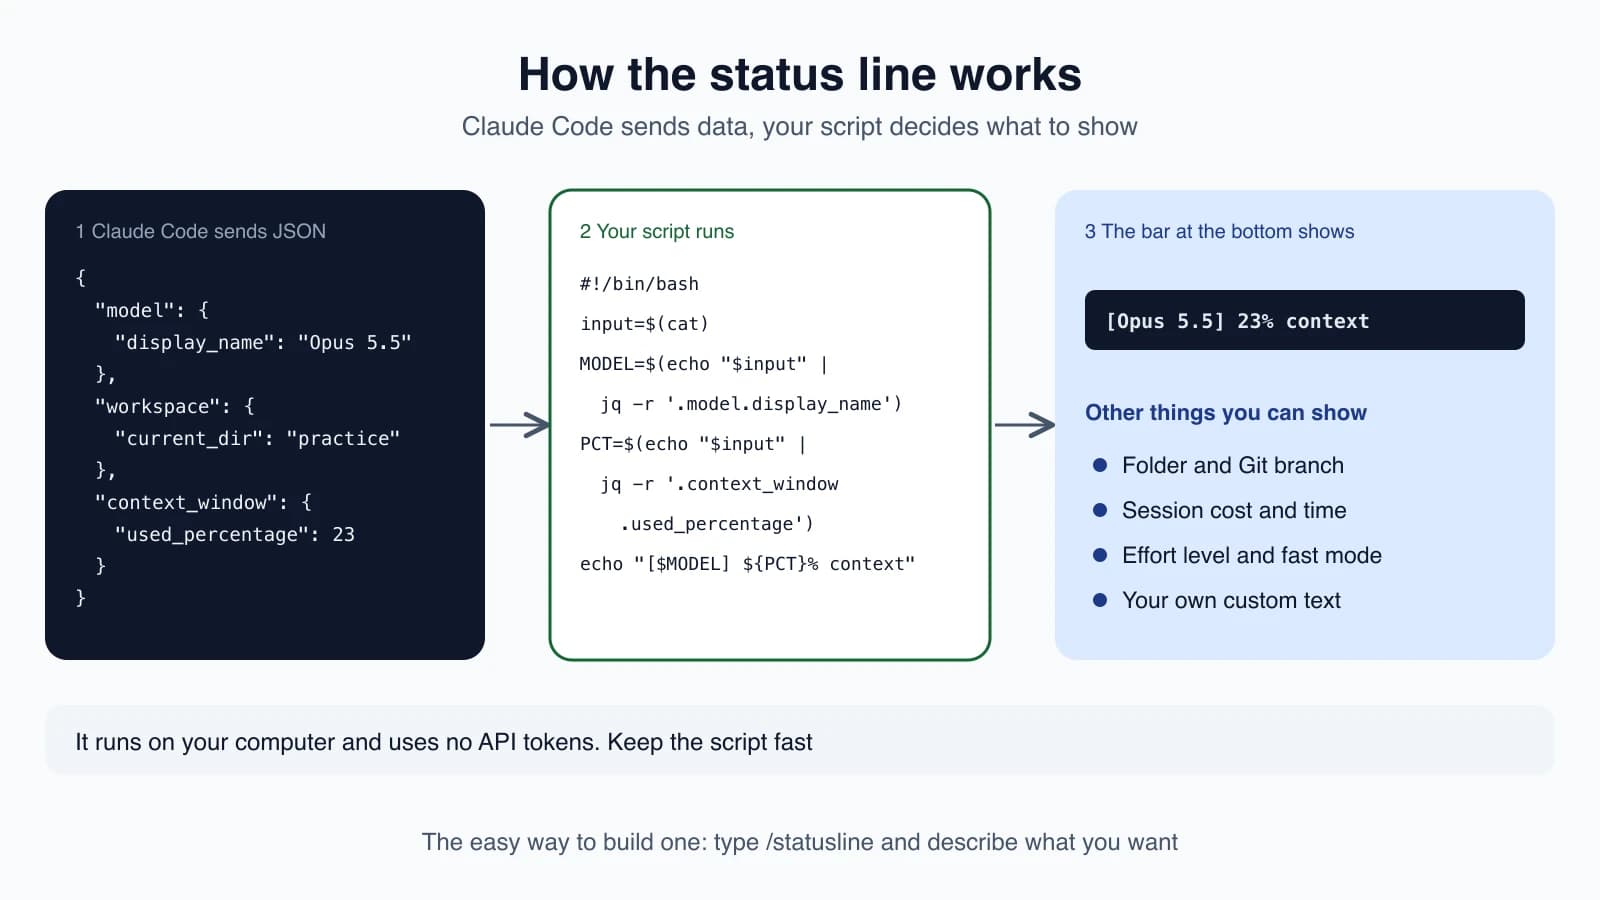
Claude Code sends your script a block of JSON data about the session. JSON is the same text format used in settings files. Your script picks out what it wants and prints a single line, and Claude Code shows that line. The status line runs on your computer and uses no API tokens. It hides briefly during some interactions, such as the help menu and permission prompts.
The easy way: ask Claude
Use the /statusline command and describe what you want in plain English:
1/statusline show model name and context percentage with a progress barClaude Code writes a script into ~/.claude/ and updates your settings for you. Approve the file edits if it asks. To remove the status line later, run /statusline delete.
The manual way
Add a statusLine entry to ~/.claude/settings.json. Setting type to "command" means "run this shell command", and command points to your script:
1{
2  "statusLine": {
3    "type": "command",
4    "command": "~/.claude/statusline.sh"
5  }
6}
Here is a simple script for macOS and Linux that shows the model, the folder and the context percentage. Save it as ~/.claude/statusline.sh. It uses jq, a small tool for reading JSON, which you may need to install.
1#!/bin/bash
2# Read the JSON that Claude Code sends on stdin
3input=$(cat)
4
5MODEL=$(echo "$input" | jq -r '.model.display_name')
6DIR=$(echo "$input" | jq -r '.workspace.current_dir')
7PCT=$(echo "$input" | jq -r '.context_window.used_percentage // 0' | cut -d. -f1)
8
9echo "[$MODEL] ${DIR##*/} | ${PCT}% context"
Make it executable with chmod +x ~/.claude/statusline.sh. Claude Code reloads settings automatically, so the bar appears as soon as you save. Windows users can use PowerShell or Git Bash scripts, and the official documentation has examples for both.
What data you can show
Your script receives many fields. Some of the most useful:
| Field | What it holds |
|---|---|
model.display_name | The current model |
workspace.current_dir | The working folder |
context_window.used_percentage | How full the context window is |
cost.total_cost_usd | Estimated session cost in US dollars |
cost.total_duration_ms | How long the session has run |
effort.level and fast_mode | Your effort level and fast mode state |
session_name | The name you gave the session, or an automatic title |
output_style.name | The current output style |
For anything else, such as the Git branch, your script can run a command and print the result. The status line refreshes when a new message arrives, after /compact, and when the permission mode changes. If it shows a clock or other time-based data, add a refreshInterval in seconds to the settings entry.
One side effect: with a custom status line, Claude Code stops showing most footer hints such as esc to interrupt. They still work.
Keep it fast
The script runs often, so it should finish quickly. A slow command, such as a network call, makes the interface feel sluggish. If a status line does not appear, check that the script is executable and that jq is installed, then run claude doctor and /status.
Mistakes beginners make
- Expecting a style to be enforced. Styles are guidance. Use hooks for must-happen rules.
- Using the wrong case in settings.
outputStyleis case-sensitive in a settings file. - Editing a custom style and not restarting. Claude Code reads style files at startup.
- Leaving out
keep-coding-instructions. A custom style without it drops the built-in coding instructions, which is not what you want for a coding style. - Writing a slow status line script. Keep it quick, and cache anything expensive.
- Forgetting that
jqis a separate tool. The sample script needs it installed.
Quick recap
- Output styles change how Claude responds for a whole session: Default, Proactive, Concise, Explanatory and Learning.
- Switch with
/output-style, or/config. Save a default withoutputStylein settings. - Custom styles are markdown files in
~/.claude/output-stylesor.claude/output-styles. Restart to load changes. - The status line shows a line your script prints. The easy route is
/statuslineand a plain-English request. - Neither styles nor the status line enforce anything. Use settings and hooks for that.
Try it yourself
In your claude-practice folder, run /output-style and look at the list. Switch to explanatory, ask Claude to add a footer to a page, and read the Insight block. Then switch to concise and ask for the same kind of change to see the difference in length. Finally, run /statusline show model name, folder name and context percentage and check the bar at the bottom of the screen.
Module 3 is complete. Next lesson, the start of Module 4: custom slash commands and skills.