
By the end of this lesson, Claude Code will be installed on your computer, you will have confirmed it works, and you will be signed in and ready for your first session. The whole process takes about five minutes.
If you would rather not use a terminal at all, there is a shortcut. The Claude desktop app has a Code tab with Claude Code built in, and claude.ai/code runs it in your browser. Both need a paid account and no installation of the command-line tool. You can follow the rest of this course from either one, although the examples show the terminal.
Before you start
You need three things.
- A supported computer. Claude Code runs on macOS 13 or newer, Windows 10 (version 1809) or newer, Ubuntu 20.04 or newer, Debian 10 or newer, and Alpine Linux 3.19 or newer. It needs at least 4 GB of memory and an internet connection.
- An account that includes Claude Code. That means a Pro, Max, Ultra, Team, Enterprise or Anthropic Console account. The free claude.ai plan does not include Claude Code. You can also connect it to Amazon Bedrock, Google Cloud or Microsoft Foundry if your company uses those.
- A project folder to try it in. Any folder with a few files works, and an empty one is fine too.
New terms for this lesson: the terminal is the text window where you type commands. A shell is the program inside it that reads what you type. PATH is the list of folders your computer searches when you type a command name.
The route at a glance
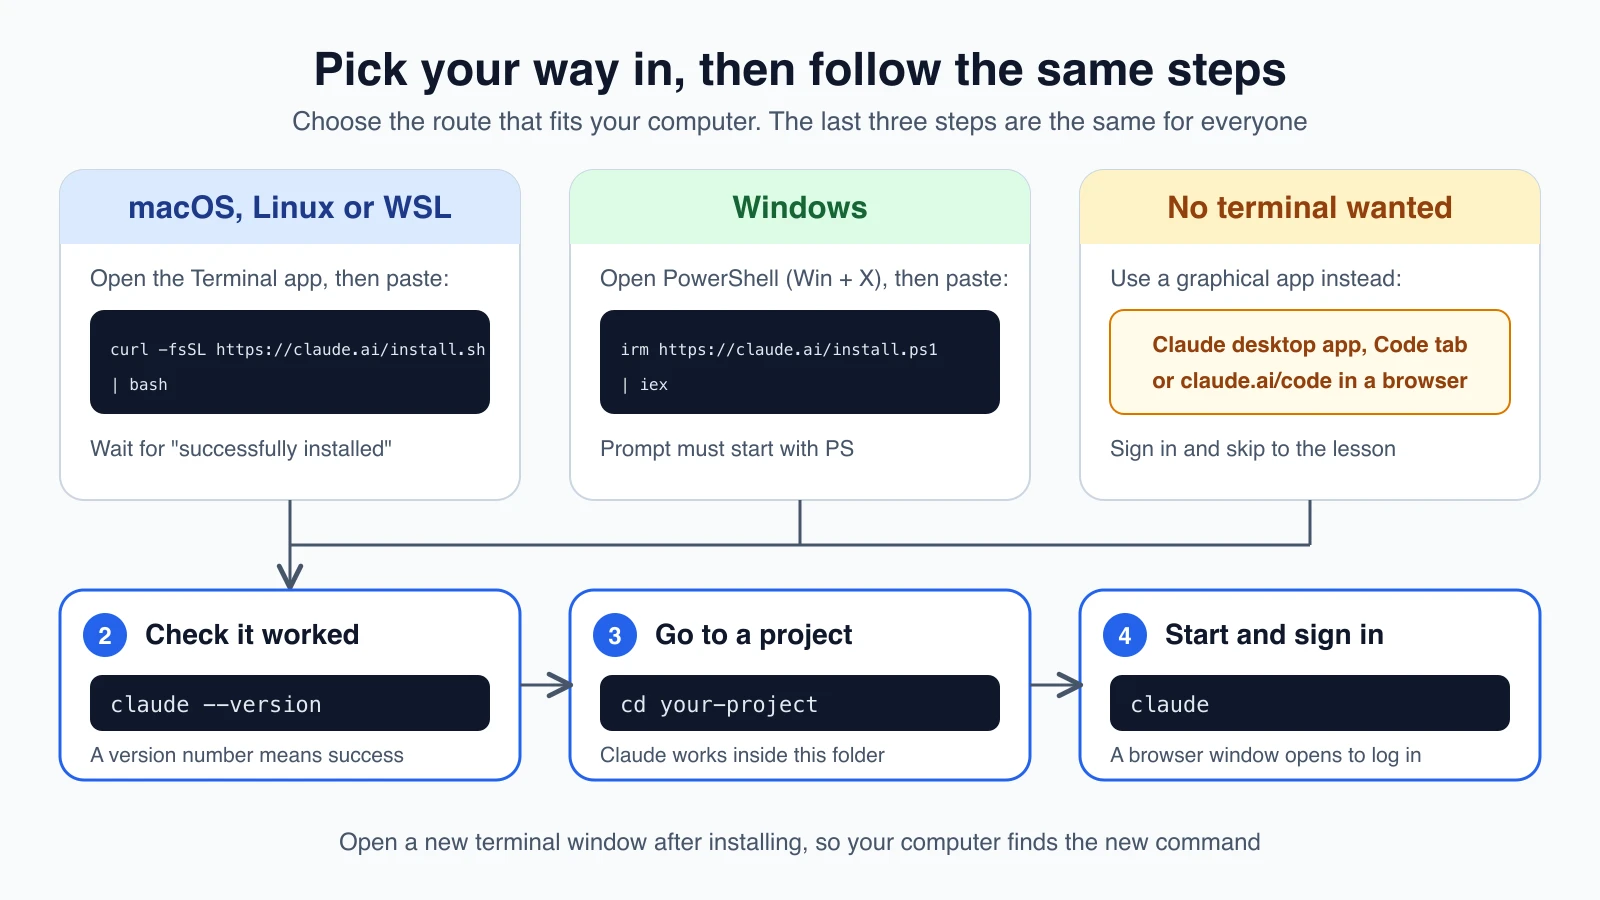
Step 1: Open a terminal and install
Open your terminal first.
- macOS: press
Cmd + Space, typeTerminal, and pressEnter. - Windows: press
Win + Xand choose Windows PowerShell (or Terminal). - Linux: press
Ctrl + Alt + T, or search for "Terminal" in your applications.
You will see a window with a blinking cursor. Now paste the command for your system and press Enter. To paste, use Cmd + V on macOS, Ctrl + V in Windows PowerShell, and Ctrl + Shift + V on most Linux terminals.
macOS, Linux, or WSL (WSL is Windows Subsystem for Linux, a way to run Linux inside Windows):
1curl -fsSL https://claude.ai/install.sh | bashWindows PowerShell:
1irm https://claude.ai/install.ps1 | iexWindows CMD (the older Windows command window):
1curl -fsSL https://claude.ai/install.cmd -o install.cmd && install.cmd && del install.cmdHow do you know whether you are in PowerShell or CMD? Look at the start of each line. PowerShell shows PS C:\Users\YourName>. CMD shows C:\Users\YourName> with no PS. Using the wrong command in the wrong window is the most common Windows mistake, and the error messages below tell you how to spot it.
The installer shows no progress while it downloads, so it can look frozen. Leave the window open and wait. When it finishes, you should see Claude Code successfully installed!
On native Windows you do not need to run anything as Administrator. Installing Git for Windows is optional. Without it, Claude Code uses PowerShell to run commands, and with it, Claude Code can use Git Bash.
Step 2: Check that it worked
Close the terminal and open a new one. This matters. A terminal that was already open may not know about the new command yet. Then type:
1claude --versionA working install prints a version number, something like 2.1.211 (Claude Code). Your number will differ, because Claude Code updates often.
If you want a fuller health check, run:
1claude doctorIt prints a read-only report on your installation and settings, with suggested fixes for any problems. It does not start a session.
Step 3: Go to your project and start Claude Code
Claude Code works inside the folder where you start it, so move into your project first. cd stands for "change directory", and a directory is just a folder:
1cd your-projectReplace your-project with the real path, for example cd ~/Documents/my-website. If you are not sure where you are, type pwd on macOS or Linux, or cd on Windows, to print your current folder.
Now start Claude Code:
1claudeStep 4: Sign in
The first time you run claude, it asks you to log in. A browser window opens. Sign in with the Claude account that has Claude Code access and follow the prompts. When you return to the terminal, you will see the welcome screen and a place to type.
If you have an ANTHROPIC_API_KEY environment variable set, Claude Code asks whether to use that key. If you approve it, the login step is skipped. Most beginners can ignore this and sign in with the browser.
Claude Code runs entirely in text. A few basics for your first minutes:
- Type your message and press
Enterto send it. - Press
Escto interrupt Claude if it is mid-task. - Type
/helpto see the available commands. - Type
exit, or pressCtrl + Dtwice on an empty prompt, to leave. - You cannot click inside the terminal. Use the arrow keys to move around.
Other ways to install
The commands above are the recommended route. Two other options exist, with one trade-off to know about.
- Homebrew on macOS:
brew install --cask claude-code - WinGet on Windows:
winget install Anthropic.ClaudeCode
The recommended installer updates itself in the background. Homebrew and WinGet installs do not, so you run brew upgrade claude-code or winget upgrade Anthropic.ClaudeCode yourself now and then. Developers who already use Node.js 22 or newer can also run npm install -g @anthropic-ai/claude-code. Never put sudo in front of that command.
To update by hand at any time, run claude update.
When something goes wrong
Most problems fall into four cases.
command not found: claude (macOS or Linux), or 'claude' is not recognized (Windows). The installer worked, but your computer does not know where to find it, because the install folder is not on your PATH. Open a new terminal first. If that does not fix it, add the folder. On macOS with the default Zsh shell:
1echo 'export PATH="$HOME/.local/bin:$PATH"' >> ~/.zshrc
2source ~/.zshrc
On Linux with Bash, use ~/.bashrc in place of ~/.zshrc. On Windows, run this in PowerShell, then open a new window:
1$currentPath = [Environment]::GetEnvironmentVariable('PATH', 'User')
2[Environment]::SetEnvironmentVariable('PATH', "$currentPath;$env:USERPROFILE\.local\bin", 'User')
'irm' is not recognized or The token '&&' is not a valid statement separator. You pasted a command into the wrong window. The first error means you are in CMD and used the PowerShell command. The second means you are in PowerShell and used the CMD command. Switch windows, or use the command that matches the one you have open.
syntax error near unexpected token '<', or a wall of HTML. The download returned a web page instead of the installer. If the page mentions "App unavailable in region", Claude Code is not offered in your country yet. Otherwise run the command again, or install with Homebrew.
dyld: cannot load or built for Mac OS X 13.0. Your macOS is older than Claude Code supports. Update through Software Update in the Apple menu.
For anything else, the official installation troubleshooting page lists errors by message.
Mistakes beginners make
- Staying in the old terminal window. Open a new one after installing, or
claudemay not be found. - Mixing up PowerShell and CMD. Check for the
PSat the start of the line before you paste. - Starting Claude Code in the wrong folder. It works inside the folder you launch it from. Run
cdinto your project first. - Signing in with a free account. The free claude.ai plan does not include Claude Code, so the login can succeed while access fails. Check that your plan is listed above.
- Running the install with
sudo. You do not need it, and it can cause permission problems later.
Quick recap
- Claude Code installs with one pasted command: one for macOS, Linux and WSL, another for Windows PowerShell, and a third for Windows CMD.
- Open a new terminal, then run
claude --versionto confirm the install, orclaude doctorfor a fuller check. - Go to your project folder with
cd, runclaude, and sign in through the browser. - You need a Pro, Max, Ultra, Team, Enterprise or Console account. The free claude.ai plan does not include it.
- If
claudeis not found, the cause is almost always PATH or an old terminal window.
Try it yourself
Install Claude Code, run claude --version, and write down the version number. Then start claude in a folder of your own, ask it "What files are in this folder?", and press Esc before it finishes to see how interrupting works. Leave with exit.
Next lesson: your first real session with Claude Code.