
After this lesson you will move around Claude Code quickly. You will know what each part of the terminal screen is for, which special characters change how a message is treated, which keys to press when Claude is mid-task, and which slash commands are worth learning first. No memorizing needed. Keep the cheat sheet in this lesson open until the keys become habit.
You should already have a working session from lesson 3. If you are on the desktop app or in an editor, most ideas here still apply, but the keyboard shortcuts are for the terminal version.
What you are looking at
Claude Code runs entirely as text, so the screen is simple. There are three areas to know.
- The conversation. Everything you and Claude say, plus a short line for each action Claude takes, such as reading a file or running a command.
- The prompt box. The place where you type. It has the version, current model and working folder shown near it.
- The status area. It shows the current permission mode and, while Claude works, progress such as its to-do list.
You cannot click inside the terminal. You move with the keyboard, and that is why shortcuts matter more here than in a normal app.
The first character decides what happens
Most of what you type is plain English, and Claude treats it as a request. But four starting characters change the behavior.
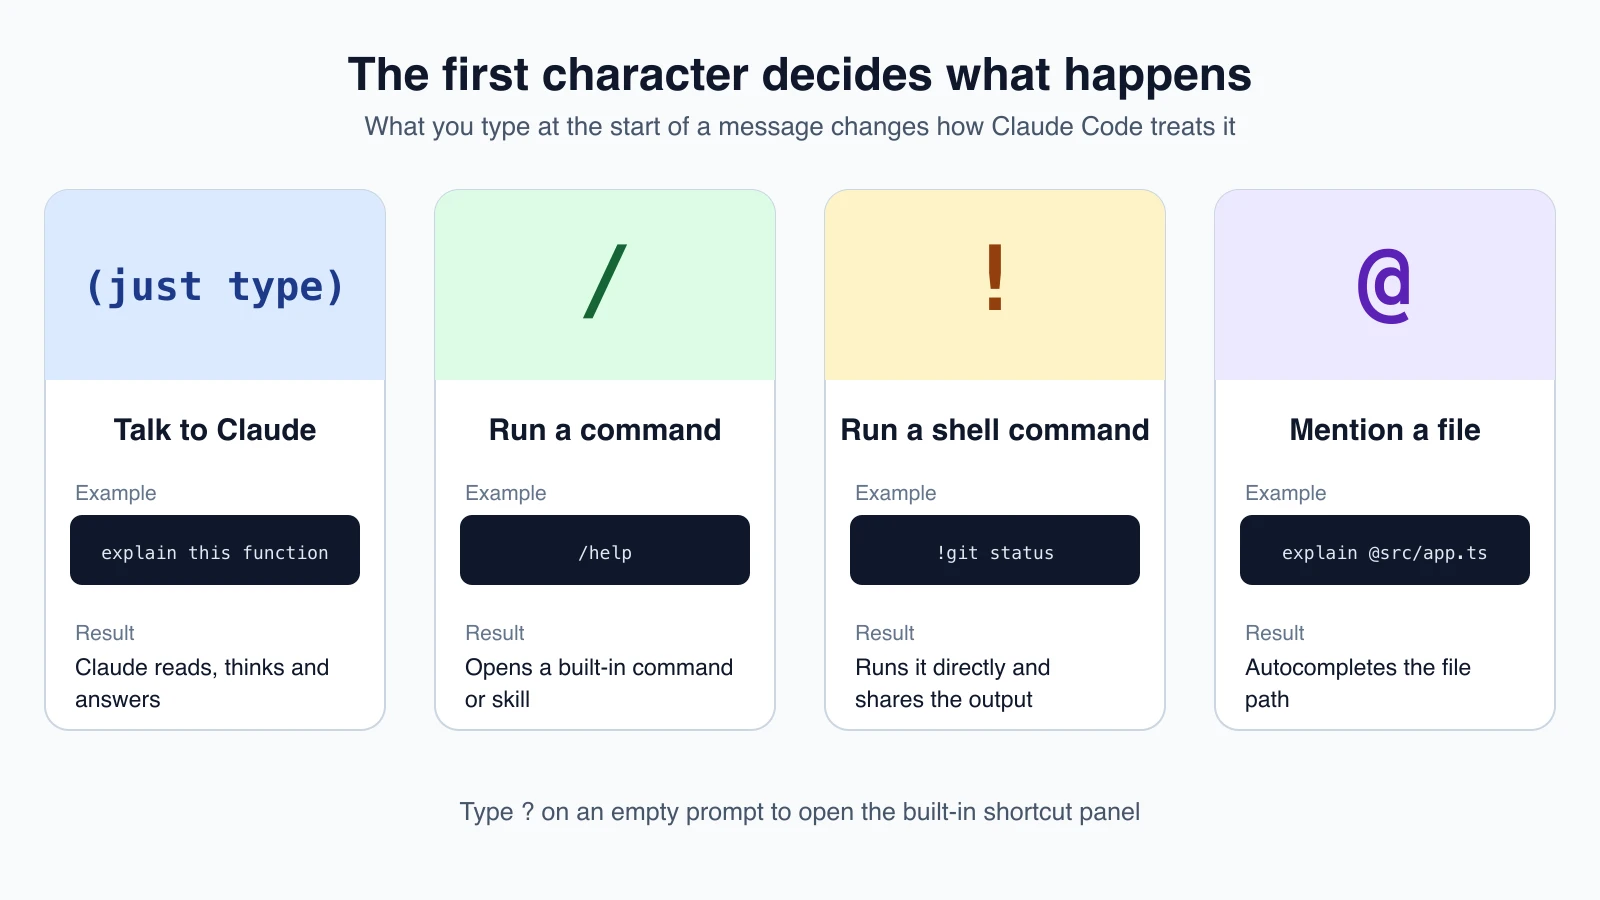
Plain text is the default. "explain this function" goes to Claude as a request.
/ runs a command. Type / at the start of a message and a menu of commands and skills appears. Keep typing letters to filter it, and press Tab to complete a name. A slash only counts as a command at the very start of a message. Slash commands are covered in the next section.
! runs a shell command. Start a message with ! and what follows runs directly in your terminal. The output also goes into the conversation, so Claude can respond to it. For example:
1!git statusThis is handy when you want Claude to see the result of a command without asking it to run the command itself.
@ mentions a file. Type @ and start a path, and Claude Code autocompletes it:
1explain @src/app.tsPointing at a file removes any doubt about which one you mean. Claude can find files on its own, so you only need @ when you want to be exact.
Press ? on an empty prompt to open a built-in panel listing the shortcuts available in your terminal.
Sending and writing multi-line prompts
Enter sends your message. Sometimes you want a message with several lines, such as a numbered list of steps. You have four ways to add a new line without sending:
- Type
\and then pressEnter. This works in every terminal. - Press
Shift + Enter. This works out of the box in iTerm2, WezTerm, Ghostty, Kitty, Warp, Apple Terminal and Windows Terminal. - Press
Ctrl + J. This works in any terminal with no setup. - Paste text directly. A pasted block of code or a log keeps its lines.
If Shift + Enter does nothing in your terminal, run /terminal-setup. It installs the key binding for VS Code, Cursor, Alacritty, Zed and a few others, and in Apple Terminal it enables Option + Enter for new lines.
While Claude is working
Claude Code does not make you wait helplessly. A few keys let you steer.
Escstops the current response so you can redirect. Claude keeps the work it has already done. This is the key to remember. If Claude heads in the wrong direction, pressEscand say what you actually wanted.Ctrl + Cinterrupts a running operation. If nothing is running, the first press clears your input and a second press exits Claude Code.Ctrl + Bsends a running command or agent to the background so you can keep working.Ctrl + Oopens the transcript viewer, which shows detailed tool activity: exactly which files Claude read and which commands it ran. Useful when you want to know what happened.Ctrl + Tshows or hides Claude's to-do checklist for the current job.Shift + Tabcycles the permission mode. Lesson 8 explains the modes.
The cheat sheet
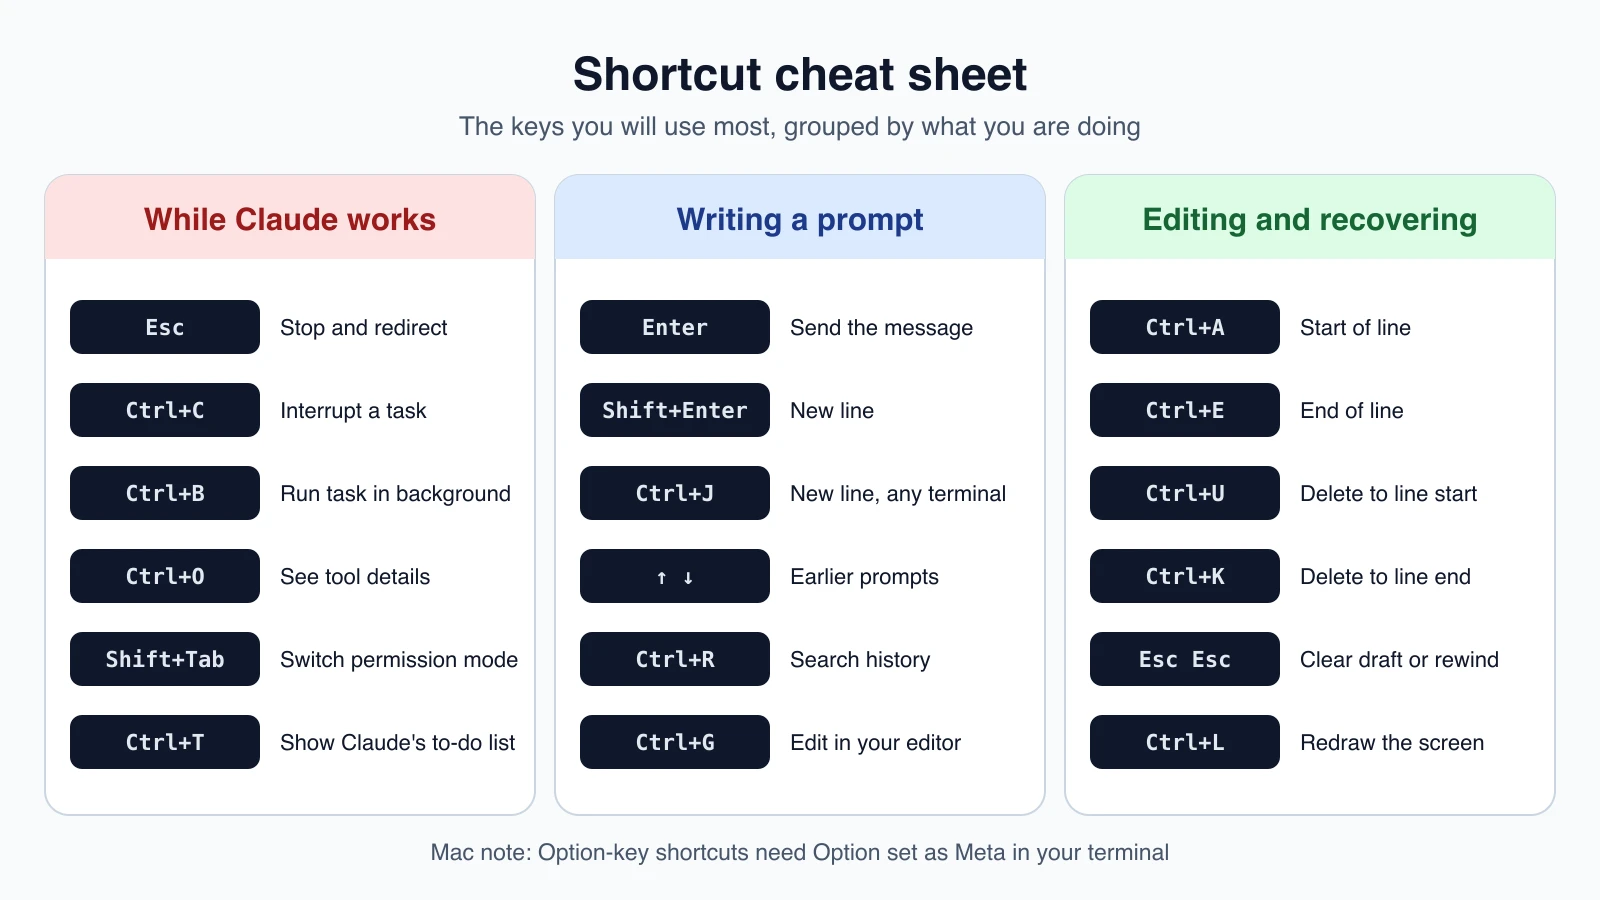
A few of these deserve more explanation.
Prompt history. Press the up arrow to bring back an earlier prompt. Ctrl + R searches your history, which is faster than scrolling when you remember a few words of what you typed.
Edit in your editor. For a long prompt, press Ctrl + G to open it in your default text editor. Save and close, and the text returns to the prompt box.
Double Escape. Pressing Esc twice does one of two things. If the prompt box has text, it clears it and saves the draft so the up arrow can recall it. If the prompt box is empty, it opens the rewind menu, which lets you restore code and conversation to an earlier point. Lesson 9 covers rewinding.
Paste an image. Press Ctrl + V to paste an image from your clipboard into the prompt. On iTerm2 use Cmd + V, and on Windows and WSL try Alt + V if Ctrl + V is intercepted. Claude can look at screenshots of a bug or a design.
Stash a draft. Ctrl + S stashes what you have typed and clears the box. Press it again on an empty box to bring the text back. Handy when you need to ask something quick first.
Garbled screen. If the display looks broken or half blank, press Ctrl + L to redraw it. Your conversation is untouched.
Editing text in the prompt box
The prompt box follows common terminal editing keys.
| Key | Action |
|---|---|
Ctrl + A | Move to the start of the line |
Ctrl + E | Move to the end of the line |
Ctrl + U | Delete from the cursor back to the start of the line |
Ctrl + K | Delete from the cursor to the end of the line |
Ctrl + W | Delete back to the previous space, which removes a whole file path in one press |
Ctrl + Y | Paste the text you just deleted |
A note for Mac users
Shortcuts that use the Option key, such as Option + P to switch models and Alt + B to move back a word, need Option to be set as the Meta key in your terminal. Each terminal app has this in its settings. Without it, those keys type special characters instead. The keys that use Ctrl work with no setup.
Slash commands worth learning first
Type / to see everything available. These are the ones to learn first.
| Command | What it does |
|---|---|
/help | Shows help and available commands |
/clear | Starts a new conversation with an empty context |
/compact | Summarizes the conversation to free up space while you keep going |
/context | Shows how much of Claude's working memory is used |
/model | Switches the AI model |
/resume | Opens the list of earlier conversations to continue |
/rename | Gives the current session a name you can find later |
/diff | Shows the changes in your working folder, including Claude's edits |
/rewind | Goes back to an earlier point in the conversation or code |
/usage | Shows session cost and plan usage (/cost does the same) |
/status | Shows version, model, account and connection details |
/doctor | Checks your setup for problems and offers fixes |
/init | Creates a CLAUDE.md file with guidance about your project |
/memory | Edits your CLAUDE.md files and memory settings |
/permissions | Manages which actions Claude may take without asking |
/plan | Switches to plan mode, optionally with a task |
/config | Opens settings such as theme and model |
/theme | Changes the color theme |
/copy | Copies Claude's last response to your clipboard |
/export | Saves the conversation as plain text |
/exit | Leaves Claude Code |
You do not need all of these today. /help, /clear, /resume and /exit cover most of the first week. The rest come up in later lessons: /model in lesson 5, /plan in lesson 7, /permissions in lesson 8, /clear, /compact and /rewind in lesson 9, and /init and /memory in lesson 12.
If you send a command while Claude is still responding, Claude Code queues it and runs it after the current turn finishes. A few commands, such as /status and /usage, run immediately.
Mistakes beginners make
- Using
Ctrl + Cto stop Claude and then pressing it again. The first press interrupts. A second press when nothing is running exits Claude Code entirely. UseEscto stop and redirect without any risk of leaving. - Forgetting the new-line keys. Pressing
Enterin a long list sends the message half-written. Learn\thenEnter, orCtrl + J, before you write anything long. - Expecting Option shortcuts to work on a Mac. Set Option as Meta in your terminal first.
- Typing a slash command in the middle of a sentence. A slash only works as the very first character of the message.
- Using
/clearwhen you meant/compact./clearwipes the conversation, while/compactshortens it and keeps the thread.
Quick recap
- The first character matters:
/runs a command,!runs a shell command,@mentions a file, and plain text goes to Claude. - Use
Escto stop Claude and redirect. UseCtrl + Oto see what it did. - Add a new line with
\thenEnter,Shift + EnterorCtrl + J. - Press the up arrow or
Ctrl + Rto reuse earlier prompts. - Start with
/help,/clear,/resumeand/exit, and add commands as you need them.
Try it yourself
Start Claude Code in your claude-practice folder. Do these in order: type ? on the empty prompt to open the shortcut panel, write a three-line prompt using Ctrl + J for new lines, run !ls (or !dir on Windows) to list your files, mention a file with @, and finally press Esc twice on a half-typed prompt to clear it and bring it back with the up arrow.
Next lesson: models, effort levels and fast mode.